MOTHER'S DAY SALE! UP TO 35% OFF - DISCOUNT APPLIES IN CART.

  • Log in
  • Cart (0)
  • Checkout
Pretty Presets and Pretty Photoshop Actions
  • Lightroom Presets
  • Mobile Presets
  • Photoshop 
    • Photoshop Actions
    • Photoshop Overlays
    • Limited Edition Holiday Collections
  • Learn 
    • Free Lightroom Training
    • Free Photoshop Training
    • Lightroom 101 Workshop
    • Photoshop 101 Workshop
    • Your Pretty Edits
  • Support 
    • About Us
    • Contact Us
    • Order Lookup
    • Lightroom FAQ
    • Photoshop FAQ
  • Install 
    • How to Install Lightroom Presets
    • How to Install Lightroom Brushes
    • How to Install Presets in the Free Lightroom Mobile App
    • How to Sync Lightroom Presets from CC to Mobile
    • How to Install Photoshop Actions
    • How to Install Photoshop Overlays
  • Best Sellers
  • Blog

Overexposure Vs. Underexposure and How to Correct It

By Ana Mireles on June 15, 2024 | No Comments

Overexposed vs Underexposed

Overexposure Vs Underexposure in Photography

Achieving the correct exposure is ESSENTIAL for capturing beautiful photos.  Overexposed photos appear too bright, while underexposed ones are too dark.  If you struggle with this issue, there are several techniques to help you prevent and correct it.

In this article, I'll guide you through both in-camera adjustments and post-processing methods to ensure your photos are perfectly exposed.

What Is Exposure?

To understand the concepts of overexposure and underexposure, it's essential to first understand exposure.  Exposure refers to the amount of light that reaches your camera's sensor or film, creating the image.

You control exposure through three primary settings: the aperture size, the shutter speed, and the sensitivity of the sensor or film (ISO).  Together, these three elements form what is known as the exposure triangle.

Achieving the correct exposure requires balancing all three factors effectively.


Overexposure vs Underexposure

How to Determine the Correct Exposure

The first step in achieving the correct exposure is to get an accurate reading of the available light, typically done using a light meter.

Most cameras come equipped with a built-in light meter, represented by a scale ranging from -2 to +2.  Your goal is to adjust the camera settings until the light meter's indicator is centered at zero.

Overexposure Photography

However, keep in mind that the built-in meter measures the light reflecting off your subject, which can sometimes lead to biased readings and result in overexposed or underexposed photos.  Understanding this limitation is crucial for making the necessary adjustments to achieve the perfect exposure.

What Is Overexposure?

Overexposure occurs when an excessive amount of light reaches your camera sensor, causing the image to appear washed out and resulting in clipped highlights.

In the histogram of an overexposed photo, you'll notice that most of the information is clustered on the right side of the graph, indicating a dominance of bright tones and a loss of detail in the highlights.

Overexposed Photo

How to Fix Overexposure In-Camera

1. Use a Smaller Aperture

    • The aperture is a hole in the lens regulated by the diaphragm, controlling the amount of light entering the camera.
    • To reduce overexposure, use a smaller aperture by increasing the f-stop number.  Remember, a higher f-number means a smaller aperture, allowing less light in.
    • Keep in mind that a smaller aperture increases the depth of field, which might not be ideal if you aim to blur the background or achieve selective focus.

2. Use a Faster Shutter Speed

    • Shorten the exposure time by using a faster shutter speed, allowing the same amount of light to enter but for a shorter duration.
    • Note that increasing the shutter speed may affect the capture of moving subjects, potentially eliminating desired motion blur.

3. Lower the ISO

    • ISO determines the sensitivity of your camera's sensor.  If your camera supports it, lower the ISO setting to its minimum value, typically ISO 100 or ISO 50.
    • Keeping the ISO low is generally advisable unless working in low-light conditions.

4. Use an ND Filter

    • Neutral Density (ND) filters reduce the intensity of light entering the camera without affecting color balance.
    • ND filters come in various strengths, reducing light from 1 stop to as much as 20 stops.  Graduated ND filters are also available for more precise control.
    • Using an ND filter can help manage overexposure, especially in bright conditions.

    How to Fix Overexposure in Post-Processing

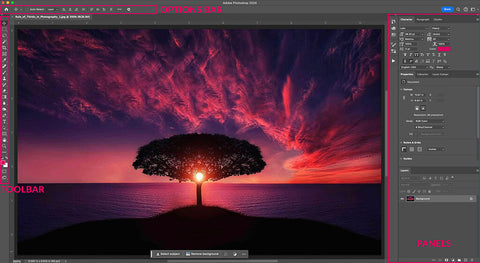
    If you didn't notice the overexposure during the shoot, don't worry—post-processing offers several tools to correct it.  Shooting in RAW format will give you the best results, as RAW files retain more detail and dynamic range.

    Here are some of the most effective tools to fix overexposed photos in Lightroom and Photoshop.  For optimal results, consider using a combination of these techniques on the same image:

    Overexposed Photograph

    1. Adjust the Exposure

      • Lightroom: Use the Exposure slider to adjust the overall exposure.  Moving it to the left will darken the entire image.
      • Photoshop: If you're working with RAW files, adjust exposure in the Adobe Camera Raw (ACR) window.  For other files, use the Adobe Camera Raw filter.  You can also use the Exposure Adjustment Layer for non-destructive edits.

    2. Reduce Whites and Highlights

      • Lightroom & ACR: Use the Whites slider to set the whitest point of the image and the Highlights slider to control the rest of the bright pixels.  Move both sliders to the left until you achieve the desired balance.
      • To deepen blacks and darken shadows, adjust the Blacks and Shadows sliders as needed.

    3. Use Curves and Levels

      • Photoshop: Both Curves and Levels tools are available as Adjustment Layers for non-destructive editing.  Use Levels to pull the histogram's information towards the left.  With Curves, add anchors and pull them down, focusing on the top left (highlights) and bottom right (shadows) of the graph.
      • Lightroom: Adjust the Tone Curve directly on the histogram to manage exposure and contrast.

    Overexposed Photography

    4. Darken the Image Using Photoshop's Blend Modes

      • Photoshop offers blend modes to control how layers interact.  To darken an image, use blend modes like Darken, Multiply, Color Burn, Linear Burn, or Darker Color.  Multiply is the most common choice.
      • Another technique is to duplicate the Background layer and set the copy to Soft Light blend mode.  This will correct overexposure and add contrast to the image.

    What Is Underexposure?

    Underexposure occurs when insufficient light reaches the camera sensor, resulting in a dark image with a loss of detail in the shadows.

    In the histogram of an underexposed photo, most of the data will be concentrated on the left side of the graph, indicating a dominance of dark tones and a lack of detail in the shadow areas.

    Underexposed Photo

    How to Fix Underexposure In-Camera

    Underexposure results in dark images with insufficient light.  Here are several ways to correct underexposure directly in camera:

    1. Use a Bigger Aperture

      • Widening the aperture allows more light to enter the camera.  The maximum aperture varies by lens, with prime lenses typically offering wider apertures than zoom lenses.
      • Keep in mind that a wide aperture reduces the depth of field, which may result in parts of your image being out of focus.

    2. Use a Slower Shutter Speed

      • Lengthening the shutter speed increases the amount of light that reaches the sensor, brightening the image.
      • This method is ideal for static subjects or when you don't mind motion blur.  Be cautious of camera shake with very slow shutter speeds, and consider using a tripod.

    3. Raise the ISO

      • Increasing the ISO makes the camera sensor more sensitive to light, helping to brighten the image.  However, higher ISO values can introduce noise, reducing image quality.
      • There isn't a specific ISO limit, as it varies by camera and personal tolerance for noise.  Some photographers avoid going above ISO 400, while others routinely use ISO 1600 or higher.
      • Aim to keep the ISO as low as possible, but don't hesitate to raise it if needed.  A slightly noisy photo is preferable to one that's too dark to see any details.

    How to Fix Underexposure in Post-Processing

    If you find yourself with an underexposed photo that you can't reshoot, post-processing provides several effective solutions.  Here are some methods to brighten your images using Lightroom and Photoshop:

    Underexposed Image

    1. Adjust the Exposure

      • Lightroom & ACR: Use the Exposure slider to brighten your photo. In Lightroom, this slider is readily available.  In Photoshop, you can access it in the Adobe Camera Raw (ACR) workspace when opening a RAW file.  For other file types in Photoshop, use the Exposure Adjustment Layer for non-destructive edits.
      • How to Use: Move the Exposure slider to the right to lighten all the tones in your photo.
    2. Adjust Shadows and Blacks
      • Lightroom & ACR: For more targeted adjustments, use the Blacks, Shadows, Whites, and Highlights sliders found under the Exposure settings.
      • How to Use: Move the Blacks slider to define the darkest points and the Shadows slider to recover details from the dark areas.  You can also adjust the Highlights slider to brighten the lighter parts of the image.

    3. Use Curves and Levels

      • Photoshop: The Curves and Levels tools allow for precise adjustments of shadows, midtones, and highlights.  Use these tools directly on the image or as Adjustment Layers for non-destructive editing.
      • Lightroom: Use the Tone Curve tool to adjust specific tonal ranges.  Lightroom doesn’t have a Levels tool, but you can use the histogram to achieve similar effects.
      • How to Use: In Levels, pull the histogram data towards the right.  In Curves, add anchor points in the shadows and midtones (left side of the graph) and pull them up to brighten the image.

    4. Brighten the Image Using Photoshop's Blend Modes

      • Photoshop: Layers and blend modes can effectively correct underexposure.  Duplicate the base layer and apply a blend mode from the Lighten category, such as Lighten, Screen, Color Dodge, Linear Dodge, or Lighter Color.
      • How to Use: The Screen blend mode is popular for brightening.  Alternatively, add a solid white layer on top, set its blend mode to Soft Light, and adjust for contrast as needed.

    Underexposed Photography

    How to Get the Perfect Exposure Every Time

    Achieving the correct exposure consistently can be challenging, but with these tips, you can improve your chances of capturing perfectly exposed images every time.

    1. Choose the Correct Metering Mode

      • Most cameras allow you to change the metering mode, which helps the built-in light meter determine how to measure and interpret light.
      • Decide whether the camera should take an average reading of the entire scene or focus on a specific point.  This choice can significantly affect exposure, especially in high-contrast situations.

    2. Turn off Auto Mode

      • While automatic mode often delivers the correct exposure, it may struggle in challenging lighting conditions.  To gain more control, switch to one of the semi-automatic modes or full manual mode.
      • If you’re uncomfortable with full manual mode, try using aperture priority (A/Av) or shutter priority (S/Tv) to have more control over your settings.

    Overexposed vs Underexposed

    3. Use Exposure Compensation

      • In semi-automatic modes, you might still encounter overexposed or underexposed photos.  Exposure compensation allows you to adjust the exposure by telling the camera to overexpose or underexpose by a certain number of stops.
      • Use this feature to fine-tune your exposure and correct the camera’s automatic settings.

    4. Try Bracketing Exposures

      • Bracketing involves taking multiple shots of the same scene at different exposures.  This technique ensures that you have at least one correctly exposed image to work with.
      • You can also combine these images later to create an HDR (High Dynamic Range) photo, which merges the best-exposed parts of each image.

    5. Use an External Light Meter

      • An external light meter provides a more accurate reading of the light in your scene by measuring the incident light rather than the light reflected off the subject.
      • This method ensures that your exposure reading is not influenced by the color or material of the subjects, leading to more consistent and accurate exposures.

    Final Thoughts

    Correct exposure is not only a technical aspect of photography but also a crucial element in expressing your creative vision.  Mastering the ability to read, interpret, and manipulate light in your images is what sets great photographers apart.

    I hope this guide aids you in your journey to achieving perfect exposure.  If you have any questions or would like to share your tips, please leave a comment.  We'd love to hear from you!

    Do you have any questions or comments about Overexposure Vs. Underexposure in Photography?  Leave us a comment below - we would love to hear from you!  And PLEASE SHARE this post using the social sharing buttons (we really appreciate it)!

    AI Lightroom Presets

    Related Articles

    Beginner's Guide to Smoke Bomb Photography
    Beginner's Guide to Smoke Bomb Photography
    Discover the art of smoke bomb photography with our comprehensive guide!  Learn about smoke bomb photoshoots, essential
    Read More
    Introduction to the Photoshop Workspace (+ Simple Workflow to Get You Started)
    Introduction to the Photoshop Workspace (+ Simple Workflow to Get You Started)
    Discover how to navigate and customize the Photoshop workspace with ease.  Learn essential tips and workflows to enhance
    Read More
    How to Use Lightroom's Powerful New AI Tools
    How to Use Lightroom's Powerful New AI Tools
    Discover how Lightroom leverages AI to enhance your photo editing workflow.  From AI Masking to Adaptive Presets, Conten
    Read More
    Pretty Presets for Lightroom author Ana Mireles

    Ana Mireles

    Ana Mireles is a Mexican photographer and researcher with a passion for writing and teaching. She’s collaborated in artistic and cultural projects in Mexico, Italy, and the Netherlands.

    June 15, 2024

    Comments

    INFO & SUPPORT
    • Lightroom FAQ
    • Photoshop FAQ
    • Contact Us
    • Order Lookup
    • Log Into Account
    Sign up for great freebies and tutorials

    Get notified about promotions, giveaways and webinars before they happen!

    Join the pretty Community

    Come join the #1 Lightroom & Photoshop Facebook Group to help you learn how to edit your photos more confidently today!


    • About Us
    • Testimonials
    • Policies
    • Terms of Service
    • Write for Pretty
    • Lightroom Scholarship
    • Photoshop Scholarship

    © 2025 Pretty Presets for Lightroom | support@prettypresets.com (406) 298-3006

    •  
    •  
    •  
    One or more of the items in your cart is a recurring or deferred purchase. By continuing, I agree to the cancellation policy and authorize you to charge my payment method at the prices, frequency and dates listed on this page until my order is fulfilled or I cancel, if permitted.