- Lightroom Presets
- Best Sellers
- Mobile Presets
-
Photoshop
-
Learn
-
Support
-
Install
- Blog
By Gayle Vehar on | No Comments

I haven’t ALWAYS shot in manual mode. When I bought my first DSLR camera, I started by learning what aperture, shutter speed, and ISO were (the exposure triangle) and how they all worked together to achieve a good exposure.
I knew little about how to use manual mode, but I figured that was the “old school” way of taking photos. After all, my new camera had lots of fancy buttons, so why not use them?
The problem with that way of thinking came when I looked at all of the photos I had taken with my fancy new camera, and the exposure was very different than what I had envisioned through the viewfinder.
After those less-than-pleasing results, I challenged myself to keep my camera in manual mode and “force” myself to get comfortable with that “old school” way of taking photographs.
That challenge totally changed my photos, and after almost 11 years of experience, I still use manual mode most of the time.

So why on earth would you use manual mode with a state-of-the-art camera at your disposal?
Shouldn’t your fancy (and expensive) camera be smart enough to take great pictures without any additional input from you?
The simple answer is “No!” Cameras are not smart enough to take great pictures all on their own ALL the time.
The truth is that your camera and all those high-tech formulas used by your camera can get tricked VERY easily. Your camera does not have a brain and does not know what to expose for unless you tell it.
Shooting in manual mode gives you complete control over your camera's settings, including aperture, shutter speed, and ISO. And by manually adjusting these settings, you can achieve more creative control over your photos, and you can ensure that your camera captures the EXACT image that you want!

I am not saying there isn’t a place for some of the other shooting modes and camera settings. I AM saying that in order to get the BEST POSSIBLE PHOTOS, you will need to know how your manual camera settings work and be IN CONTROL of what those settings are doing when you are taking photographs.
Let me put this a different way. To achieve a consistently great outcome, YOU WILL NEED TO KNOW ENOUGH ABOUT YOUR CAMERA AND WHAT GOES INTO A PROPERLY EXPOSED IMAGE so that you will know when to take control yourself and when you can let your camera take over.
My goal for this series of mastering Manual Mode posts is to help you take matters into your own hands and teach you HOW TO BETTER CONTROL that beautiful piece of equipment you spent lots of money on!!
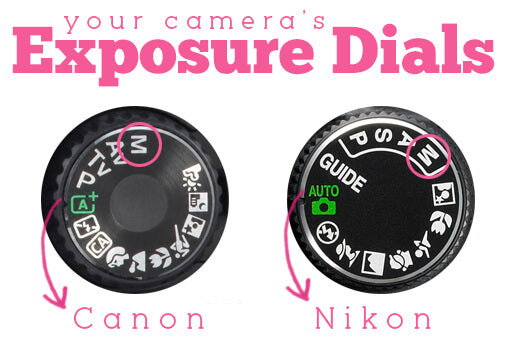
Until the next post, I am giving you a list of buttons to locate on your camera. They are listed below with photos to help you find them.
The Exposure Dial is what you use to turn on your camera's Manual Mode, so you need to know where this is. The "M" on the dial stands for Manual Mode!

You will use this important dial to manually adjust your camera's aperture and shutter speed settings.

You may need some assistance from your camera manual to learn how to manually adjust your aperture, shutter speed, and ISO settings. Dig it out and have it on hand before you continue on to the next part of our blog series.

Make sure to read the rest of our series to help you Master Manual Mode. If you’ve missed any of these posts, you can read/review them anytime by clicking these links!
Day 2. How to Use Your Camera's Light Meter
Day 3. Aperture for Beginners
Day 4. Shutter Speed for Beginners
Day 5. ISO for Beginners
Day 6. Perfect Exposure: Putting it All Together
Day 7. Practicing Your Way to Manual Mode Perfection
Bonus: free downloadable Mastering Manual Cheat Sheet for use on the go!


Hi!! I am Gayle. I am a wife to my handsome husband and mom to 4 beautiful kids. In my spare time, I am a photographer and blogger at Mom and Camera. I have a passion for sharing my love of photography with others. I teach local photography classes and regularly share photography tips and tricks on my blog. I hang out there a lot—I’d love you to stop by and visit!

Comments