- Lightroom Presets
- Best Sellers
- Mobile Presets
-
Photoshop
-
Learn
-
Support
-
Install
- Blog
By Gayle Vehar on | No Comments

Clipping occurs when there are areas of a photo that have no information. When an area has no information, it is either pure white (clipped highlights) or pure black (clipped shadows). Photographers often refer to these as "blown out" areas.
Having large areas of your image with highlight or shadow clipping is generally undesirable. Luckily, this can be corrected in Lightroom quite easily!
Lightroom uses added colors to warn you of areas that have highlight or shadow clipping. When this is turned on, you will see:

If you don't want to see these colored warnings in Lightroom, you can turn them on or off in a couple of different ways:
1. You can use a Lightroom keyboard shortcut to turn both the highlight and shadow clipping warnings on or off in Lightroom by simply tapping the "J" key. Go here for my other favorite Lightroom shortcuts.
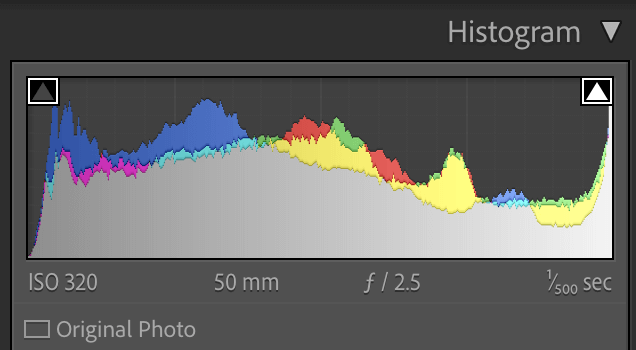
2. You can also turn these clipping warnings on and off INDIVIDUALLY by clicking the little arrows on the top left and right of the histogram in Lightroom. The right arrow will toggle the highlight clipping warning on or off, and the left arrow will toggle the shadow clipping warning on or off.

Like most editing programs, there are several options for fixing image clipping in Lightroom.
The most obvious choices are to use the Highlights and Shadows sliders located in the Basic Panel.
You can also further adjust the highlights and shadows by using the curve in the Tone Curve Panel.
The only way to target clipping in specific areas of an image is using the Masking tools. These tools (brush, linear gradient, select sky, etc.) allow you to reduce clipping in a much more targeted way than the adjustments in the basic panel.
To do this, start by selecting the Masking Tool. You will find it in the tool panel on the right side of the Develop Module between the Histogram and the Basic Panel.
Once you have selected the Masking Tool, choose one of the masking options. I usually choose the Brush tool for this type of work because I can brush the adjustment exactly where I want it.

Next, load the tool by adjusting the sliders that opened when you chose the Brush tool. For recovering clipping, try moving the Highlights slider to the left, slightly reducing the Exposure slider, and play around with reducing the Whites and Blacks sliders.
Finally, brush over the areas of the image where the clipping is happening.

I have found the easiest way to fix highlight and shadow clipping is to use the Lightroom Presets and Brushes included in a few Pretty Presets for Lightroom collections.
A little bit of shadow or highlight clipping isn't a big deal - especially if it doesn't appear in critical areas of your photo. If there are small areas where the highlight or shadow clipping cannot be recovered, and it isn't distracting to your image, don't stress over it too much!
If you are a visual learner, check out our video tutorial below that talks about clipping and shows you the different techniques to fix it!
Do you have any questions or comments about Clipping and How to Fix It? Just leave us a comment below - we would LOVE to hear from you. And PLEASE SHARE this post using the social sharing buttons (we really appreciate it)!

Hi!! I am Gayle. I am a wife to my handsome husband and mom to 4 beautiful kids. In my spare time, I am a photographer and blogger at Mom and Camera. I have a passion for sharing my love of photography with others. I teach local photography classes and regularly share photography tips and tricks on my blog. I hang out there a lot—I’d love you to stop by and visit!

Comments