- Lightroom Presets
- Best Sellers
- Mobile Presets
-
Photoshop
-
Learn
-
Support
-
Install
- Blog
By Tammy Porter on | No Comments

Do you ever feel overwhelmed reading photography tutorials littered with complex photography jargon? If you're nodding in agreement, you're not alone. I've been there, too—losing interest after just a few sentences.
So, in this article, I will break down two essential concepts that all photographers should understand—FOCAL PLANE and DEPTH OF FIELD—in a straightforward manner.
I will also show you how to use a low f-stop to capture multiple subjects clearly and keep them all sharply in focus!
Depth of field refers to the zone within a photograph where everything appears sharp and in focus. Every single day, I see someone say they are scared to use a low f-stop. Well, stop the madness! Low f-stops like 1.4, 1.6, and 1.8 can be your friend and truly enhance your photography, trust me!
First and most importantly, if you want to shoot at a low f-stop, you are going to have to learn and understand the term “Focal Plane.”
The definition of focal plane is the distance from the camera at which the sharpest focus is attained. I like to think of the focal plane as an imaginary line that runs from right to left across your photo.
Picture yourself in an open field with some beautiful trees far off in the background and your family positioned right in the center of the field. If you take a piece of tape and stretch it straight across the field from left to right and place your family directly on the tape (regardless of whether it's just one person or ten), they will all be in focus, even at f1.4. However, if one of them steps in front or behind the tape, they will be out of focus… simply because they stepped out of the “focal plane” (i.e. your piece of imaginary tape).
At an aperture of f1.4, this tape is incredibly narrow, like a roll of scotch tape. As you increase your f-stop number, the tape metaphorically widens, eventually turning into a broad strip of packing tape.
You must also be aware of your position relative to your subjects when shooting at low f-stops. You need to face your subjects directly without veering off to the side because if you're not squarely in front of your subjects, the straight line of the focal plane will become skewed, just as if you physically moved off-center, distorting the alignment of your imaginary tape.
I'll be using a series of photos to demonstrate how to achieve sharp focus on multiple subjects when shooting wide open. For these examples, I'll maintain an aperture setting of f1.4 and then describe the process. Let's dive in!
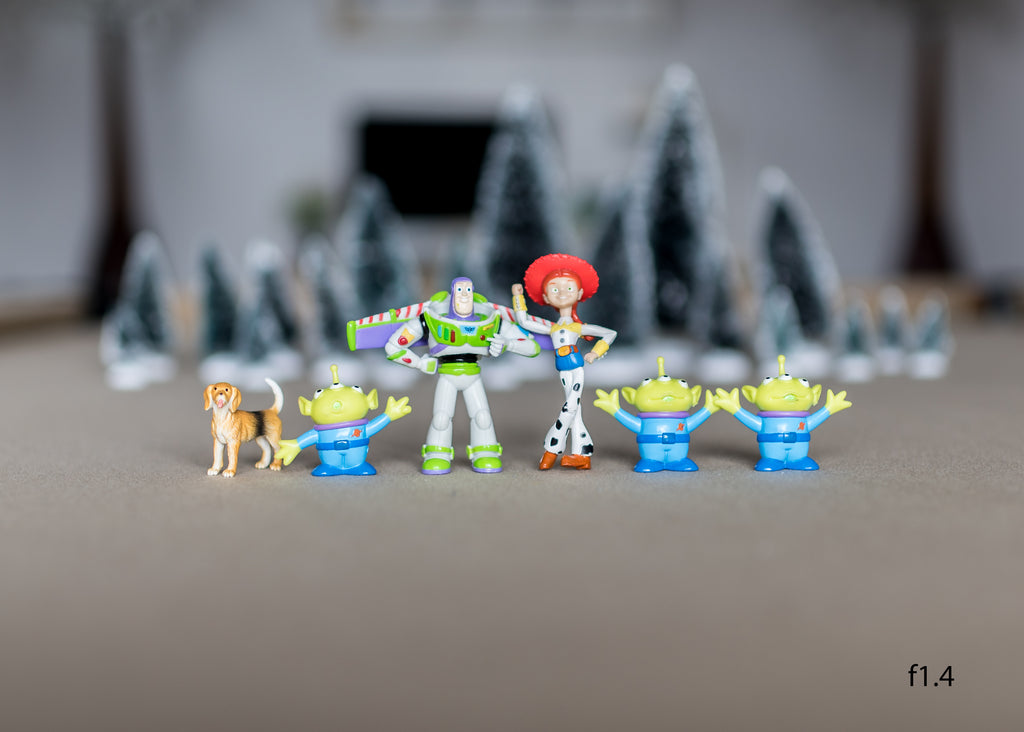
Our first set of photos features a delightful ensemble: Buzz and Jessie, alongside three little aliens and a pooch. In each photo, I set my focus on Jessie's face, with my aperture set to f1.4.
You might wonder how Buzz, Jessie, the alien kiddos, and the dog are all in sharp focus despite their height differences. The secret lies in their alignment within the same "plane." Height differences won't affect the focus. It's all about whether they are positioned directly along our imaginary line of tape or "focal plane." As long as they're on this line, they'll appear in focus, regardless of their height relative to each other.
Now, let's say that evil Uncle Zurg shows up at your photo session, accompanied by the nefarious Buzz clone and his pet dinosaur, requesting a group photo. You really don't want to, but you also don't want to upset evil Uncle Zurg. However, now you're faced with an additional challenge as the light begins to fade, forcing you to use a low f-stop to compensate for fading light.
Don't worry. Just get them all positioned on that piece of tape (aka the focal plane), and you'll be fine. Whether it's adding one or ten more characters to the mix, as long as they align with your focal plane, you will be able to capture everyone in sharp focus.
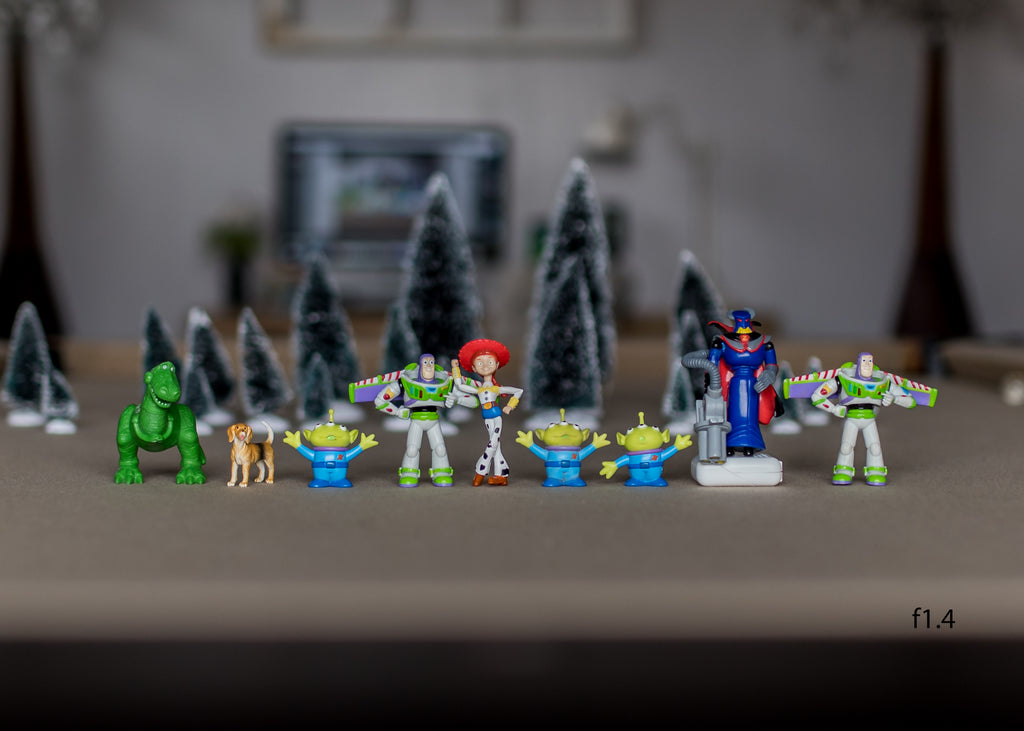
Now, it's kind of hard to get plastic people to hold hands, look longingly into each other's eyes, or horse laugh, so these poses look a bit stiff, but YOUR subjects can move, lean on, or look at one another and still be in focus. In other words, they don’t need to stand stiffly shoulder to shoulder.
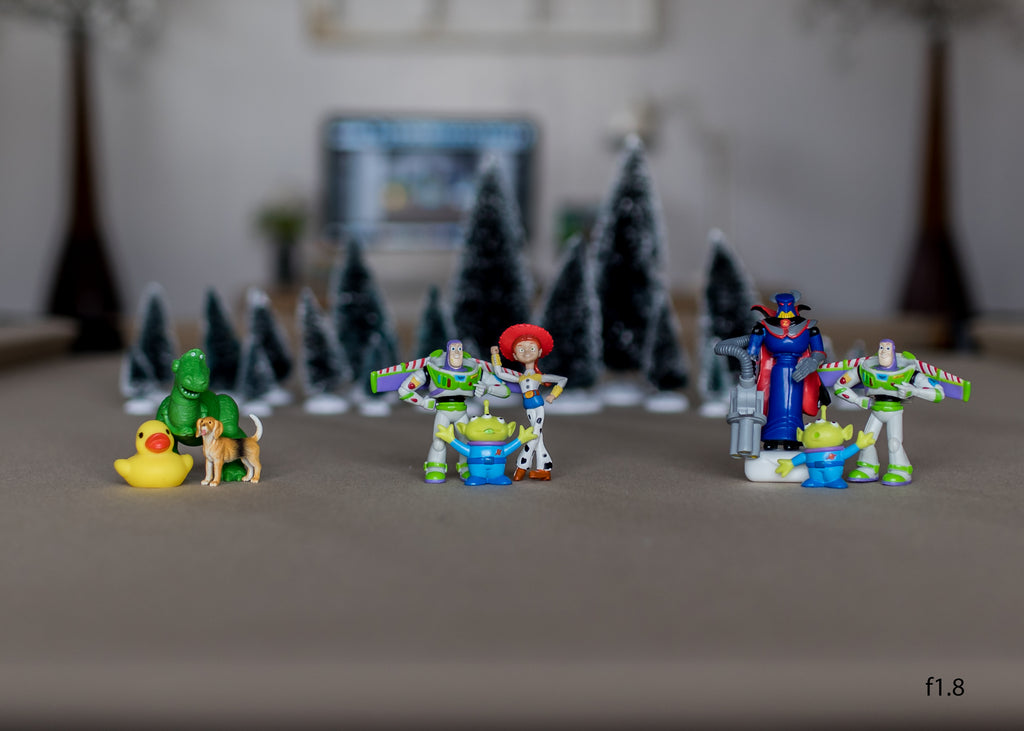
If your creative vision involves distinguishing between contrasting groups within your frame, like heroes versus villains, this can also be done! They don't have to stand side by side. You can position one group on the right and one on the left or even spread them out into three or more distinct groups—whatever you prefer.
Just be sure they are on the same focal plane, and limit your groupings to a depth of no more than two people. If you decide to "stack" people in two rows, keep in mind that a slight adjustment to a higher f-stop will be necessary. This adjustment widens your "tape," ensuring that both layers remain in focus.
For the next photo, using a setting of f1.8 worked out just right:
Now, let's say you want to get one of those shots where the family is bundled up together, looking at one another, and laughing. This can also be done at a low f-stop, I promise!!
The trick is surprisingly simple: just step back. Yes, that's it—simply move a few steps back. How far back should you go? It's hard to say precisely since it depends on a few factors, like the lens you're using and how many people are in your photo. It could be a couple of feet, maybe a little jump back, or just a tiny bit more. I'm not one for getting bogged down in technicalities or measurements.
To figure out if you're standing at the proper distance, look through your camera's viewfinder. You should be able to see all of momma Jessie's head within the small autofocus square. If you can only see a bit of her face or just an eye, then you're standing too close.
Sure, there are mathematical formulas that could give you the exact distance, but let's keep it simple. I prefer the trial-and-error method: take a test shot, check the focus by zooming in on your viewfinder, and if not everyone is in focus, just take a small step back and try again.
I moved closer to take this photo. So, to ensure everyone was in focus, I had to increase my f-stop to 4.0.
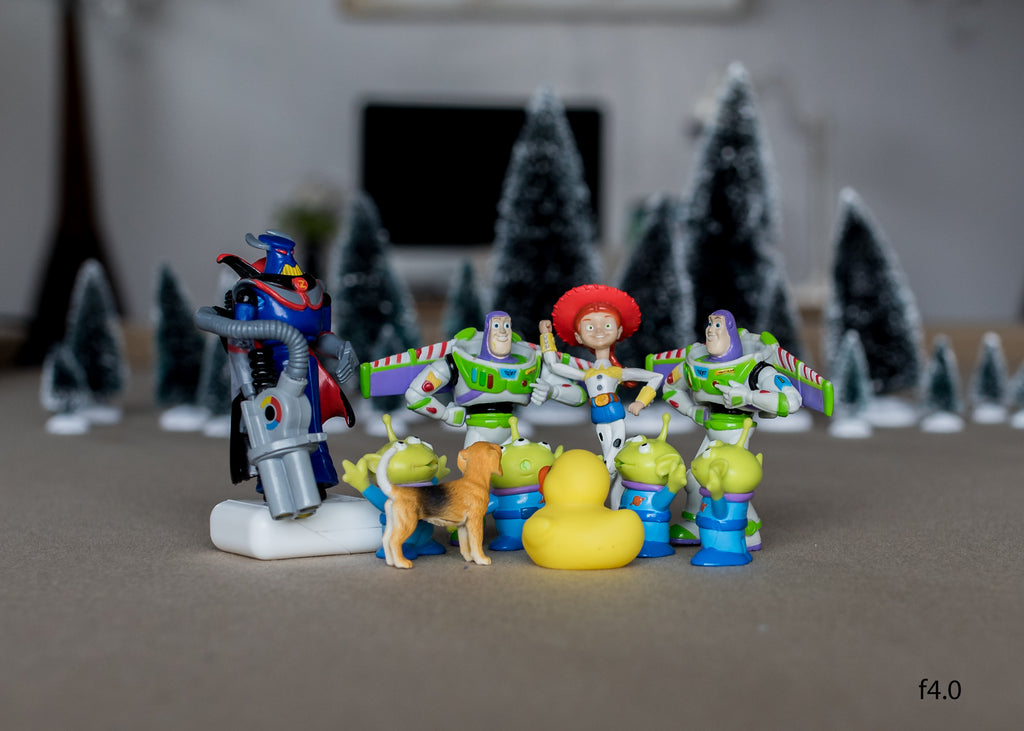
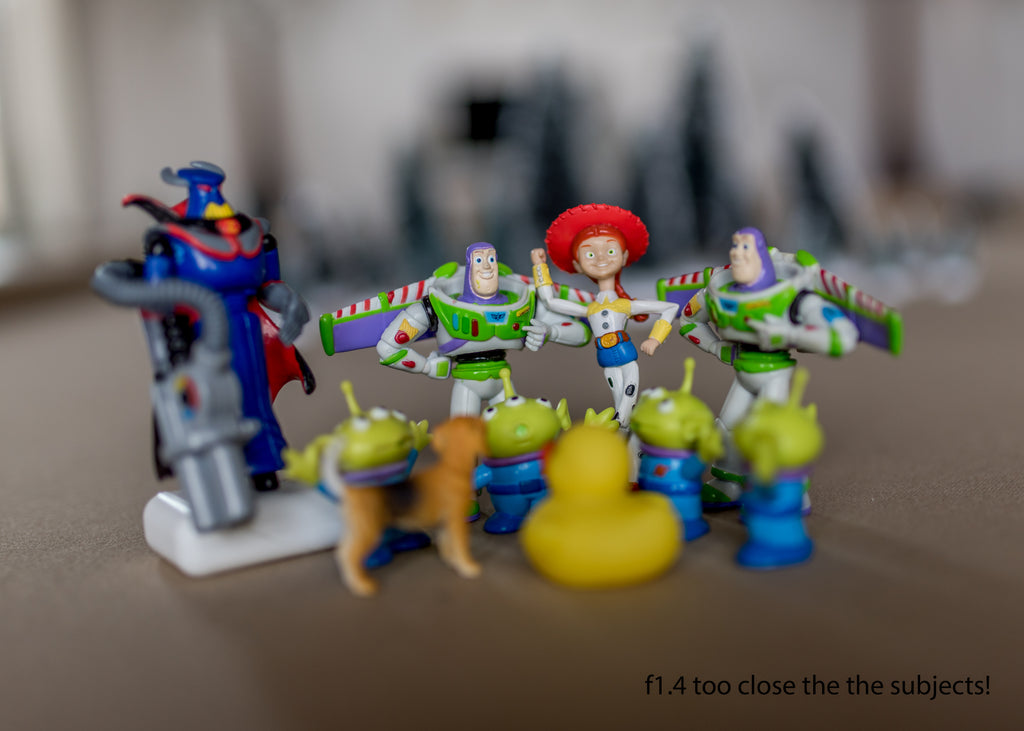
I got even closer for this photo (probably too close) and shot it at f1.4. As you can see, Buzz and Jessie are the only subjects in focus (this is what you don't want):
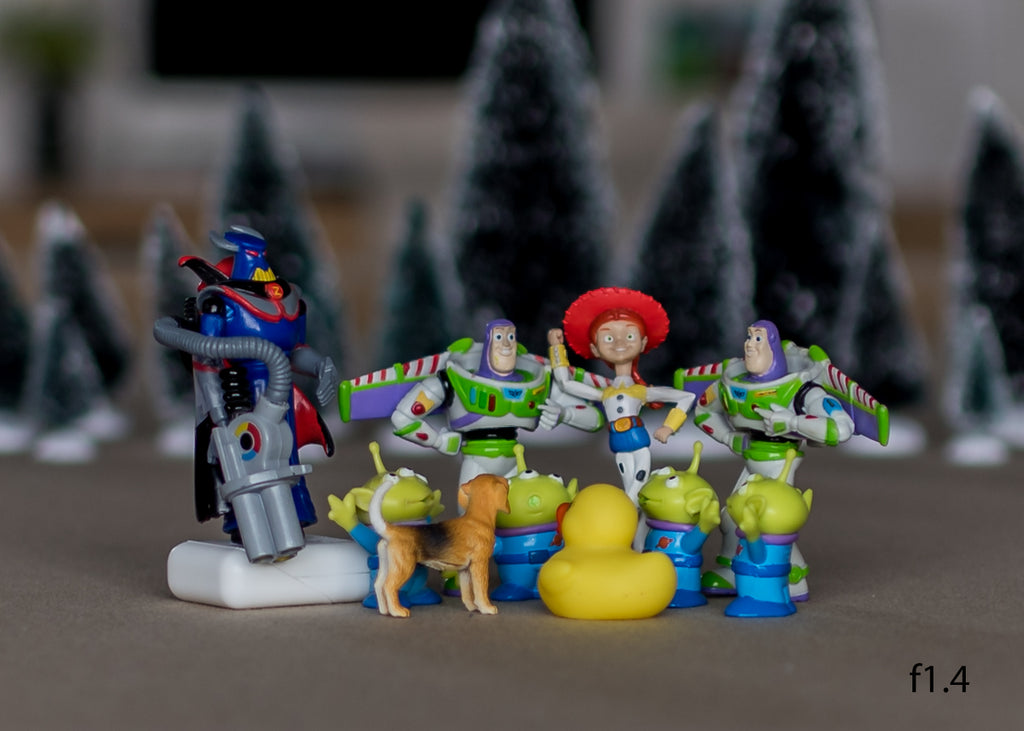
I moved back several feet and tried again at f1.4, and bam… everyone was in focus again!
Want to know how to make your photos look pro with that soft, blurry background (this is called shallow depth of field)? It's all about putting some space between the person or thing you're snapping a picture of and whatever's behind them. So, move your subject away from those trees, walls, or whatever else is in the background.
But hey, I'm not saying you should just flip your camera to the lowest f-stop, like f1.4, and go wild. I am saying that it IS possible to use a low f-stop when you want a nice blur to your background or to fight a low-light situation.
So, what's next? Practice time! Grab a buddy (or even some Toy Story figures) and start experimenting. Get comfortable with a low f-stop so you can use it when you want to or when you need to!
Do you have any questions or comments about Understanding Focal Plane? Leave me a comment below - I would love to hear from you! And PLEASE SHARE this post using the social sharing buttons (we really appreciate it)!


Tammy is a child photographer based in the desert of Arizona. A mother of two, a wife, and a secret lover of interior design. She spends her days juggling a hair salon, a budding children's jewelry line, and her camera. Photography is the driving force behind her relentless need to create beautiful things. You can follow her on Facebook.

Comments