- Lightroom Presets
- Best Sellers
- Mobile Presets
-
Photoshop
-
Learn
-
Support
-
Install
- Blog

Now that we have covered the important reasons WHY you should be learning to shoot in manual mode and how to use your Light Meter, let's take a closer look at the first of 3 essential elements that make up the exposure triangle: Aperture - a crucial setting to understand and use properly if you want to take great photos!

In photography, the aperture refers to the opening in the lens through which light passes into the camera. It is a crucial element in controlling the amount of light that reaches the camera sensor or film, and it also affects the depth of field and the sharpness of the image.

The aperture is measured in f-stops, which represent the ratio of the focal length of the lens to the diameter of the aperture opening. Or, in more simple terms, the f-stop tells you how open or closed the aperture is
The most confusing thing about aperture and F-stops (and one that you need to remember because it's a bit counter-intuitive) is how the F-stop number correlates to the size of the opening:
The following infographic will help you understand this correlation:

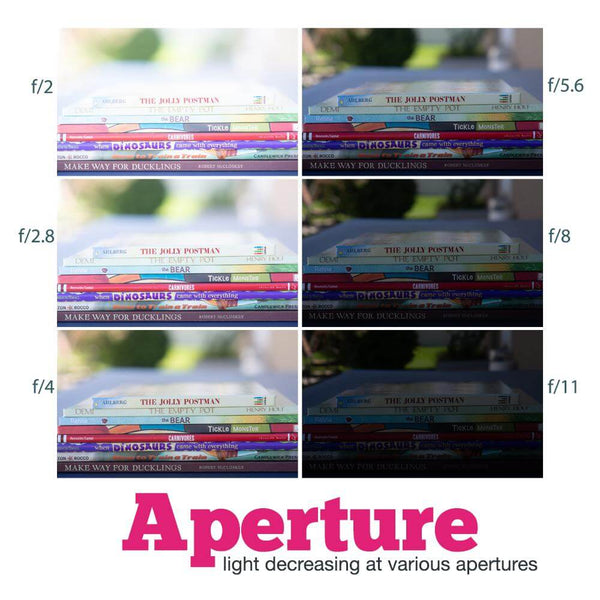
Now, take a look at these six images I shot of the SAME SUBJECT, each taken with my aperture set on a DIFFERENT F-STOP SETTING. As you can see, the lower F-stops (wider aperture) let in more light than the higher F-stops (smaller aperture).
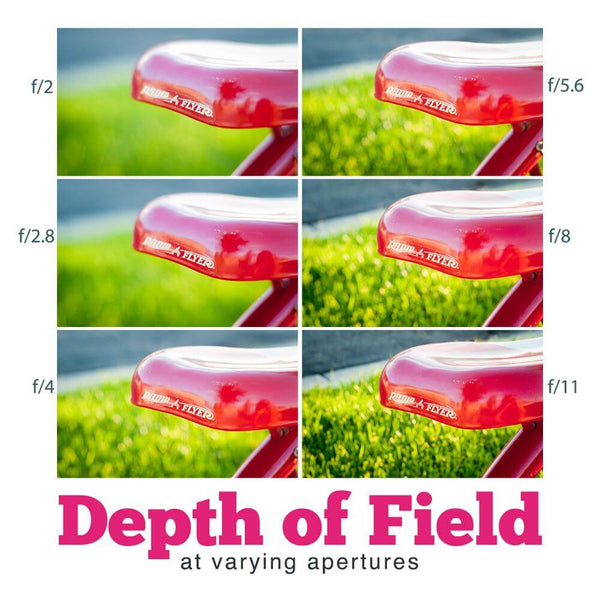
Aperture not only lets in light, it's also a powerful way to control your DEPTH OF FIELD.
Depth of field is the AMOUNT of your image between your camera and the farthest your eye can see that is in perfect focus.
Generally, when we observe a scene in the physical world, all the elements within our field of vision will appear to be in focus (unless one has poor eyesight)! However, this is not always the case when capturing images with a camera.
For example:
Make sure you are in Manual Mode before following the instructions below!
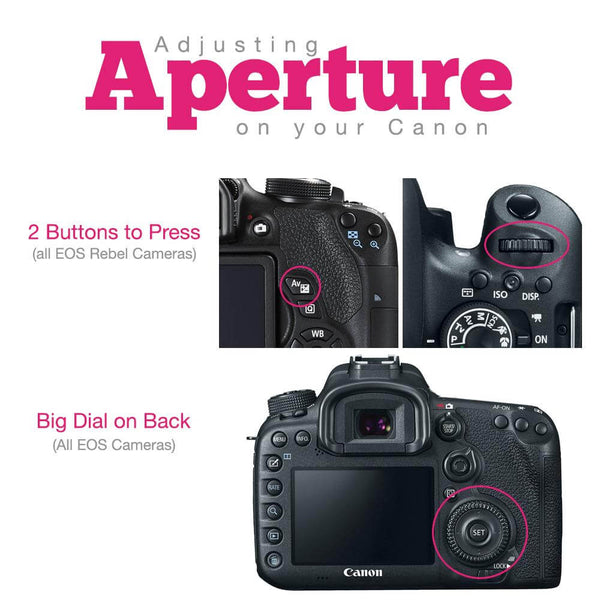
To set the aperture on your Canon Rebel series camera, depress the shutter release button until the meter is activated. Then, using your thumb, hold the Av button on the back of the camera and use your index finger to turn the Main dial right for a smaller aperture (larger f-stop number) or left for a larger aperture (smaller f-stop number).
To set the aperture on your Canon EOS series cameras, depress the shutter release button until the meter is activated. Then, turn the large dial on the back of the camera using your thumb.
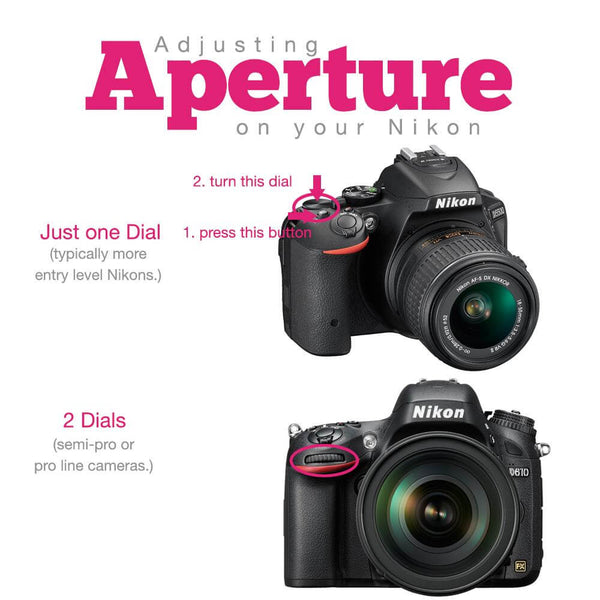
To set the aperture on Nikon's entry-level cameras, depress the shutter release button until the meter is activated. Then, using your index finger, hold down the button with the little aperture circle next to it on the top of the camera, and then use your thumb to turn the Main dial.
To set the aperture on Nikon's semi-pro or pro-line cameras, depress the shutter release button until the meter is activated. Then using your index finger, turn the sub-command dial on the front of the camera beneath the shutter release button.
Let's say I want to take a portrait of my daughter, and I want her to be in focus and the background to be blurred. I would choose an open aperture (like f/2.8) and focus on her eyes.
This will result in the subject appearing sharp and in focus while the background and foreground elements are intentionally blurred.

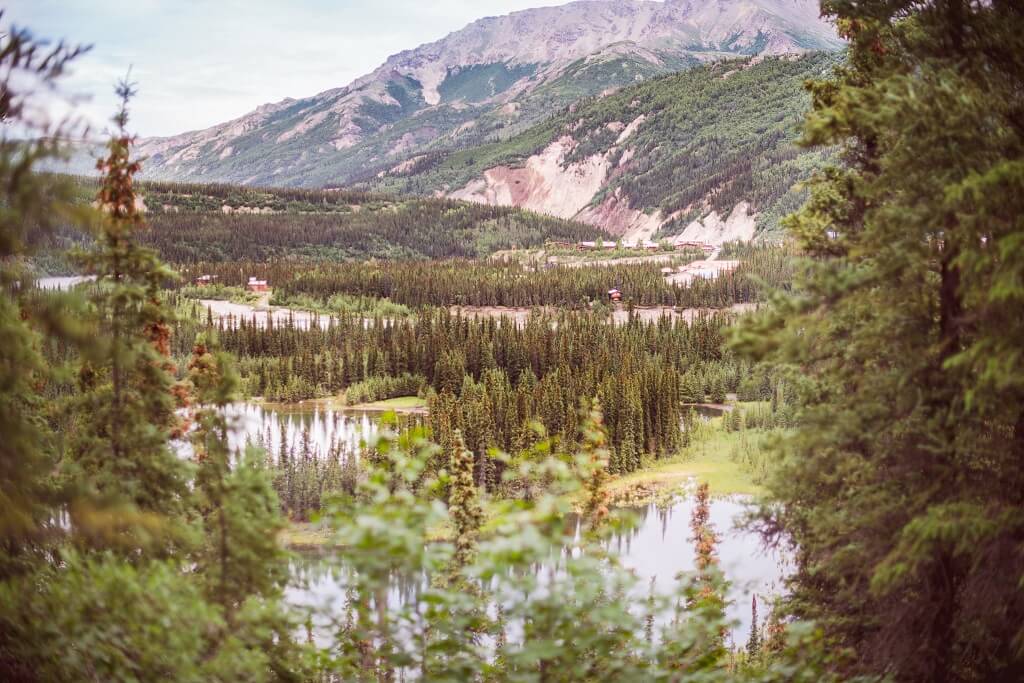
In the following example, I want to photograph the beautiful landscape and mountains behind my house. Because I want EVERYTHING between my camera and the mountains to be in focus, I would choose a closed-down aperture of f/16 or f/22 to ensure that ALL of the landscape details are sharp.
You may find that you cannot access all the F-stops mentioned above. This is because the lowest aperture setting is limited by the physical construction of the lens, which determines the lowest F-stop value that can be achieved.
Additionally, some lenses have a narrower range of aperture settings, which can further limit the F-stops that are available.
In summary, the aperture is an important element of exposure and creative control in photography. By adjusting the aperture, photographers can control the amount of light, the depth of field, and the sharpness of their images.
Don't miss tomorrow's tutorial on Shutter Speed - another biggie!
Make sure to read the rest of our series to help you Master Manual Mode. If you’ve missed any of these posts, you can read/review them anytime by clicking these links!
Day 1. Why Shoot in Manual Mode
Day 2. How to Use Your Camera's Light Meter
Day 4. Shutter Speed for Beginners
Day 5. ISO for Beginners
Day 6. Perfect Exposure: Putting it All Together
Day 7. Practicing Your Way to Manual Mode Perfection
Bonus: free downloadable Mastering Manual Cheat Sheet for use on the go!


Comments