- Lightroom Presets
- Best Sellers
- Mobile Presets
-
Photoshop
-
Learn
-
Support
-
Install
- Blog

Yesterday we talked about how shutter speed works. Today, we will focus on the last of the three essential elements of the exposure triangle: ISO - a very important setting to understand and use properly if you want to take the best possible photos.

In photography, ISO refers to the sensitivity of your camera's image sensor to light and is one of the three essential elements of exposure, along with aperture and shutter speed (which we covered in our previous posts)
ISO is measured in numbers, such as 100, 200, 400, 800, and so on.
The term ISO has been carried over from the days of real film, which is made up of little crystal grains. At ISO 100 or 200, those crystal grains are tiny and need more light to expose them. With ISO 1600 or 3200 films, the crystal grains are much larger and thus require less light to expose them. The trade-off is that the larger crystal grains are more noticeable, and photos are less smooth.

Digital cameras have ISO equivalents. However, with digital cameras, it isn’t crystal grains that become noticeable as the ISO numbers get larger; it's the pixels that become more noticeable as noise or grain.

(This example photo was taken at ISO 6400 on a Nikon D610. At 100, the grain is noticeable but not distracting. No noise reduction has been applied).
Generally, you want to keep your ISO as low as possible. However, this does NOT mean you should always shoot with an ISO of 100.
There is generally much less light available when shooting indoors than when taking photos outside in the sun. In these low-light situations, you should use whatever light you have available and raise your ISO as necessary to get a good exposure.

Why? Because capturing a nicely exposed photo is more important than worrying about grain or noise.
Digital cameras have really improved their high ISO capabilities in the last several years. Many current cameras can shoot at high ISOs with relatively little grain and noise.
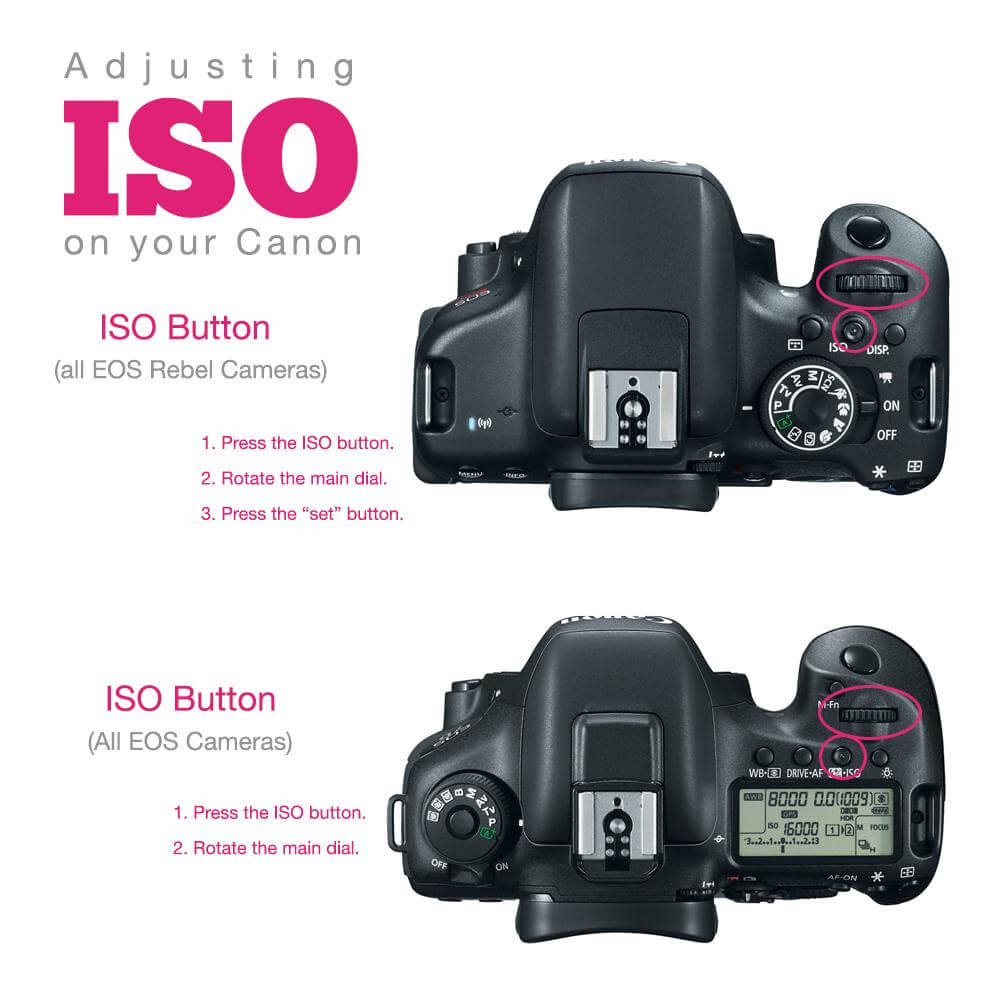
To adjust ISO on your Canon Camera, press the ISO button and rotate the main command dial. The ISO button is located on the top of the camera in one of the locations shown in the diagram below.
To adjust ISO on your Nikon entry-level camera, press the "Info" button and select ISO using the back circular dial. Then set the number you want and press "OK." Some entry-level Nikon cameras have touch screens that allow you to adjust ISO.
TIP: Since setting ISO requires a few steps, consider setting the "Fn" button on the front of your camera to adjust your ISO. Consult your manual for the exact steps to do this.
To adjust ISO on your Nikon Pro or Semi-Pro camera, press the "ISO" button and rotate the main command dial. Depending on the model, the ISO button will be located on the top or back of your camera.

Make sure you remember these general rules about ISO before moving on to the next part of our Mastering Manual tutorial:
Don't miss the rest of our series to help you Master Manual Mode. If you missed any of these posts, you can read/review them anytime by clicking these links!
Day 1. Why Shoot in Manual Mode
Day 2. How to Use Your Camera's Light Meter
Day 3. Aperture for Beginners
Day 4. Shutter Speed for Beginners
Day 6. Perfect Exposure: Putting it All Together
Day 7. Practicing Your Way to Manual Mode Perfection
Bonus: free downloadable Mastering Manual Cheat Sheet for use on the go!


Comments