- Lightroom Presets
- Best Sellers
- Mobile Presets
-
Photoshop
-
Learn
-
Support
-
Install
- Blog
By Gayle Vehar on | No Comments

With social media and online content being such widely used outlets for photographers to showcase their images, it is more important than ever to protect them the best you can to prevent them from being claimed by other photographers.
Should you watermark your images? Although it’s not guaranteed to prevent image theft, adding a watermark with your logo or just some simple text to your photos to show ownership (and brand marketing) is a great start.
To help you do this, I put together this step-by-step tutorial to show you three different ways to create and add a watermark in Photoshop.
Adding a Text Watermark to an Image
Adding a Graphic Logo Watermark to an Image
Creating a Custom Photoshop Brush - to add your text or graphic logo watermark
P.S. If you want to learn how to add a watermark in Lightroom, we have a separate tutorial here!
To create a text watermark in Photoshop, you can simply add a new text layer to your image by using the text tool and typing in your name, business name, or website in the font and color you desire.
I suggest keeping the font relatively small and easy to read. And if you want to keep your watermark from being too distracting, stick to black or white text color - you want it to be seen, but you don’t want it to be the center of attention. However, whichever font or color you choose to use is strictly up to you.
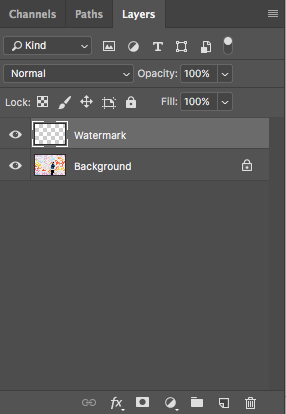
Open the image you want to add a text watermark to. Create a new layer by selecting Layer>New>Layer. Rename the new layer “Watermark” in the dialogue box, then click OK.

Making sure you are working on the new layer, select the text tool. Now click anywhere on the image to begin adding the text. Choose the font, text size, and color you desire, and then type the text you want to use.
You can change the font, color, and location of the text on the image at any time by highlighting the text and editing it as you wish. Once your text watermark is how and where you like it, simply hit enter, and you’re done!
Keep in mind that you can adjust opacity from the layers panel to lighten your text watermark if needed. Or, to make it bolder, you can duplicate the layer.

Going forward, a speedy way to replicate these text watermark steps on your images is to go to the Actions panel and create an action.
Start by opening your actions panel. Next, click on the "Create New Action" button at the bottom of the Actions Panel. This button looks like a square with a corner folded up. When you click this, a new dialog box will open, asking you to name your action, so go ahead and do that. Then press the "Record" button.
Now all the steps you take in Photoshop will be recorded. Just follow the steps we described above to add your watermark. When you are finished adding the watermark to your image, press the "Stop" button to tell Photoshop to stop recording what you are doing.
Now, the process of adding a watermark to your image has been turned into an Action. To run the action you just created, highlight the action and press "Play." Once the action runs and adds your text, you can go into the layers panel to select the text and make any necessary changes, including changing the text location or the color.

Another way to watermark your images is to add a logo or design. In most cases, this would be one you have already created (or had made for you) to use for your advertisement purposes, such as your website, business cards, flyers, etc.
Just as with adding text, less is more. You DO NOT want to add something too large or colorful that distracts from your image (like the one I added below):

In Photoshop, Open both the image you want to watermark AND the file/image containing your logo. Select your logo and press Cmd/Ctrl + C.
Paste your logo image to the image you are watermarking. You can then drag your logo to reposition and resize it as needed.
If your logo is on a white background, select the layer containing the logo from the layers panel and change the blending mode to “Darken” to get rid of the white background.

Now adjust the opacity as needed to get the transparency to your liking. Again, less is more.
Once again, be mindful of the logo design you are using. The logo on your website or business cards may NOT be the best one to use for watermarking purposes. You may need to change the color to something more simple and less distracting, like black or white.
Once you have your logo watermark set the way you like (for use on your images), save it to a different file on your computer for future use.
Adding a watermark using a custom Photoshop brush is probably the FASTEST and EASIEST way to add watermarks to your photos quickly. You can set this up with both a text or logo design.
Once you create your custom brush, you can simply select the brush tool, click on the watermark brush and then click anywhere you want on your image to place the watermark.
Follow these steps to turn your already saved watermark into a custom Photoshop brush for super easy, future use:
Make sure your logo resolution is set to around 500 - 1000 pixels. This will ensure that the quality won't be affected if you need to scale it down once it's added to your image.
You will also need to make sure that your logo is on a white background before creating a brush with it. So make any adjustments you need to (as far as resolution and grayscale) before converting it to a brush.

Once you have the image the way you want it and opened in Photoshop, click on Edit>Define Brush Preset. Name it something that you will easily remember so you can quickly locate it in your brush list. “Watermark” or “Logo” are the most obvious options.
If you plan on creating more than one watermark brush (maybe one for a logo/design and a separate one for basic text), make sure to name them accordingly. After naming your brush, press OK to save it. You now have a custom watermark brush ready to use at any time!

To use your custom watermark brush, select the brush tool from the left toolbar and click on the watermark brush from the list; or just select “B” from your keyboard (Photoshop shortcut), then right-click to access your brush list and find it.
Choose a color and adjust the size of your brush by using the [ ] bracket tools to increase or decrease the size. Now click anywhere on the image to place your watermark where you want it to be.
From now on, it won't be necessary to repeat these steps each time you want to use your watermark brush. It will automatically be saved in Photoshop once you complete the steps to name and define it. Then, adding a watermark to your image will be as easy as selecting your brush and placing it wherever you like!
Watermarking images is an important part of photography. If you follow these steps, adding watermarks to your photos can become a very quick and easy process, ESPECIALLY if you turn your watermark into a Photoshop Action or Brush to save even MORE time!
Do you have any questions or comments about How to Make a Watermark in Photoshop? Leave us a comment below - we would LOVE to hear from you! And PLEASE SHARE this tutorial using the social sharing buttons (we really appreciate it)!


Comments