- Lightroom Presets
- Best Sellers
- Mobile Presets
-
Photoshop
-
Learn
-
Support
-
Install
- Blog
The Lightroom Develop Module is where you will be developing (editing) your photos and is the most exciting place to hang out in Lightroom! There are so many options for editing your photos in this module and when you are finished here your photos will look fabulous!
There is lots to know about the Develop Module, so let's dig in and get you oriented!

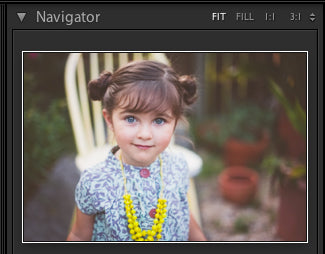
We covered this in the last lesson, but as a review, this is where you will see a preview of your image. As you use the zoom tools above this small view of your photo, a rectangle will appear and you can drag it around to decide what you see in the main image area of the Develop module.
This is also where you can see a preview of any presets you want to apply. Just hover over the preset name and a preview will appear in the Navigator.
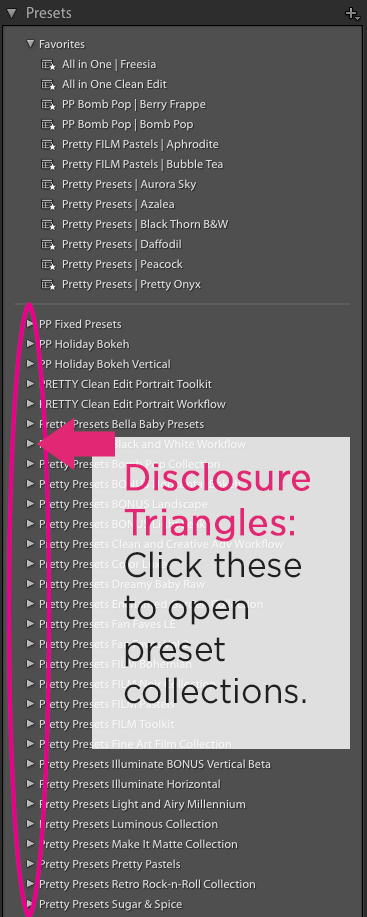
This is where Lightroom will store all the presets that you install as well as any that you make. If you don't see the individual preset names, you may need to open a preset collection using the disclosure triangle to the left of the preset collection's name. The disclosure triangle will be pointing down when its open.
Remember, to see a preview of the preset in the Navigator area before you apply it, just hover over the preset you want to see. If you want to apply the preset, just click on it.
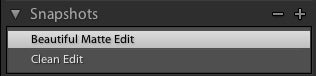
Lightroom allows you to take a Snapshot of your photo at any given point while editing. Click on the “+” on the Snapshot Panel to add a Snapshot.
Snapshots is a great feature. For example, let’s say you edit your photo using one preset but want to apply another preset to see how it looks. Just take a Snapshot of version and then you can go back and forth to decide which you like.
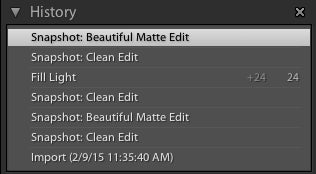
Lightroom’s History Panel keeps a record of everything you do to your photo from the time you import it into Lightroom. This is one of the main reasons I choose to use Lightroom over other editing software.
Using the History Panel, you can go back to any point in your history and start from there or go all the way back to the beginning and start over.
And when you exit Lightroom, your history won’t go away. It will still be there the next time you open Lightroom and will still be there 5 years from now if you need it!
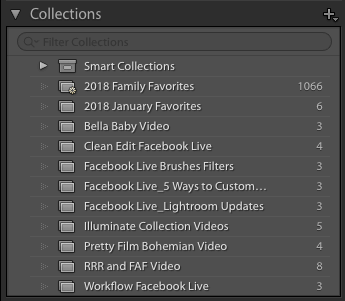
You will notice that the Collections Panel is available in the Develop Module just like it was in the Library Module. In fact, the Collections Panel is available in every module and will look the same throughout all the Modules.
However, you will notice that you won’t have access to your Folders in the Develop Module. This should help you understand why creating collections is so valuable and time-saving.
For example, if I finish editing one session and want to move on to another, as long as I have already created a collection for the next session, I won't have to leave the Develop Module. If I haven’t created a collection, I will need to navigate back to the Library Module find that folder of images and then come back.
The Develop Module Toolbar is located in the same place as the one in the Library Module, but will have different tools available.
The tools I like to have available in the Develop Module Toolbar are:
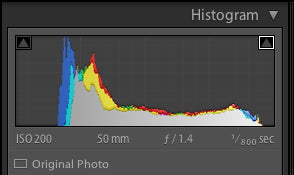
The Histogram Panel will give you loads of information about your photo. The histogram is a graph of the different tones in your image. The darker tones are graphed on the left and the brighter tones are graphed on the right.
One of my favorite things you can do is view the RGB color values of any area of the photo that you hover over. This can help you edit skin tones and proof your photos. You can also make adjustments to your photo by clicking and dragging directly on the histogram.
Local Adjustment Tools that will allow you to make adjustments to small/local areas of your photo. These tools include (from right to left)

Clicking on any of these tools will open a new panel giving you options for using it. When you click on the Masks icon (the circle with a dotted outline), you will find six options that will help you select specific smaller areas of your image. Once you make a selection of a smaller area of your image using one of these tools, you can make changes to that small area using a series of sliders that are similar to those available in the Basic Panel.

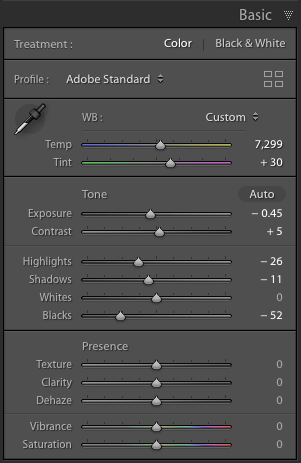
The basic panel will be your MOST used panel when making adjustments to your photo. This is where you will adjust your white balance, exposure, contrast, shadows/highlights, clarity, and saturation.
Moving any of these sliders to the right will increase the value and moving them to the left will decrease the value.
The dropper at the top-left of the panel gives you the option of adjusting your white balance by clicking the dropper over different areas of your photo. This will work best if you choose a neutral area of your photo. I typically look for a gray tone to click on.
I won’t go into depth with each of the other panels or this post will get way too long, but I will provide a brief description of them and you can click on the links to read more.

The Previous and Reset Buttons are found at the bottom of the right-side panels in the Develop module.
The Previous Button allows you to apply all the same settings you applied to the last photo you developed - super simple and easy! It will also apply any crop, brushes, or filters you applied, although you may need to adjust edits separately for each photo.
The Reset Button will reset your image back to the Lightroom default settings. This is a quick way to start over!

Make sure to read the rest of our series to help you Master Lightroom. If you’ve missed any of the posts, you can read/review them at any time by clicking these links!
Day 1. The Lightroom Catalog
Day 2. Lightroom Import
Day 3. Lightroom Library Module
Day 5. Basic Lightroom Editing Workflow
Day 6. How to Use Lightroom Presets
Day 7. Lightroom Export and Everything Else
Do you have any questions or comments about the Lightroom Develop Module? Just leave us a comment below - we would LOVE to hear from you. And PLEASE SHARE this post using the social sharing buttons (we really appreciate it)!


Comments