- Lightroom Presets
- Best Sellers
- Mobile Presets
-
Photoshop
-
Learn
-
Support
-
Install
- Blog
This week, let’s go into a little more depth about developing your photos. And at the end of this post, I’ll include a simple workflow to help you work through editing your photos.
The Basic Panel is where I usually begin editing my photos. Adjustments that you make in the Basic Panel (and all the other panels below it) are global adjustments. This means that they apply adjustments to the entire photo.
Typically, I work down the basic panel one step at a time, so let's do the same thing here:

Before I make ANY edits I always like to have a good white balance. The little eye dropper tool is my best friend when it comes to White Balance. I click on the eye dropper tool and then find a white/gray/neutral area of my photo. If I am having a difficult time finding a neutral area, I will use the whites of my subjects eyes.
Hovering over an area with the eye dropper will show you a preview of the white balance you would have if you selected that spot. Sometimes I will still tweak my white balance even after using the eye dropper tool using the Temp and Tint sliders.
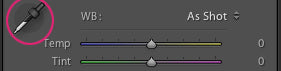
The option to adjust the white balance using the different white balance settings that come with your camera is also available. To do this, just use the drop-down menu to the right of “WB” to see your choices.
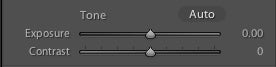
Use this slider to adjust the exposure of your photo. To increase the exposure of your photo, click and drag the slider to the right. To decrease the exposure of your photo, click and drag the slider to the left.

Use this slider to increase or decrease the contrast of your photo. To increase the contrast, click and drag the slider to the right. To decrease the contrast of your photo, click and drag the slider to the left.
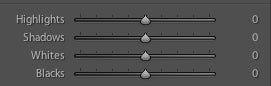
I am lumping highlights and shadows together because they work hand-in-hand.
To brighten the highlights on your image, click and drag the Highlights Slider to the right. To decrease the brightness of the highlights, click and drag the Highlights Slider to the left.
To add a little brightness to the shadows of your image, click and drag the Shadows Slider to the right. To darken the shadows, click and drag the Shadows Slider to the left.
I often use these sliders together by brightening the shadows (dragging the slider to the right) and lessening the highlights (dragging the slider to the left) on images.
If you are familiar with setting a white point and black point in Photoshop, then these will be familiar to you.
Alt-drag the Whites Slider to the right until you start to see some black spots appearing. Alt-drag the Blacks Slider to the left until you start to see some white spots appearing.
NOTE: I generally don’t use the Whites Slider, but will drag the Blacks Slider to the left to add a little contrast.
The Texture Slider is used to decrease or increase the amount of “texture” in a photograph while still retaining fine details.
Moving the Texture Slider to the left will reduce unwanted, medium-sized details like reducing texture in the skin. Moving the Texture Slider to the right will enhance medium-sized details in a photograph like when you want to bring out the texture of foliage or hair.

This Clarity Slider is a little like smart contrast. It works by finding edges and sharpening or softening them. You can add more clarity or less clarity. More clarity looks good on landscape images or images with a lot of texture. Less clarity looks best on portraits.
My favorite way to use the Clarity Slider is as a brush. We will talk about brushes in a minute.
The Dehaze Slider does pretty much what it says - it removes or adds haze to your image.
Simply click and drag to adjust the slider. Moving the slider to the left, into negative values, will increase the level of haze. Moving the slider to the right, towards the positive values, will decrease the amount of haze.
This Vibrance Slider is a little like smart saturation. It adds saturation, but will protectively not add too much saturation to skin tone colors which is why its a great tool to use with portraits.
Increasing Vibrance will give a little color pop to images. Decreasing Vibrance will have the opposite effect.
The Saturation Slider will increase and decrease saturation across ALL colors. Thus, a saturation adjustment will work best for landscape images and NOT portraits.

Once I have worked my way through the Basic Panel, I move on to Lightroom's Masking Tools to make local adjustments. Local Adjustments are changes that are made to only a portion of the photo. You can access Lightroom's Tool panel located directly above the Basic Panel.

You can use the Crop Tool to crop your photos to any aspect ratio or shape you can imagine. You will also use this tool to rotate and straighten your photos.
Use the Spot Removal Tool (bandaid icon) to remove acne and other small spots from your photo. You can remove spots of any shape by clicking and dragging over the your mouse over the area you want to change.
Although the Lightroom Spot Removal feature has improved a lot in the last few releases, it still isn’t perfect at removing or fixing large areas yet.
Use this tool to fix red eye caused by camera flash. (Eye with plus sign icon)

The Linear Gradient tool is located in the Masking panel. You access Masking by clicking the circle icon with a dotted line around it. This tool allows you to apply local adjustments over a large area of an image by dragging and pulling from the edge of your photo towards the center.
These changes will be applied more heavily at the outside of the image and gradually taper off. This tool is great for applying changes around the edges of your photo, to skies, and areas above and below horizon lines.
TIP: Each time you apply a Linear Gradient Mask, Radial Gradient Mask, or Brush Mask, a small Pin (black and white dot) will appear. To delete the effect you’ve applied, highlight the dot and click delete. A pin is highlighted when there is a small black dot in the middle.

The Radial Gradient Tool is located in the Masking panel. You access Masking by clicking the circle icon with a dotted line around it. This tool is similar to the Linear Gradient tool, but they are applied in a circle instead of a line. Click and drag a circle over an area of your photo and changes will be applied to the inside or outside of your circle (if you invert) depending on what you select.

The Brush Tool is located in the Masking Panel. You can access Masking by clicking the circle icon with a dotted line around it. This tool will allow you to be much more precise when applying changes. Use this tool to brush adjustments on to your photo wherever you choose to apply them.
Changes can be brushed on to areas as small as they eye or as large as the background. The brush size can be changed using the right and left bracket keys to allow for this precise brushing.

The longer you use Lightroom the more you will develop your own editing workflow. This is my workflow when I'm not using Lightroom Presets. Everyone’s editing workflow will be slightly different and your’s could be slightly different too. That's okay!
In the next post, I will discuss editing with Lightroom Presets and Brushes in depth and I will show you my editing workflow when using presets. HINT: You can work so much faster using Presets and Brushes!
Here's my workflow:
Happy Developing in Lightroom!
Make sure to read the rest of our series to help you Master Lightroom. If you’ve missed any of the posts, you can read/review them at any time by clicking these links!
Day 1. The Lightroom Catalog
Day 2. Lightroom Import
Day 3. Lightroom Library Module
Day 4. Lightroom Develop Module
Day 6. How to Use Lightroom Presets
Day 7. Lightroom Export and Everything Else
Do you have any questions or comments about Developing Photos in Lightroom? Just leave us a comment below - we would LOVE to hear from you. And PLEASE SHARE this post using the social sharing buttons (we really appreciate it)!


Comments