- Lightroom Presets
- Mobile Presets
-
Photoshop
-
Learn
-
Support
-
Install
- Best Sellers
- Blog

Once you're a Lightroom user, the best way to import photos from your memory card to your hard drive will be through Lightroom. This way, you can add photos to your hard drive AND let Lightroom know where they are at the same time.
Note: The best way to learn from this tutorial will be to follow along. So open up Lightroom and get ready to import:

One piece of advice: I always tell new Lightroom users to go really slow with this process the first few times. Once you have completed the import process several times and are familiar with all the settings, you will get into the habit of doing it, and it will go much more quickly. IN THE MEANTIME, JUST GO SLOW AND BOOKMARK THIS TUTORIAL FOR FUTURE REFERENCE!
Personally, I never hook my camera up to a computer to transfer files as it drains the camera battery. If you do not have a card reader attached to your computer, I recommend getting one.
I think this one looks great for both SD card and Compact Flash users.
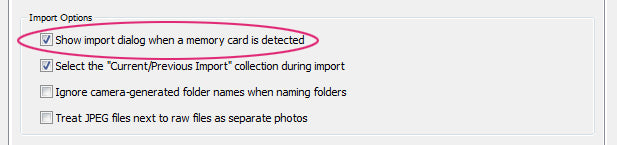
If you want Lightroom to open automatically for you when you insert a memory card, go to Edit>Preferences (Windows users) or Lightroom>Preferences (Mac users). Find the Import Options section under the “General” tab and check the box next to “Show import dialog when a memory card is detected.”
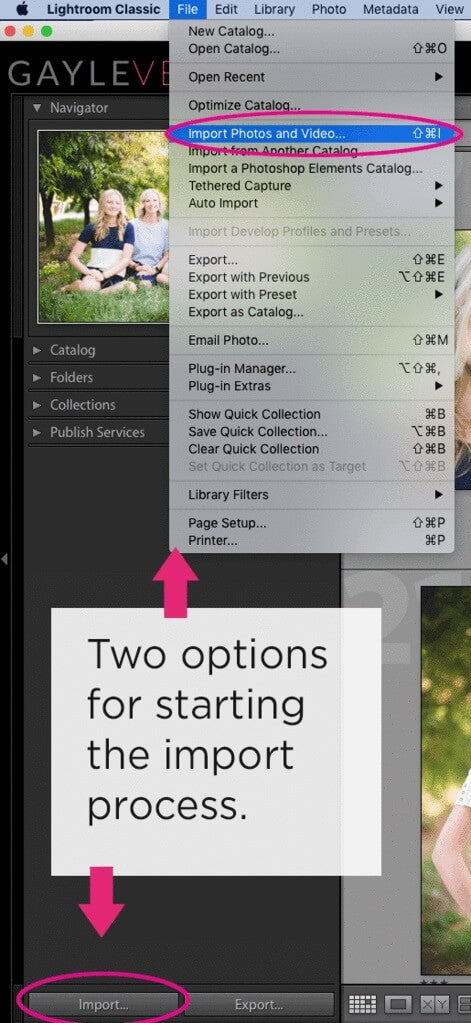
If the Lightroom Import Dialog Box does not automatically open for you, you need to tell Lightroom you want to import some photos. You can do this by choosing File>Import Photos and Video or clicking on the Import button below your left-hand panels and above your filmstrip.
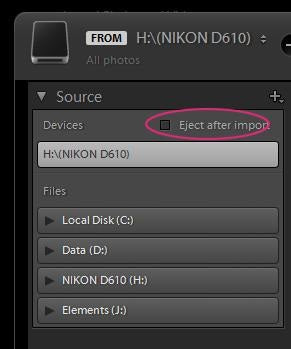
Next, you need to tell Lightroom where you want to import your photos or video from. This can be a memory card, a hard drive, or your camera.
If you are adding your photos from a memory card, you can also check the “Eject After Import” box, which will automatically disconnect the memory card after completing the import.
Next, you need to let Lightroom know how you want these photos added to your Lightroom Catalog. If you are importing from a memory card or camera, you will only have the first two options below available. If the photos are coming from a hard drive, you will have more options. Let’s go over these options:

The big box in the middle will show all the photos on your memory card or camera. Lightroom will automatically place a checkmark next to all the images that have not yet been imported.
If you only want to import specific photos, click on the first one you want to import and then Shift+click on the last one you want to import. Then check one of the boxes.

You can filter the photos that you see here by choosing one of the following:
If you chose the “Add” option above, you won’t need to do anything here. If you are copying your files to your hard drive or moving your files to a new location, you will need to choose where they are going.
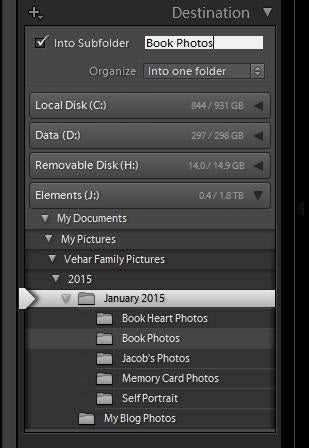
Open The Destination Panel on the right side of the photos. Use the listed drives to tell Lightroom which drive and the location on that drive to place the images.
Use the “Into Subfolder” option if you’d like to create a new subfolder to hold the photos. Use the “Organize” drop-down menu to choose whether to place all the images in one folder or folders by date. If you decide to put them in folders by date, you will be allowed to choose your date format.
One final step. The last thing you need to do in this process is click IMPORT!
You may have noticed that I skipped a few of the right-hand panels on the import window. That's because those options are NOT CRITICAL to the import process. However, let's go over them quickly to show how they can help during a Lightroom import.
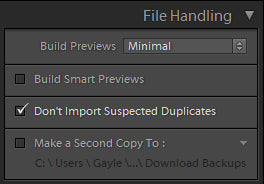
In the File Handling Panel, you can tell Lightroom the size of previews you want it to build on import. I typically choose “Minimal” because it's the fastest. “Embedded and Sidecar” will use the largest preview available from the camera. “Standard” previews are large previews that you see when choosing the “fit” zoom level. "1:1" previews are a 100% view of actual pixels.
As you edit photos, Lightroom will create larger previews of photos as you need them. With this option, you are only choosing the initial preview that you will see.
Smart Previews allow you to edit your images when they are not connected to your computer. Lightroom smart previews are lightweight, smaller files.
This panel also allows you to make a backup copy of your files at the same time that you are importing them. You can choose any location connected to your computer for the backup.
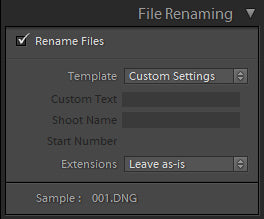
The File Renaming Panel allows you to choose how your files are renamed on import. This is available whenever you are copying or moving files. Simply check the box “Rename Files.” Then choose a renaming option from the Template choices. If the option you select has a custom naming feature, you will need to enter any custom text you want to include in the file names.
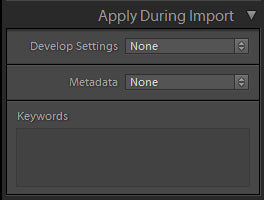
The Apply During Import Panel gives you the option to apply specific settings or keywords to each photo you are importing.
Under the Develop Settings, you may choose to apply any Lightroom Preset you have in your Develop Presets folder.
Under Metadata, you can apply certain bits of metadata to your files, such as copyright information and other personal information, to allow people to find you if they want to use your photo. You can create a metadata preset/template by choosing either “New” or “Edit” from the drop-down menu.
You can also add keywords to the photos you're importing by typing them in the box. The keywords will be applied to ALL the images you are importing, so make sure that they actually relate to all the photos.
Make sure to read the rest of our series to help you master Lightroom. If you’ve missed any of these posts, you can read/review them at any time by clicking these links!
Day 1. The Lightroom Catalog
Day 3. Lightroom Library Module
Day 4. Lightroom Develop Module
Day 5. Basic Lightroom Editing Workflow
Day 6. How to Use Lightroom Presets
Day 7. Lightroom Export and Everything Else
Do you have any questions or comments about How to Import Photos in Lightroom? Just leave us a comment below - we would LOVE to hear from you! And PLEASE SHARE this post using the social sharing buttons (we really appreciate it)!


Comments