- Lightroom Presets
- Mobile Presets
-
Photoshop
-
Learn
-
Support
-
Install
- Best Sellers
- Blog
By Gayle Vehar on | No Comments

Keywording photos should be an important part of everyone's digital workflow in Lightroom. When keywords are added to images, those same keywords can later be used to search and find images in a Lightroom Catalog much more quickly - especially in a LARGE catalog!
Keywords are basically metadata (or information) in the form of words you can add to an image file. This keyword metadata is added to your image in Lightroom's Library Module - specifically in the Keywording Panel.
To open the Keywording Panel in the Library Module, press the Lightroom keyboard shortcut "Cmd/Ctrl + 2."
Adobe Lightroom is a brilliant and intuitive software program, and once you begin adding keywords to your images there, it will start learning what type of words you regularly add to your photos. In addition, It will also recognize specific kinds of images and populate keywords within the Keyword Suggestion area of the Keywording Panel based on the type of image it is.
One of the simplest ways to add keywords to your image is to type them into the Keyword Entry Box at the top of the Keywording Panel. Simply highlight the image you want to add keywords to and then type words separated by a comma that describes the photo.
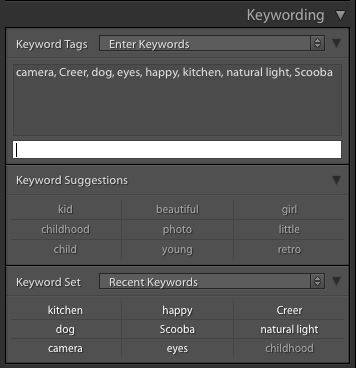
There are a few other ways to add keywords as well. You can choose from any of the below options:
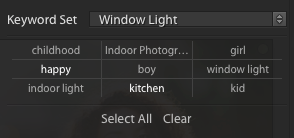
A Keyword Set is a group of up to nine keywords that are linked together. Whenever possible, adding keywords using a Keyword Set is a great idea.
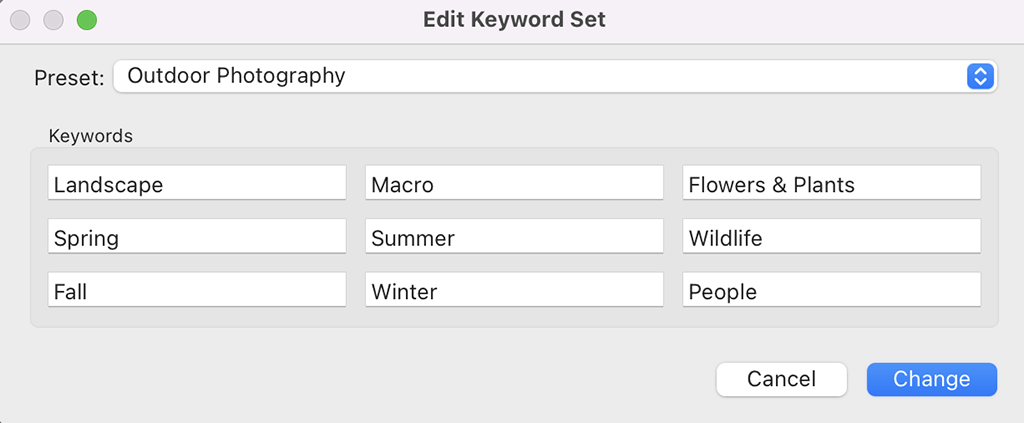
Choosing a Keyword Set will bring up those nine keywords targeted to a specific type of photography or photography setting. Once you have created a Keyword Set, adding them is as easy as choosing the Keyword Set and clicking on the ones that apply to your image.
Creating a Keyword Set is simple, following the steps below:
Begin by typing up to 9 keywords in the top box of the Keywording Panel. Each of these words should be centered around the type of photography you do or a location you frequently shoot at.
Next, in the Keyword Set area of the Keywording Panel, choose "Recent Keywords" from the dropdown menu. This should immediately populate the nine keywords you just typed in.
Finally, choose "Save Current Settings as New Preset" from the same dropdown menu and give it a name. Click "Create" when finished.

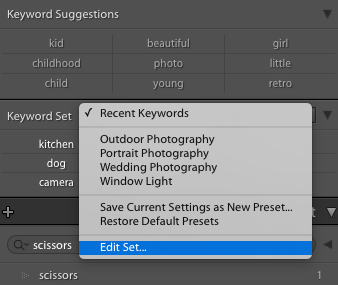
This comes in handy if you want to edit one of the default Keyword Sets created by Adobe or edit a keyword set you have already created:
First, choose a Keyword Set from the Keyword Set dropdown menu.
Next, choose "Edit set" from the same dropdown menu. This will open up a box with the name of the Keyword Set and nine small boxes with words in them.
From here, you can change the name of the Keyword Set or any of the keywords in that set. Remember, the maximum number of words you can have in a Keyword Set is nine.
Just like you can sync edits in Lightroom, you can also sync keywords to OTHER PHOTOS in Lightroom:
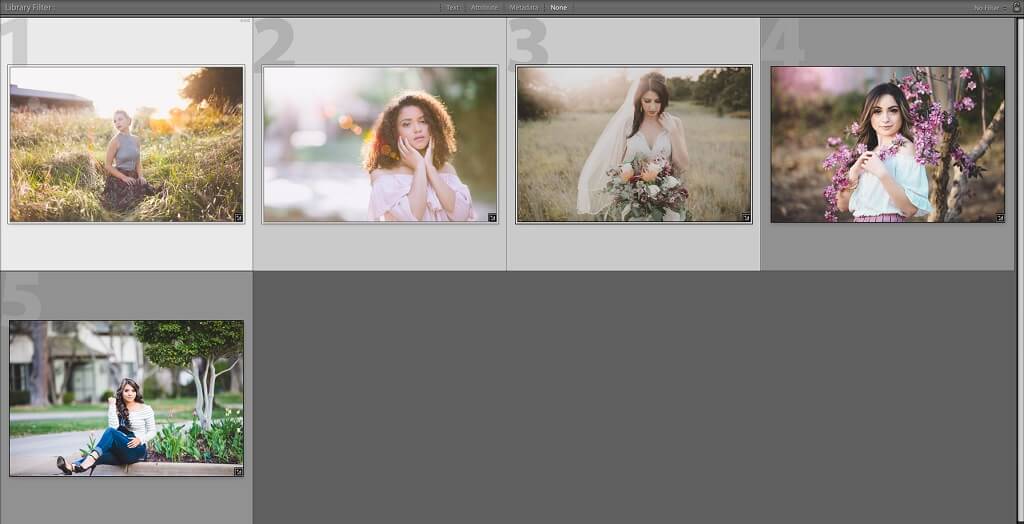
In the Library Module, add keywords to the first image in the set you would like to sync.
Then hold down the "Shift" key and click on the last image in the set that you would like to sync. You will see the "Sync Metadata" button appear on the right side of the Library Module - click it.
Since I just want to sync the keywords, I only check the Keywords box and then press "Synchronize." Your keywords will then be synced to all of the selected photos you selected.

Another way to quickly add keywords to multiple photos is to use the Painter Tool - which I will discuss next.
The Painter Tool is another fun way to add keywords to one or multiple photos in Lightroom:

In the Grid view, click the Painter tool icon in the toolbar. If the Painter Tool is not in the toolbar, you can choose to have the Painter Tool appear in the Toolbar Menu at the far right of the toolbar.
When the Painter tool is enabled, the pointer becomes a painter icon, and the Painter icon is no longer visible in the toolbar. If necessary, choose Keywords from the Paint menu in the toolbar. It is possible to use the Painter Tool to paint other characteristics besides keywords so just make sure that the keywords option is selected.
Type the keyword or keywords you want to add or remove in the toolbar field.
You can also quickly assign keywords using the Painter Tool and Keyword Sets together.
Creating keyword hierarchies is a way to organize your keywords and simultaneously add multiple keywords (keywords within keywords) to your photo. This is an advanced way to use keywords.
Basically, this involves placing keywords within keywords. Then, when the lowest keyword in the hierarchy is added to an image, the other keywords above it are also added.
An instance of when you would want to use keyword hierarchies is when you have images that would benefit from multiple location keywords. For example, if you took a photo in San Diego, you may want to add "San Diego" as a keyword. But you could also create a keyword hierarchy, like United States>California>San Diego (you could go even further). Then when you add San Diego as a keyword, all of those other words that apply to your image will also be added automatically.
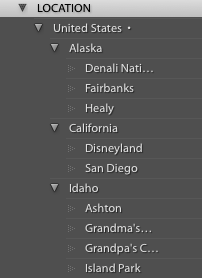
NOTE: If you look in the keyword panel to check this, by default, you will only see San Diego. That doesn't mean other words haven't been added; they are just not visible.
You can create a keyword hierarchy by creating a new keyword under which you want other keywords to be included. For example, I created a new keyword, "Location." I created this new keyword by finding the Keyword List panel in the Library Module (located on the right-hand side). Clicking the "+" will open a dialog box to help you create a new Keyword.

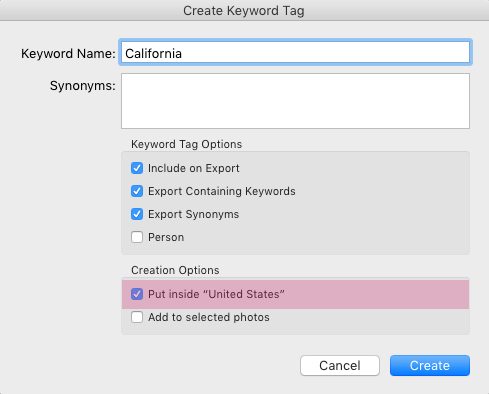
With that keyword highlighted, click on the "+" again and add the keyword "United States." It will give you the option to put this keyword inside the keyword you have highlighted. Then you can highlight "United States" and click the "+" again to add all the places within the United States you desire to add. You can always add to this over time.
I previously mentioned that Lightroom keyword hierarchies are a more advanced keywording technique. This is not because they are hard. But, this technique does require some additional time to set up - something only more advanced users who depend heavily on finding images with keywords or are using keywords to help others locate their photos online (i.e. stock photography) would be willing to do.
Confidently adding keywords to your digital images in Lightroom will make finding your photos at a later date much easier. If you are currently struggling with this, take a few extra minutes to add keywords to your images each time you import your photos into Lightroom. You will thank me later!
Do you have any questions or comments about Using Lightroom Keywords? Leave us a comment below - we would LOVE to hear from you! And PLEASE SHARE this post using the social sharing buttons (We really appreciate it)!


Hi!! I am Gayle. I am a wife to my handsome husband and mom to 4 beautiful kids. In my spare time, I am a photographer and blogger at Mom and Camera. I have a passion for sharing my love of photography with others. I teach local photography classes and regularly share photography tips and tricks on my blog. I hang out there a lot—I’d love you to stop by and visit!

Comments