- Lightroom Presets
- Mobile Presets
-
Photoshop
-
Learn
-
Support
-
Install
- Best Sellers
- Blog

This time of year many of us will be taking a Christmas Card photo with the intent to send it out to all of our friends and family. Sometimes we stress way too much about the process of creating a Christmas card.
Today I want to show you how you can create a cute and simple card in Lightroom using our overlays for Lightroom!

The first step to creating your Christmas card will be to download our FREE Christmas overlays we have created for you and then unzip the folder.
Open Lightroom and find the photo that you want to use for your Christmas card. If you want to use more than one photo then you should consider creating a collection in the Collections Panel. Creating a collection is as easy as right-clicking on one of the collections already in Lightroom and choosing "Create Collection" and then giving it a name. You can just drag and drop photos from the Library Module into the collection.
The Print Module is the second to last module in Lightroom. Open the Print Module. Choose one of the default Lightroom templates, one of the FREE Pretty Presets blog/facebook timeline templates from the left-side in the Template Browser panel, or even create your own template!

In the Layout Style Panel (the top panel in the Print Module) make sure that Custom Package is Highlighted.
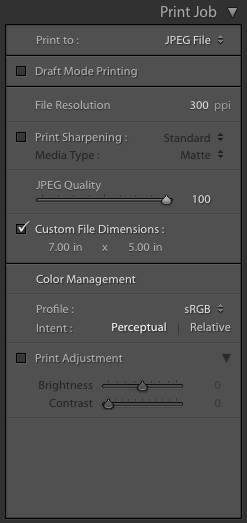
Next, move over to the Print Job Panel on the right-side. This is where you will set the size of your Christmas Card. Check the Custom File Dimensions box and type the dimensions you want in the section below. Make sure the JPEG quality is set to 100 and your File Resolution is set to 300 ppi. Don't worry about what these changes do to the image boxes that were already on your template.
Highlight and tap the delete key to delete any images boxes that were already on your template. Now you can add your own. You do this under the Cells Panel on the right side. No matter which size you add to your print document you can resize and reposition the cells.
Once you have the cell or cells added and positioned where you want them, drag and drop the image you want on the Christmas card into the cell. If needed, you can reposition the image by holding down the Ctrl/Cmd key and then click and drag the photo to reposition it inside the cell.
Now that your image/images are set, we are going to add the Christmas overlay. We are going to do this in the Page Panel using an Identity Plate. Check the Identity Plate box and then click on the little triangle in the lower-right corner. Navigate to the "Edit" option in the drop-down menu that opens up.
Highlight the button next to "Use a Graphical Identity Plate" then move down and click on "Locate File". This is when you will need to remember where you unzipped and saved the Christmas Overlays. Highlight the overlay you would like to add and then click "Choose" when you have made your selection.
I like to save my Identity Plate once I have it selected in case I want to use it again. To do this, move down to the drop-down where it says "Custom". Choose "Save As" and give it a name. Then click "Okay".

You can position your identity plate anywhere on your image by clicking and dragging it where you want. You can also resize it using Scale slider in the Page Panel or by just clicking on the corner resize handles that border the Identity Plate.
This is quite a work around and your options are limited here. But, you can use Watermarking to add your names or the year to your Christmas card. To do this, check the Watermarking box also found in the Page Panel. Then, from the dropdown menu, choose "Edit Watermarks". Use the Watermark Editor box that opens to add your text. And use the options to the right to change your font and style the text the way you want.
You will only be able to anchor your text to certain areas of your photo. You CAN NOT move the watermark wherever you want the same way you can place the Identity Plate. Use the "Anchor" section in the Watermark Effects area to anchor the watermark where you want and then use the "Inset" sliders to adjust the position from there.
Remember, this is a workaround and not the original way a watermark is intended to be used!
This part is easy. In the Print Job Panel on the right-side of the Print Module, make sure that next to "Print to" you have JPEG File chosen. Turn off the Print Sharpening box inside the Print Job Panel as well.
Then click the "Print to File" button in the lower right. This will open up a box that allows you to name your file and choose the location to save it. Click the "Save" button.
Now you are DONE and ready to upload to your favorite photo or card printer!
We hope you have an amazing holiday and that these overlays help you save time creating your Christmas cards this year!

If you enjoyed these free overlays, PLEASE show some love and share this post.
Do you have any questions or comments about How to Use Overlays in Lightroom? Leave us a comment below - we would LOVE to hear from you! And PLEASE SHARE this post using the social sharing buttons (We really appreciate it)!


Comments