60% Off Today! Shop the Enchanted Garden Retirement Sale!

  • Log in
  • Cart (0)
  • Checkout
Pretty Presets and Pretty Photoshop Actions
  • Lightroom Presets
  • Mobile Presets
  • Lightroom Brushes
  • Photoshop 
    • Photoshop Actions
    • Photoshop Overlays
    • Limited Edition Holiday Collections
  • Support 
    • About Us
    • Contact Us
    • Order Lookup
    • Lightroom 101 Workshop
    • Photoshop 101 Workshop
    • Lightroom FAQ
    • Photoshop FAQ
    • Free Lightroom Training
    • Free Photoshop Training
  • Install 
    • How to Install Lightroom Presets
    • How to Install Lightroom Brushes
    • How to Install Presets in the Free Lightroom Mobile App
    • How to Sync Lightroom Presets from CC to Mobile
    • How to Install Photoshop Actions
    • How to Install Photoshop Overlays
  • Blog
Home   /   Lightroom Tutorials   /   5 Steps for Creating Your Own Lightroom Print Templates

5 Steps for Creating Your Own Lightroom Print Templates

By Gayle Vehar on May 04, 2018 | No Comments

5 Steps for Creating Your Own Lightroom Print Templates - Pretty Presets Tutorial

How to Create Lightroom Print Templates

Lightroom is an amazingly powerful program.  We all love it for the many ways that it saves us time in editing and the simplicity of using it to edit images.

Usually, our main focus is on the ways Lightroom can help us save time in the Develop Module.  However, in this tutorial I want to share how it can also save you time with blogging and creating beautiful product collages for your clients using Lightroom Print Templates.

Lightroom's Print Module has the power to create these collage templates without ever having to leave Lightroom.  And you can do it in just a few simple steps.  Are you ready?

Bonus: Dont miss the link to our Free Lightroom Templates (located at the end of this tutorial)

Lightroom & Photoshop Facebook Group

1. Navigate to the Lightroom Print Module

Open the Print Module in Lightroom.  You'll find it between the Lightroom Slideshow and Web Modules.  It will be the second module from the right.

5 Steps for Creating Print Templates in Lightroom | Pretty Presets for Lightroom

2. Adjust Your Settings

Once you are in the Print Module, you'll need to let Lightroom know the size and type of print template you are creating.  This involves changing the settings in two different panels - the Layout Style Panel and the Print Job Panel.

In the Layout Style Panel, make sure you have "Custom Package" selected.

In the Print Job Panel, make sure that you have "JPEG File" selected next to the words Print To.  This will ensure Lightroom knows that at the end of this process, to save this as a JPEG and not print it directly to your printer.  Next, set your File Resolution to 300 ppi, uncheck the Print Sharpening box, and make sure the JPEG Quality slider is all the way to 100.

5 Steps for Creating Print Templates in Lightroom | Pretty Presets for Lightroom

The last setting you need to customize is the Custom File Dimensions.  Make sure the box next to this setting is checked.  Then, in the boxes below, tell Lightroom what size image you want to end up with.  You can set any settings here that you'd like - 5x7, 8x10, or anything larger and custom that you'd like to create.

5 Steps for Creating Print Templates in Lightroom | Pretty Presets for Lightroom

3. Add Photos to Your Lightroom Template

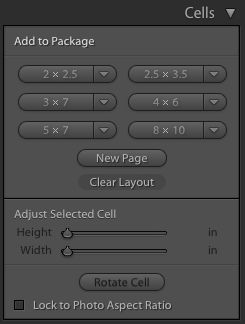
Now you need to add photos to your template.  To do this, start in the Cells Panel inside the Print Module.  Make sure that the "Lock to Photo Aspect Ratio" box is unchecked.  Next, click on one of the cell size buttons to add it to your collage.  You can adjust the shape and size of the cell you add so there is really no need to worry too much about which one you select.

Use the handles around the photo box to adjust it's size, shape and location. Lightroom operates best if there is at least a tiny bit of white space between your photo boxes.  It doesn't seem like it should make a difference but it does - trust me.  It will be easiest if whenever possible you leave at least a small bit of white between your boxes.

When your boxes are set up how you would like them, go ahead and drop the photos you want into each of the boxes.  If you want to move the photo around within the box, just hold down the cmd/ctrl key and then click and drag on the photo to reposition it.

4. Saving Your Lightroom Collage

To save your collage, click the "Print to File" button on the lower right-side of the Print Module.  Lightroom will open a dialog box so that you can give this file a name and tell it where to save it.  It will save as a JPEG file that you can upload to the web or to your favorite place to make prints.

5 Steps for Creating Print Templates in Lightroom | Pretty Presets for Lightroom

If this is a file that you are going to save and share on the web, you can try decreasing the JPEG quality a bit or reducing the File Resolution a bit to reduce the file size.

5. Saving Your Lightroom Template for Future Use

If this is a Lightroom template that you'd like to use again, you can save it as a template that will be ready to use the next time you need it.  On the left-side of the Print Module, locate the Template Browser Panel.  Click the "+" sign next to Template Browser. 

5 Steps for Creating Print Templates in Lightroom | Pretty Presets for Lightroom

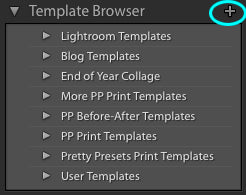
This will open up a Lightroom dialog box that will allow you to give this template a name and choose which folder inside your Template Browser to save it in.  If you don't have any folders set up to save it in, just choose the "User Templates" that is there by default in Lightroom.

Thats it!  You're done - congratulations on creating your first Lightroom Template!

As a bonus, we created and put together an awesome bundle of 10 Free Lightroom Print Templates that you can download and use.  You can find them here.  Did I mention they were free!  Enjoy!

Troubleshooting Tips

  • If your cells will are moving and snapping to certain dimensions, go to the Rulers, Grid & Guides Panel and make sure you have Grid Snap turned to OFF.
  • If the photo cells are changing ratio when you place your photo inside, move to the Cell Panel and uncheck "Lock to Photo Aspect Ratio."
  • If you aren't used to using Inches to set your Custom File Dimensions, you can change the Ruler Units to Centimeters (or other options) in your Rulers, Grid & Guides Panel.  Set your "Ruler Units" to whatever works best for you.
  • If you want to place images from multiple folders into a collage, you will need to create a Collection and add the photos you want to use to the Collection.  Collections are what Lightroom uses in Book, Slideshow, Print and Web Modules to find photos.

Do you have any questions or comments about Creating Lightroom Print Templates?  Leave us a comment below - we would love to hear from you!  And PLEASE SHARE our tutorial using the social sharing buttons (we really appreciate it)!

Lightroom Presets

Related Articles

White Balance Settings & How to Get it Right in Camera
Importance of White Balance In Photography Getting your white balance right in-camera will not only save you a lot of...
Read More
Top 3 Most Downloaded Lightroom Presets
Top 3 Most Downloaded Lightroom Presets Photographers in our Pretty Presets community always ask us what our best-sel...
Read More
6 Great Photography Projects for Slow Times
6 Photography Projects to Keep You Busy During Slow Months Winter is usually a slow time for photography in the north...
Read More
Pretty Presets for Lightroom author Gayle Vehar

Gayle Vehar

Lightroom Instructor

Hi!! I am Gayle. I am a wife to my handsome husband and mom to 4 beautiful kids. In my spare time, I am a photographer and blogger at Mom and Camera. I have a passion for sharing my love of photography with others. I teach local photography classes and regularly share photography tips and tricks on my blog. I hang out there a lot—I’d love you to stop by and visit!

May 04, 2018

Comments

INFO & SUPPORT
  • Lightroom FAQ
  • Photoshop FAQ
  • Contact Us
  • Order Lookup
Sign up for great freebies and tutorials

Get notified about promotions, giveaways and webinars before they happen!

Join the pretty Community

Come join the #1 Lightroom & Photoshop Facebook Group to help you learn how to edit your photos more confidently today!


  • About Us
  • Testimonials
  • Policies
  • Terms of Service
  • Write for Pretty
  • Pretty Scholarship

© 2023 Pretty Presets for Lightroom.