MOTHER'S DAY SALE! UP TO 35% OFF - DISCOUNT APPLIES IN CART.

  • Log in
  • Cart (0)
  • Checkout
Pretty Presets and Pretty Photoshop Actions
  • Lightroom Presets
  • Mobile Presets
  • Photoshop 
    • Photoshop Actions
    • Photoshop Overlays
    • Limited Edition Holiday Collections
  • Learn 
    • Free Lightroom Training
    • Free Photoshop Training
    • Lightroom 101 Workshop
    • Photoshop 101 Workshop
    • Your Pretty Edits
  • Support 
    • About Us
    • Contact Us
    • Order Lookup
    • Lightroom FAQ
    • Photoshop FAQ
  • Install 
    • How to Install Lightroom Presets
    • How to Install Lightroom Brushes
    • How to Install Presets in the Free Lightroom Mobile App
    • How to Sync Lightroom Presets from CC to Mobile
    • How to Install Photoshop Actions
    • How to Install Photoshop Overlays
  • Best Sellers
  • Blog

7 Tips for Getting Sharper Images at Open Apertures

By Gayle Vehar on November 04, 2015 | No Comments

7 tips for getting sharp images at open aperture | Photography tutorial from Pretty Presets for Lightroom

How to Get Sharper Images at Open Apertures

Shooting at open apertures gives a beautiful creamy bokeh and blur to the background.  But shooting at open apertures also comes with its own set of difficulties.  These tricks will help you get sharper photos at open apertures.

Lightroom and Photoshop Facebook Group

1. Keep Your Subjects on the Same Plane

When shooting at open apertures, keeping your subjects on the same plane becomes very important because there isn't very much depth of field.  The easiest way to do this is to have your subjects feet all lined up, have them lined up shoulder to shoulder, holding hands, or have them sitting with their bums lined up in a row parallel to you.  Having them touching in some way also helps to keep your subjects on the same plane.

2. Keep Your Distance

Keep a reasonable distance between you and your subjects, especially if you photograph multiple subjects with an open aperture.  Putting some distance between you and your subjects will give you a little more depth of field.  Moving close to your subject will provide you with less depth of field.

7 tips for getting sharp images at open aperture | Photography tutorial from Pretty Presets for Lightroom

3. Photographing Close Up?

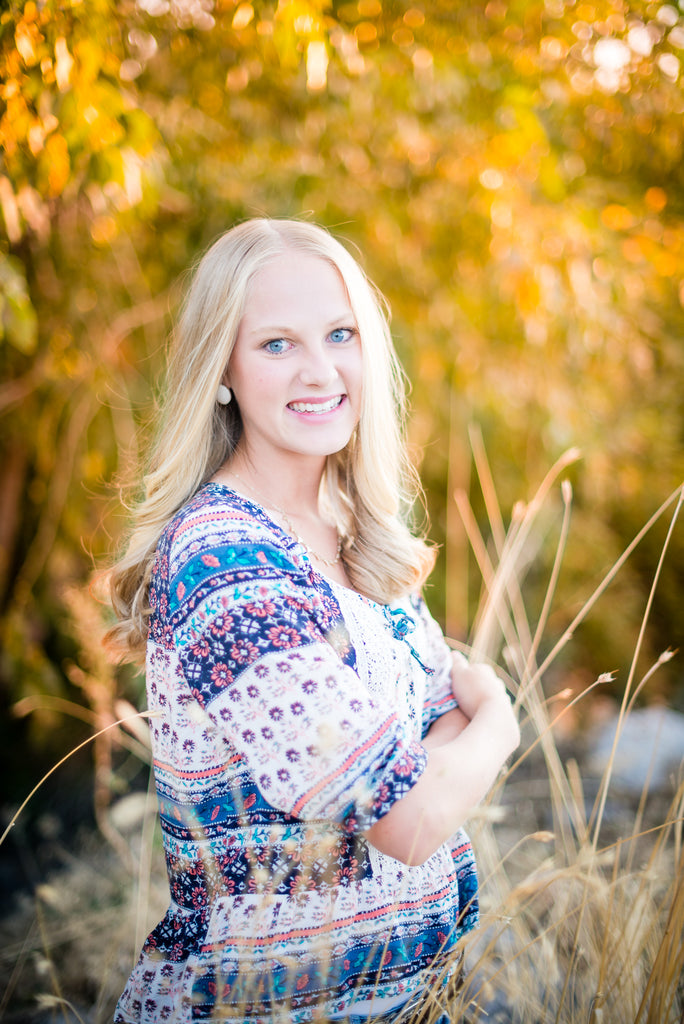
If you photograph a subject close up, pick an eye and focus on it. The eyes are the first thing we look at in a photograph, and we expect the eyes, at the very least, to be in focus.

7 tips for getting sharp images at open aperture | Photography tutorial from Pretty Presets for Lightroom

4. Keep Subjects Far Away From the Background

Keeping your subjects far away from the background does two different things.  First, it will help to keep the background beautifully blurred.  Second, the further your subject is from the background, the sharper it will appear because of the contrast of sharpness between your subject and the beautifully blurred background.

For instance, if your subject is close to the background, there will be little difference in sharpness between your subject and the background.  But if your subject is far from the background it will appear sharper in relationship to the blurry background.

7 tips for getting sharp images at open aperture | Photography tutorial from Pretty Presets for Lightroom

5. Toggle Your Focus Points

Toggle your focus points when shooting at open apertures—especially if you shoot at 2.0 or wider.  Using the focus and recompose method at these open apertures leaves room for error.   And error is what we need less of at these open apertures.  

6. Avoid the Widest F-Stop

Avoid shooting at your lens's most open aperture.   If you use a 50mm f/1.4, don't pick 1.4 as your aperture.  Choose an aperture of at least f/1.6 instead.  If you are shooting with an 85mm f/1.8, choose an aperture of at least 2.0 instead.

And if you aren't getting sharp images at those open apertures, choose a smaller aperture and gradually work your way to shooting with more open apertures.

7 tips for getting sharp images at open aperture | Photography tutorial from Pretty Presets for Lightroom

7. Find Good Light!

This might be the most important of all the tips.  If you don't have good light, your camera and lens can't focus properly.  If you don't have good light, you risk underexposing your shot.  Underexposing your image introduces noise into the picture as you brighten it and will make your subjects appear less sharp.  Always look for good light and make sure that you are nailing your exposure in-camera to ensure the sharpest image possible.

Do you have any questions or comments about How to Get Sharper Images at Open Apertures?  Leave us a comment below - we would love to hear from you!  And PLEASE SHARE our tutorial using the social sharing buttons (we really appreciate it)!

Clean & Colorful Lightroom Presets

Related Articles

How to Start a Boudoir Photography Business
Ready to start your boudoir photography business?  Learn key tips for building a portfolio, hosting mini sessions, choos
Read More
Beginner's Guide to Boudoir Photography
Are you ready to start your journey into boudoir photography?  This beginner's guide covers everything you need to know
Read More
Beginner's Guide to Smoke Bomb Photography
Discover the art of smoke bomb photography with our comprehensive guide!  Learn about smoke bomb photoshoots, essential
Read More
Pretty Presets for Lightroom author Gayle Vehar

Gayle Vehar

Lightroom Instructor

Hi!! I am Gayle. I am a wife to my handsome husband and mom to 4 beautiful kids. In my spare time, I am a photographer and blogger at Mom and Camera. I have a passion for sharing my love of photography with others. I teach local photography classes and regularly share photography tips and tricks on my blog. I hang out there a lot—I’d love you to stop by and visit!

November 04, 2015

Comments

INFO & SUPPORT
  • Lightroom FAQ
  • Photoshop FAQ
  • Contact Us
  • Order Lookup
  • Log Into Account
Sign up for great freebies and tutorials

Get notified about promotions, giveaways and webinars before they happen!

Join the pretty Community

Come join the #1 Lightroom & Photoshop Facebook Group to help you learn how to edit your photos more confidently today!


  • About Us
  • Testimonials
  • Policies
  • Terms of Service
  • Write for Pretty
  • Lightroom Scholarship
  • Photoshop Scholarship

© 2025 Pretty Presets for Lightroom | support@prettypresets.com (406) 298-3006

  •  
  •  
  •  
One or more of the items in your cart is a recurring or deferred purchase. By continuing, I agree to the cancellation policy and authorize you to charge my payment method at the prices, frequency and dates listed on this page until my order is fulfilled or I cancel, if permitted.