- Lightroom Presets
- Best Sellers
- Mobile Presets
-
Photoshop
-
Learn
-
Support
-
Install
- Blog

Blur in photography refers to an image (or parts of an image) that aren’t sharp. This is often caused by camera shake, and it’s a mistake that you usually want to avoid.
However, when blur is shot on purpose, it can be seen as a creative element that enhances an image. For example, motion blur can make photos look much more dynamic.
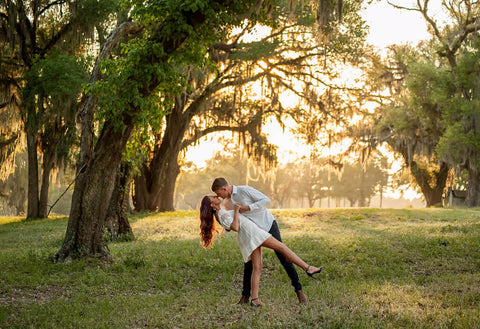
Blurring the background is another popular photography technique used to bring focus to a subject and really help it stand out. This effect is often used in portrait photos, but I have seen it used effectively in ALL types of photography.
The BEST way to achieve background blur is IN-CAMERA by choosing the correct aperture and focal length and considering the distance between the subject and the camera.
However, sometimes it's impossible to get the right conditions for background blur, or your camera settings may not have been appropriately set. When this happens, you can blur your background in post-processing quickly and easily using Photoshop.
Let's take a look at our first example:

Let’s start with this simple example where we have two relatively defined planes where the subject is in front of a flat background. In this case, we don’t have to worry about different depths.

I always like to keep a bottom layer intact in case anything goes wrong. So, duplicate the layer two times.
You can do this by dragging the background layer into the New Layer icon located at the bottom of the Layers Panel, or you can press the keyboard shortcut Cmd/Ctrl+J. Do this action twice so that you will have the same image in three different layers.
Rename the layers to keep things tidy. The top layer is the subject, the middle layer will have a blurred background, and the bottom layer (as I mentioned) will remain intact as the background layer.

Next, go to the top layer and make a selection of your subject using whichever selection tool that works best for you. Sloppy selection work is the biggest pitfall in this process, so make sure you spend enough time selecting your subject correctly.
The pen tool is the most precise, but it has a steep learning curve and is not always necessary. An easy way to start is using any of the AI tools available in the newer versions of Photoshop - specifically, Select>Subject is a good place to start. You can then fine-tune your selection using the other tools.

For other cases, it may be easier to start with a color range selection or any of the lasso tools - it will really depend on your subject. There isn’t a single tool that works best every time, and in most cases, it’s a combination of tools that will help you achieve the best result.
Next, add a layer mask by clicking on the icon on the bottom (highlighted below). This will hide the background from the top layer. You can delete the background instead, but using a layer mask will keep your process non-destructive because you will always be able to recover the information and fine-tune your selection if needed.

With the selection still active, go to the middle layer. Now, go to the menu and click on Edit>Fill. When the pop-up dialog box opens, choose Content-Aware from the drop-down menu and click OK.

Now you will have a complete background without the subject; it doesn’t need to look perfect because the blur will blend the imperfections, and the subject will cover part of it.
Change the Blur Layer into a Smart Object by right-clicking on the layer and choosing Convert to Smart Object. You can also go to the menu Filters and select Convert for Smart Filters. Either way, the results will be the same.

Finally, open the menu Filters again and choose Blur>Gaussian Blur. Use the slider in the dialog box to decide how much blur you want to apply. Make sure you have the Preview option enabled so that you can see the effect in action.
Once you are satisfied, click OK. If it's not perfect, don't worry. You can always go back and adjust the amount of blur because you turned the layer into a Smart Object.

As you can see in the steps above, it’s pretty easy to blur the background in Photoshop when there’s a clear separation between planes. However, when there is a middle area (between the subject and background, you will also need to consider how blur affects those different depths.
To create a realistic blur effect for this type of image in Photoshop, you will need to understand how depth of field works in your camera.
The first thing to consider is that the focal plane runs parallel to the sensor plane. What does this mean? Imagine a line that goes to the left and right of your subject - everything in that line will be as sharp as your subject.
Now imagine a perpendicular line that goes from the front to the back of your subject - that’s the one that controls the depth of field. Things closer to the focal point are sharper than anything further away - so the blur needs to increase in that direction gradually.
The other thing to remember is that the depth of field runs ⅓ in front of the focal point and ⅔ to the back. For example, when taking a portrait photo, you should place your focal point one-third into the subject’s head (which is the subject's eyes, more or less). This will keep the eyes, nose, and the rest of your subject's head sharp and only blur the background. This may sound a bit complicated, but it gets easier when you see it in action.
Now, let’s get to our example. Photoshop has several different tools that allow you to blur the background while considering the depth of field. My favorite Photoshop tool to achieve this is the Tilt-Shift Blur.

As described above, start by making two copies of your background layer. The original will remain untouched. This way, you will always have a backup in case there’s something that needs to be fixed.
Rename the layers to keep organized. Name the top one "Subject" and the middle one "Blur." Now click on the top layer to ensure you are working on it.
Also, as before, select the subject using whichever selection tool you find works best. Then, click on the Layer Mask icon to hide the background.

Click on the middle layer - the one we renamed "Blur." Make sure the selection of the subject you made earlier is still active. If it's not, you can click on the layer mask you created in the previous step while holding the Alt key to activate it, then return to the middle layer.

Next, go to the Selection Menu and choose Modify>Contract. This will open a dialog box where you can tell Photoshop to shrink the selection by a few pixels (input something between 2 and 5, depending on your photo). This will prevent a halo around your subject.
Now, invert the selection using Cmd+I (Mac) or Ctrl+I (PC). Finally, turn this layer into a Smart Object by right-clicking on it and choosing Convert to Smart Object. That way, you can always come back to re-adjust the blur.

Go to Filter>Blur Gallery>Tilt-Shift. This will open a new workspace that’s dedicated to the Blur Gallery. Don’t worry; once you apply the filter, you will go back to your regular workspace in Photoshop.

This will place an overlay on top of your image, which has a circle, two solid lines, and two dotted lines.
The circle is where the focal point will be (in other words, the SHARPEST AREA). You will also see two solid lines (one on top and one on the bottom). Everything WITHIN these two solid lines will stay sharp.
Next, let's discuss the two dotted lines. Everything between the solid lines and the dotted lines will be blurred gradually. Finally, everything in front of or behind the dotted lines will be completely blurred.

First, we need to define the AREA OF BLUR by clicking on the circle and dragging it to where we want our focal point (sharpest area) to be.
Then, hover over one of the SOLID LINES until the cursor turns into a vertical line (with arrows pointing up and down on each edge). We can now click and drag the solid line to make the depth of field deeper or narrower. Do the same thing with the other solid line as needed.
Do the same thing with the two DOTTED LINES to define how smooth the transition from sharp to blurred will be.
Now that we have defined the AREA OF BLUR, we will need to decide on the AMOUNT OF BLUR. To do that, go to the Blur Tools located in the control panel on the right side of the screen. Use the Blur Slider to increase (or decrease) the intensity of the blur as desired.
Congratulations! Your image should now have a nicely graduated blur.
Keep in mind that this is just one way to gradually blur a background in Photoshop. You can also use the Field Blur Filter or the Gaussian Blur with a Gradient Mask to achieve a similar effect.
Bokeh is a stylistic blur effect that comes from out-of-focus lights. This type of blur can often be seen in Christmas photos because blurred lights on a Christmas tree make for a beautiful effect.
Bokeh lights can be achieved in-camera using the DIY tools outlined here. Fortunately, Photoshop has a super handy tool located in Blur Gallery Filter that can be used to blur lights in the background without blurring the entire background. Let’s take a look at the example below:

Start by duplicating the background layer twice - just like you did in the previous examples.
Make a good selection of your subject and add a Layer Mask on the top layer so that your subject is the only visible part (same as previously described).
Click on the middle (blur) layer and convert it to a Smart Object. Use the selection to fill the subject area with the Content-Aware tool (as described in the first example above). If the background is too busy to be filled with Content-Aware, contract the selection and invert it (as described in the second example above).
Next, open the Blur Gallery and blur the background (it doesn’t matter if you choose the Field Blur or the Tilt-Shift blur).
Adjust the location and intensity of the blur using the handles on the canvas and the Blur Tools panel. So far, this is blurring the background as usual - regardless of whether or not you want to add the bokeh effect.

Now the final touch - adding bokeh! While you are still in the Blur Gallery Workspace, open the Effects panel on the right and use the Light Bokeh or Color Bokeh sliders to introduce some bokeh onto your blurred background. Congratulations, you are done!
The next time you are unable to achieve a nicely blurred background in-camera during a photoshoot, don't worry! Open your image in Photoshop and use these tools to digitally recreate a beautiful blur effect with very realistic results.
Do you have any questions or comments about How to Blur Background in Photoshop? Just leave us a comment below - we would LOVE to hear from you! And PLEASE SHARE this post using the social sharing buttons (we really appreciate it)!


Comments