- Lightroom Presets
- Best Sellers
- Mobile Presets
-
Photoshop
-
Learn
-
Support
-
Install
- Blog

(All images in this post were photographed by Tina Auten and edited with presets, actions, and/or overlays from Pretty Presets & Actions)
Signs of Spring are everywhere across Texas, but none are as eagerly anticipated as our beloved state flower, the Texas Bluebonnet, which arrives in a dramatic burst of color from mid-March through early May. The sight is simply breathtaking, and it never fails to make my heart skip a beat with excitement.
As Bluebonnet fields begin to appear along highways, state parks, and private fields, photographers and tourists alike flock to capture their magnificent beauty, armed with cameras of all shapes and sizes.
As a Texas photographer, I receive many emails from clients and potential clients inquiring about Bluebonnet photoshoots and locations. Indeed, taking a portrait in the Bluebonnets has become a beloved Texas tradition to celebrate Spring, and I'm more than happy to oblige!
So, if you're planning a Bluebonnet photoshoot, or having your own photos taken, here are some essential tips to help you get the most out of your photos, including several safety tips to keep in mind:
The best time of day for Bluebonnet portrait photography is typically during the “golden hours,” which is the hour BEFORE sunset and the hour AFTER sunrise.
The light during those times is soft and warm, which is flattering for portraits, and the Bluebonnet colors will be enhanced by the warm glow of the late evening or early morning sun.
Bluebonnets usually bloom in wide-open fields with very little open shade, so shooting at these times can be especially important to prevent your subjects from squinting their eyes, which can often occur when shooting in harsh sunlight.

When choosing a location for your portrait session in the Bluebonnet field, finding a spot with a clean background and a clear blue sky is important.
A cluttered or busy background can distract from the main subject and take away from the overall composition. Keeping the background simple and balanced will create a more visually appealing photograph and ensure the focus stays on your subject.
In addition to composition, the background can also contribute to the mood and overall aesthetic of the photograph. A cloudy sky can create a moody or dramatic feel, while a bright blue sky can convey a sense of happiness and joy, often associated with the vibrant fields of Spring wildflowers like Bluebonnets.

When photographing bluebonnets, depth of field is particularly important because it can help you create a more visually appealing and exciting image.
For portraits, use a shallow depth of field to create a blurred background that emphasizes your subject and the flowers in the foreground. This can help create a sense of depth and dimension in your image and draw the viewer's eye toward the subject.
Alternatively, if you want to capture a landscape or a more expansive view of a Bluebonnet field, use a deeper depth of field to ensure that more of the scene appears in focus. This can help provide context and scale for the flowers and create a sense of the environment in which they are growing.

Lens choice is an essential factor to consider when photographing Bluebonnets or any subject for that matter. Different lenses can produce different effects and help you achieve your desired look and feel for your image.
Ultimately, your lens choice should depend on the specific composition and style of the image you want to create.

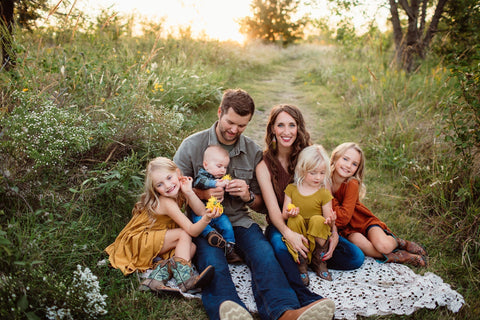
When photographing a portrait in a Bluebonnet field, clothing can play an important role in your image's overall aesthetic and mood.
Try to stick with COLORS that complement or contrast with the blue, purple, and green hues of the Bluebonnet flowers and their foliage. Earthy tones like beige, brown, or rust are all excellent choices. Pastel shades of orange, pink, and yellow also work well.
Make sure to avoid patterns or neon colors that may be distracting and take away from the natural beauty of the scene.
The STYLE OF CLOTHING can also help set the tone for the portrait. For example, a flowing dress or skirt can create a sense of movement and add a romantic or dreamy quality to your image.

Keep your props simple (an apple crate, a simple wooden chair) as you don’t want to distract from the beauty of the Bluebonnets or your subject. Some photographers prefer to use blankets, but use them sparingly, as you don’t want to flatten the flowers for those after you!
For those of you who use props such as wagons, furniture, blankets, crates, metal pails, and more, please take extra care when setting them up and how you direct your clients there.
Avoid props like glitter, confetti, balloons, and materials that can damage the natural Bluebonnet habitat.

To ensure your safety and the safety of your subjects and environment, follow these precautions and safety tips when photographing Bluebonnets:

As a Texan, the Bluebonnet holds a special place in my heart!
During the years I lived away as an Air Force wife, I longed for the vibrant blue fields each Spring. And now that I’m back in Texas, I consider it a pleasure and privilege to capture the beauty of my favorite flower once again.
With these helpful tips, you can also capture stunning Bluebonnet photos while being mindful of safety and the environment. Remember, it’s everyone's responsibility to preserve the legacy of the Bluebonnet and other wildflowers for generations to come.
So grab your camera and join me in celebrating the magic of the Texas Bluebonnet! Don't let this awe-inspiring experience pass you by!
Do you have any questions or comments about Bluebonnet Photography? Just leave us a comment below - we would LOVE to hear from you. And PLEASE SHARE this post using the social sharing buttons (we really appreciate it)!


Comments