- Lightroom Presets
- Best Sellers
- Mobile Presets
-
Photoshop
-
Learn
-
Support
-
Install
- Blog

In the world of photography, there's a hidden feature that can significantly enhance your shooting experience by allowing greater control and precision over your shots: BACK BUTTON FOCUS (BBF), often referred to as back button autofocus.
Back button focus, in its simplest form, shifts autofocus from the shutter button to a dedicated button on the rear of your camera (hence the name back-button). Rather than continuously pressing the shutter button halfway to focus and then capturing an image, back button focus enables you to lock focus separately from the shutter button. Most cameras also allow you to remove the focusing function from the shutter release button, which will help if you ever want to focus and then recompose your shot.
Now, you may be asking yourself, "What's the big deal with back button focus, and why should I go through these extra steps to activate this feature?
In this comprehensive guide, I will explain what back button focus is, why it's useful (including real-life scenarios), and how to activate it on various camera models, including Nikon, Canon, and Sony.


Now that you understand the advantages let's explore several real-life scenarios in which back button focus becomes an invaluable tool:
Let’s say you are photographing a wedding, and during the ceremony, the couple will be in the same spot for an extended period of time. By using back button focus to select the focus ONLY ONCE and having the ability to continuously press the shutter without the camera refocusing for every shot, you will be able to more easily capture facial expressions and gestures that happen within a fraction of a second.
As you may or may not know, you can miss some really great moments if you have to continuously refocus during a wedding ceremony!

Even when shooting portraits, subjects are rarely entirely still, especially children, who are often in constant motion.
With back button focus, you can achieve precise initial focus on your subject's eyes or any specific point of interest in the frame. Once established, you can use continuous autofocus to efficiently track moving subjects while maintaining that initial focus point.
This dynamic focusing technique allows you to efficiently follow your subject's motion, ensuring that your images remain sharp even when capturing candid moments or spontaneous expressions.

Back button focus may seem best suited for stationary subjects, but it's equally valuable for capturing moving subjects.
For example, suppose you are shooting a sporting event and have a particular subject you want to focus on. In that case, you can lock focus on the intended subject without worrying about the camera autofocusing on something else (i.e. other players, referees, spectators, etc.).

The process of enabling back button focus varies from camera to camera. However, the typical steps involve assigning the focusing function to a specific button on the back of your camera. Here's a brief overview of how to do it on Nikon, Canon, and Sony cameras:
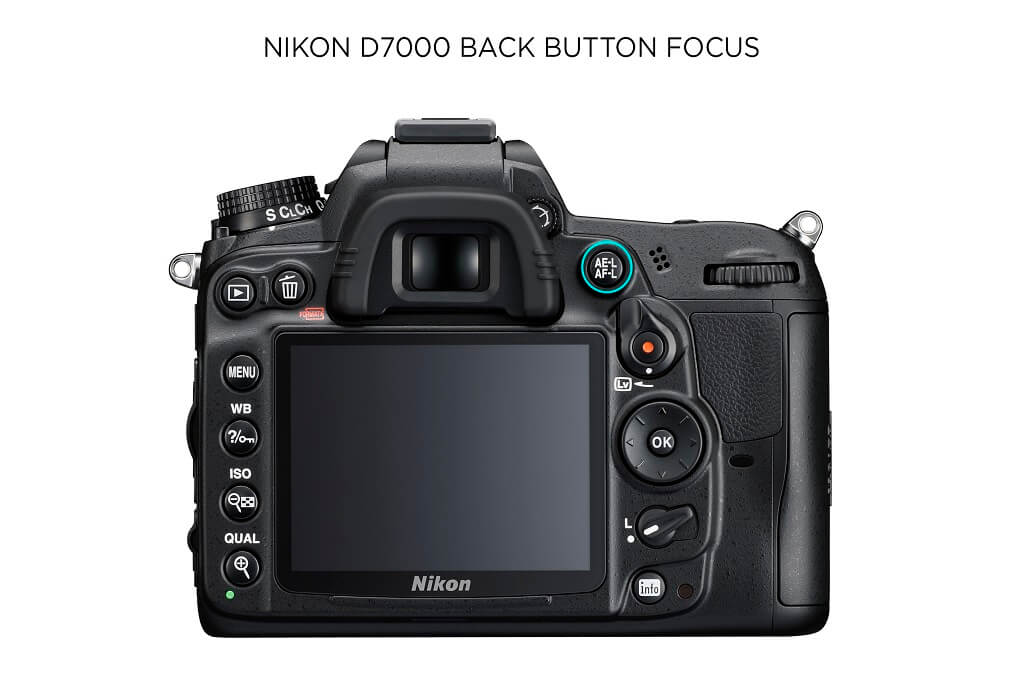
Here are the steps to activate the BBF feature on your Nikon D7000. This will give the AE-L/AF-L button the ability to focus and take that ability away from the shutter button (These steps will be very similar for most Nikon cameras).
Follow these steps to activate the BBF feature on your Canon 5D Mark II. You must be in M, Av, Tv, or P modes to activate this feature. Back button AF will not work in full auto mode.
Here are the differences between options 2 and 3:

Option 2 activates the back button AF, removing AF control from the shutter button. The shutter button will still fire the shutter, though. With this option, the camera metering is updated every time you take a shot, so if you are shooting in Shutter or Aperture priority, the camera will still automatically adjust these values to compensate for any changes in lighting.
Like option 2, this setting shifts the AF from the shutter button to the back button. However, it also locks the metering. So, the shutter and aperture values you have when you lock the focus will be applied to all subsequent shots. This feature is helpful if you are shooting in lighting conditions that will not change, such as a studio.

If you need additional help enabling the back button focus feature, refer to your camera manual or download a copy through the manufacturer's website. Here is a list of popular camera manufacturers, with links to their camera manual libraries so you can locate yours quickly:

As with any new technique, becoming proficient in back button focus may take some practice. However, you will find it a handy and powerful feature once you've familiarized yourself with it. I was hesitant to use it initially, but once I tried it, I never went back.
By setting your camera to continuously focus, you can hold down the back button to maintain continuous focus. This feature is excellent for moving subjects and portraits where subjects aren't perfectly still.
Some novice photographers might initially view back button focus as an unnecessary complication. However, most experienced photographers observe a notable improvement in image sharpness and focus accuracy. Back button focus also reduces the number of accidental captures.
Before your next photoshoot, consider giving back button focus a try. You may find that it becomes an indispensable feature in your photography toolkit, enhancing your ability to capture breathtaking moments with precision and ease.
Do you have any questions or comments about Back Button Focus? Leave us a comment below - we would love to hear from you! And PLEASE SHARE our tutorial using the social sharing buttons (we really appreciate it)!


Comments