MOTHER'S DAY SALE! UP TO 35% OFF - DISCOUNT APPLIES IN CART.

  • Log in
  • Cart (0)
  • Checkout
Pretty Presets and Pretty Photoshop Actions
  • Lightroom Presets
  • Mobile Presets
  • Photoshop 
    • Photoshop Actions
    • Photoshop Overlays
    • Limited Edition Holiday Collections
  • Learn 
    • Free Lightroom Training
    • Free Photoshop Training
    • Lightroom 101 Workshop
    • Photoshop 101 Workshop
    • Your Pretty Edits
  • Support 
    • About Us
    • Contact Us
    • Order Lookup
    • Lightroom FAQ
    • Photoshop FAQ
  • Install 
    • How to Install Lightroom Presets
    • How to Install Lightroom Brushes
    • How to Install Presets in the Free Lightroom Mobile App
    • How to Sync Lightroom Presets from CC to Mobile
    • How to Install Photoshop Actions
    • How to Install Photoshop Overlays
  • Best Sellers
  • Blog

How to Smooth & Soften Skin in Photoshop

By Amanda Glisson on October 11, 2021 | No Comments

Skin Softening in Photoshop

How to Smooth Skin in Photoshop

Several of our Photoshop Action collections come with skin brushes that will beautifully smooth and soften your subject's skin, and do so quickly and easily!

These collections are:

  • Pretty Retouch and Makeup Collection
  • Pure Color Workflow Collection
  • Luxe Newborn Collection

Retouch Photoshop Actions

In this video and in the written steps below, we will show you how SIMPLE it is to use the Photoshop brushes to reveal beautiful, creamy skin.  You will also learn to adjust opacity and individual layers within your action for a custom and polished look!

Specifically, we will go over how to use the Oh So Soft Skin Brush from the Pure Color Workflow Collection.  Let's take a quick look here:

Smooth & Soften Skin in Photoshop - Video Tutorial


Here are the written steps for smoothing skin in Photoshop using the Oh So Soft Skin Brush:

Step 1. Start With a Clean Image

Before making any skin adjustments, its generally a good idea to fix exposure, the contrast, shadows and highlights first.  In other words, make sure you have a nice, clean looking image before you start editing skin.

The Pure Color Workflow Actions are set up to guide you through this, which is another reason I love this collection!

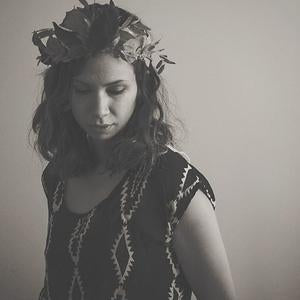
Here is the before image that I will be using:

Smooth Skin Photoshop

Step 2. Run the Action

Once you have the Pure Color Workflow Collection installed, scroll down until you see our mini re-touch set.  Then select the Oh So Soft Skin action and press play.

Step 3. Select the Brush Tool

When you run this action, the prompt will say "paint with a soft white brush to reveal smooth, creamy skin".  Press continue.  You will want to make sure your brush is selected.  If it isn't already, type "B" to select it.

White should be the default foreground color.  If its not, bring white to the top.  Tip: when working with layer masks, keep in mind that black conceals and white reveals.

Make sure your brush opacity is set to 100%.  I like to keep my flow around 85% and the layer mask should also be selected by default (that's the little black triangle right here next to your action folder).

how to smooth faces in Photoshop

Step 4. Brush on the Smoothing Effect

Now that you have the brush selected, you can start smoothing by brushing on your subject's skin.  Tip: you can make the brush larger and smaller with the left and right bracket keys - it is normal to make your brush larger and smaller quite a bit throughout this process.

You will want to brush over the majority of the skin, especially areas with wrinkles, around the eyes, eyelids and forehead.

  • Keep in mind that its very important when smoothing your client's skin, you don't want to brush over and blur specific details of the face like the ears, eyebrows, lash line, eyelashes and lips.  I generally zoom in and carefully paint around them.
  • For the nose area, you should avoid painting the ridge of the nose, but you can paint the sides, the tips of the nose and down the nostril.  Just don't brush over the the actual nose line, if that makes sense.
  • You also don't want to paint over the jaw line or the chin because it will blur a line that is meant to be there

When smoothing skin on the rest of the body I usually like to bring my brush opacity down to about 50%.  I find it looks more natural when the skin on the face has a little bit more smoothing effect than the rest of the body, but that's my personal preference.

Step 5. Check Your Work

At some point it may get hard to tell exactly where you brushed on your image.  If this happens, just press the backslash key to turn on and off a mask (shows as red on your image) which will make it easier to see where you have already brushed.

How to Smooth Skin in Photoshop

Step 6. Correcting Mistakes

If you make a mistake and brush over an area that you didn't mean to, its very easy to fix!

To remove the smoothing effect from a particular area, just bring black to the foreground color (remember black conceals and white reveals).  Make sure your brush is the appropriate size and the opacity is set to 100%.  Then brush over the area you want to correct.  Super simple!

Step 7. Adjust the Strength of the Action

This skin action is meant to subtly smooth and enhance your subject's skin.  It does not give an airbrush effect, which would be a much more DRASTIC change.  If you want even MORE dramatic smoothing you can adjust the action to give that effect by bringing up the opacity to 100% from the current 70% that the action normally plays at.

This also works the other way around.  If you want LESS of a smoothing effect, bring the overall action opacity down or you can open it and click on the layers and bring those down as well.

Here is the before and after and I'm really loving the change:

Soften Skin Photoshop

These actions are super simple to use and I hope this tutorial helps you with learning how to use and customize the Pretty Presets & Actions skin smoothing brushes!

Would You Like More Help Editing Portraits?

If you missed our previous portrait editing tutorials check them out now!  They build on the basic but necessary and important things you need to know when editing portraits in Photoshop:

  • How to Whiten Teeth in Photoshop
  • How to Brighten Eyes in Photoshop
  • How to Change Hair Color in Photoshop

Do you have any questions or comments about How to Smooth Skin in Photoshop?  Leave us a comment below - we would LOVE to hear from you! And PLEASE SHARE our tutorial using the social sharing buttons (we really appreciate it)!

Portrait Photoshop Actions

Related Articles

Pretty Presets & Actions 2024 Photoshop Scholarship Winner
Pretty Presets & Actions congratulates our 2024 Photoshop Scholarship Winner!  See who won and find out how to apply
Read More
How to Start a Boudoir Photography Business
Ready to start your boudoir photography business?  Learn key tips for building a portfolio, hosting mini sessions, choos
Read More
Beginner's Guide to Boudoir Photography
Are you ready to start your journey into boudoir photography?  This beginner's guide covers everything you need to know
Read More
Pretty Presets for Lightroom author Amanda Glisson

Amanda Glisson

I'm a momma of four who, like a lot of other moms, found my love of photography through photographing my own beautiful children. Since first picking up a camera over 9 years ago and having professionally photographed all sorts of subjects and venues, I have come to learn that I am most passionate in newborn and child photography and I am lucky enough to be able to specialize in this area!

October 11, 2021

Comments

INFO & SUPPORT
  • Lightroom FAQ
  • Photoshop FAQ
  • Contact Us
  • Order Lookup
  • Log Into Account
Sign up for great freebies and tutorials

Get notified about promotions, giveaways and webinars before they happen!

Join the pretty Community

Come join the #1 Lightroom & Photoshop Facebook Group to help you learn how to edit your photos more confidently today!


  • About Us
  • Testimonials
  • Policies
  • Terms of Service
  • Write for Pretty
  • Lightroom Scholarship
  • Photoshop Scholarship

© 2025 Pretty Presets for Lightroom | support@prettypresets.com (406) 298-3006

  •  
  •  
  •  
One or more of the items in your cart is a recurring or deferred purchase. By continuing, I agree to the cancellation policy and authorize you to charge my payment method at the prices, frequency and dates listed on this page until my order is fulfilled or I cancel, if permitted.