- Lightroom Presets
- Mobile Presets
-
Photoshop
-
Learn
-
Support
-
Install
- Best Sellers
- Blog
In this tutorial, I'm going to show you how to add a beautiful sky overlay behind a window using Photoshop with just a few easy steps!
As photographers, we usually shoot our images either indoors or outdoors. But sometimes, an indoor photo can really be brought to life by amping up the outdoor scene. A sky overlay is the perfect way to do this. And its a very simple process that can really change the dynamic and depth of your image.

Whether your outdoor scene is blown out (I purposely blew the sky out a little more in this image just for this demonstration), or maybe the background behind the window is full of distractions and things you do not want in the image. Either way, this simple technique can really take your indoor images from blah to beautiful!
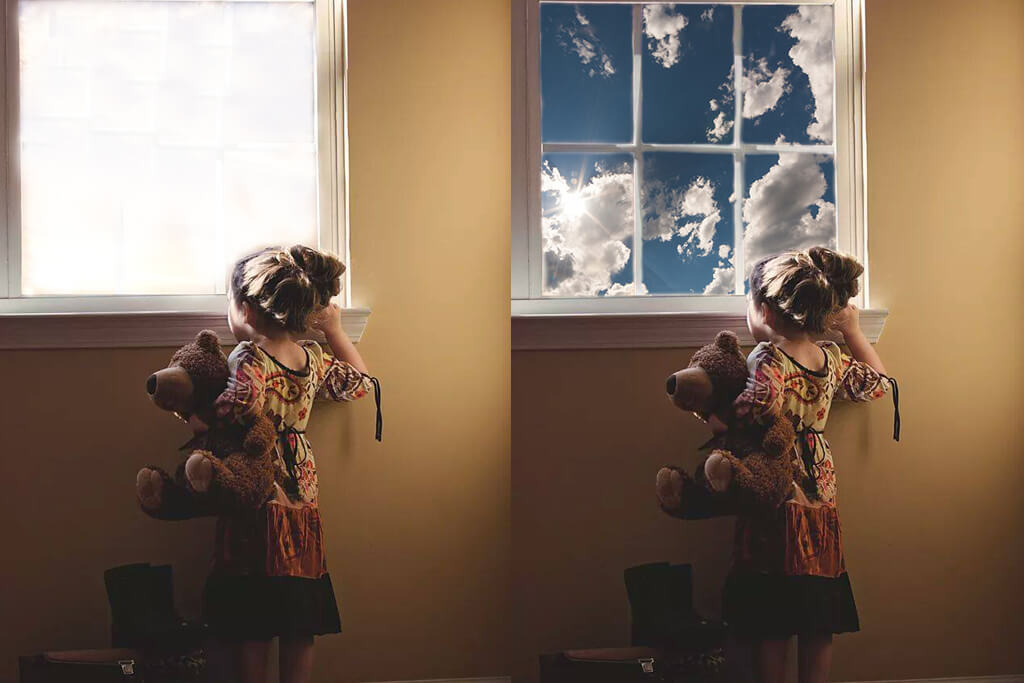
This is an image I took of my daughter standing in front of our kitchen window. I wanted to give it the feel of her gazing outside daydreaming of all of the wonderful places she could travel. Hence why her suitcase is sitting on the floor beside her.

Now, let's take this image and completely change it by replacing the current sky with a cloud overlay from Pretty Actions.
For this photo, I selected sky overlay number 24 from the Vivid Skies Cloud Overlay Collection. I felt this overlay matched well with the lighting and highlights on my daughters face. This will ensure that the details will match throughout the image, both inside and outside, which is important when doing any type of Photoshop compositing work.
To begin, open the image up in Photoshop. I'm using CS6, but other versions should be similar. Now we need to pull the sky overlay in the image to work with. To find the overlay and place over our image, Go to File<Place, as shown below.

Once you do this, you will receive a pop up of your file folders for you to locate the sky overlay. Navigate to the folder you saved your overlays too, select the overlay you want, and hit “Place”.

Now you can move, stretch, and rotate the cloud overlay to get it where you want it placed. Using my cursor, I am going to drag the image up to the area where my window is, positioning it so that I get parts of the setting sun showing, as this will match the highlights on my daughter's hair and face well.
Keep in mind this layer is on top, so there is going to be more sky showing than we will need.

Now, making sure we are still working in the overlay layer in the layers panel, we are going to get rid of parts of the sky we don't want. We want it to appear behind the window only. The easiest way I have found to do this, that works best for me, is to start by creating a layer mask inside the layer.

Remember that a white layer masks “reveals”, showing the sky overlay. We need to invert the layer mask to turn it black so the overlay will be “concealed” or hidden. That way we can go back in and paint it exactly where we want it. To invert the layer mask, hit Ctrl+I on your keyboard. This will turn your layer mask black, and you will no longer be able to see the sky overlay in the image.

You will need to select a soft brush, and since we are working on a black layer mask, make sure the foreground color is set to white. Make sure your brush is set to 100% opacity. I like to keep my flow set at 100% as well when working with tedious areas around the window frame.

Now you can begin painting in the sky in the window, working carefully and diligently around the edges. Zooming in a good bit will make this process much easier.
If you get some of the sky on the window frame, or your subject, simply switch your brush to black to erase it. Below you can see where I've painted in the sky in half of the area desired, just so you can see the difference.

Once you have the sky painted in how you like, simply flatten the image. Voila, you now have a completely different image just by adding a sky overlay.
Below is the completed image. I will go back in and play with the shadows on the window seal in order to tone them down and even them out. But as you can see, this overlay adds a lot of depth to the image!

Here are a few more examples of images I have created using this technique.


The last image is the same as the one used in this demonstration, only I've kept the entire window frame in the image, and also added a different cloud overlay from the Vivid Skies Collection just to demonstrate the difference in feeling you can achieve by changing out your overlay.

Do you have any questions or comments about Replacing a Sky Behind a Window in Photoshop? Leave us a comment below - we would LOVE to hear from you! And PLEASE SHARE our tutorial using the social sharing buttons (we really appreciate it)!


Comments