- Lightroom Presets
- Mobile Presets
-
Photoshop
-
Learn
-
Support
-
Install
- Best Sellers
- Blog

As an avid photographer, I've always been captivated by the boundless potential of digital artistry, particularly in the seamless fusion of text with visual elements.
In this comprehensive tutorial, we will delve into the fascinating world of text-face portraits using Adobe Photoshop. This unique art form blends typography with photography, allowing us to express emotions, tell stories, and convey messages in a strikingly innovative way.
As we explore the powerful tools of Photoshop, you will learn step-by-step how to craft a visually stunning typographic portrait. We will cover essential techniques such as manipulating text, utilizing layer blending modes, enhancing lighting and contrast, and experimenting with various fonts and sizes.
Whether you're a seasoned Photoshop expert or a curious beginner, this tutorial is designed to be accessible and engaging for all skill levels! So, gather your creative spirit, charge your imagination, and let's go!

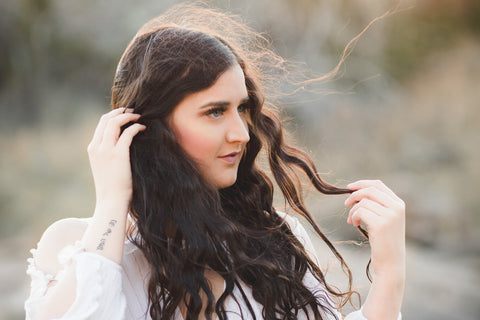
Sometimes, the most frustrating part of this process can be finding a good image to work with. For example, if an image is not well-lit or lacks contrast, the text-face effect loses some of its punch.
When choosing an image for your own text-face portrait, here are some important things to consider:
This is the image I will be using for my edit:

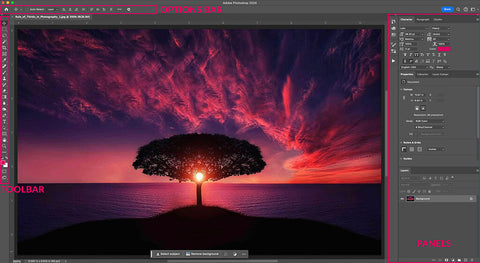
Now that you have your image picked out, it’s time to open it up in Photoshop. Simply right-click your image, choose the "Open with" option, and select Adobe Photoshop.

We are going to need a layer mask of the subject, so the first thing to do is select the subject.
There are several ways that this can be done; you can use the quick selection tool or magnetic lasso tool, so choose the selection tool you are most comfortable with. I think the easiest way is to click the "Select" menu option and then choose "Subject" from the dropdown menu.

Now, you should have a selection of the subject, but depending on the method you used, your selection may need improvement. So go ahead and use the quick selection tool to add or remove any missed areas to get a clean outline.

After you have a good selection of your subject, go to the "Select" menu option again and choose "Select and Mask" from the dropdown menu.

Under the edge detection heading, check the box for Smart Radius and change the Radius to 1px. The cursor should be a brush tool, and you can adjust the brush tool size using the toolbar in the top left corner.
Drag your brush over areas that need a softer and more refined edge, such as areas with hair. You can skip this step if the subject in your chosen image does not have soft or feathery edges.

In order to prevent the background color from leaking into the outline of the subject, select Decontaminate Colors, drag the Amount to 100%, and change Output To "New Layer."
Now, you should have a new layer of your subject without a background.

Create a new layer below the subject layer. Make sure the background and foreground colors are black and white, respectively. Then, press the Alt+Delete keys simultaneously to fill the new layer with black.
Select the subject layer and add a black and white adjustment layer by selecting the half-white circle in the bottom right corner.

To make a selection of the subject's shape, hold the CTRL key and select the subject layer. Then, go to the "Select" menu option and choose "Save Selection" from the dropdown menu. Don't worry about naming it; just click OK.
Now, you should see the selection saved in the Channels Panel. Then press CTRL+D to deselect the subject.

Next, we want to create a copy of our visible image to use as a displacement map that will make the text look like it is wrapping around the contours of the face.
To do that, click the subject layer and select the icon that looks like three horizontal lines in the top right corner of the layers. Click "Duplicate Layer" to open a small menu. Once it opens, change the document to "New" and name the layer "Displacement."

After duplicating the layer, a new window of the subject will open. Press "CTRL+Shift+U" simultaneously to remove the color from the image.
Next, go to the "Filter" menu option, hover your cursor over "Blur," and select "Gaussian Blur."
Blurring a displacement map before applying it to an image will help smooth out noise, minimize blocky effects, increase realism, and enhance integration. I chose 8.0 pixels, but depending on the size and resolution of the image you selected, the radius of your blur might be different.

Save the displacement map to your desktop as a .psd file by clicking the "File" menu option and selecting "Save As" from the dropdown menu so we can use it later. I named my file "Displacement" so it can be recognized quickly.
Now it's time for some FUN! Scour the internet for cool word clouds that correspond with the message you are trying to convey or the emotions demonstrated in your image.
You can also customize or create your own word cloud using words that are meaningful or important to you! For example, I made a word cloud using https://wordart.com/ and incorporated lyrics from Bob Dylan’s "The Times They Are A-Changin."
If you create your own word cloud, MAKE SURE you use white text on a black background. The effect will also work better if you choose a font where the letters are slightly more condensed - this will make it easier to notice the contours of the subject’s face later when we displace the text.
Here is the word cloud I created for this tutorial:

Now that you have your word cloud picked out, it’s time to open it up in Photoshop. Simply right-click your image, choose the "Open With" option, and select Adobe Photoshop. This will open a new tab in Photoshop of your word cloud in addition to the document you are already working on in Photoshop.
Open the Channels Panel by going to Windows>Channels and press CTRL+Click the RGB thumbnail. This will make a selection of the white text. Create a copy of this text on its own layer by pressing CTRL+J.

Select the Move Tool from the toolbar and drag the text into the tab with your subject. This should add a text layer to your subject’s layers.
Then, press CTRL+T to open the Transform Tool and use it to increase or decrease the size of your word cloud. For my image, I increased it just enough to create a mask over my subject’s eyes.
I want to emphasize the text, so I'm going to add a drop shadow. To do this, open the layer style window for the text layer by double-clicking on this text layer in the layers panel. Make sure the Drop Shadow option box is ticked, and for structure, change the Blend Mode to "Normal," adjust the Opacity to 60%, Distance to 5 pixels, Spread to 0 pixels, Size to 5 pixels, and ensure the Contour is set to "Linear."

Next, we want to cover the ENTIRE IMAGE with text. Press CTRL+J to make a copy of the text layer. You can also rotate the layer to your liking using the transform tool by pressing CTRL+T. Continue making copies of the text layer until the entire image is covered.
To clean up the Layers Panel, select all of the text layers and press CTRL+G to group all of the text layers into one folder.

At this point, you may notice some gaps between the text; these must be filled in for full effect.
Start by pressing CTRL+J to make a copy of the text group. Then press CTRL+T to open the transform tool and rotate the copy of the text group by 90 degrees.
Now, we need to merge the two text groups into a single layer so we can make a mask of it later. To do this, select both of the text groups and press CTRL+E.

If we stop here, the text will not align with the displacement map because some of it extends past the visible image; it must be cropped to fit.
To do this, press CTRL+A to select the boundaries of the document automatically. Then, under the Image dropdown, select "Crop." Finally, press CTRL+D to deselect the text.

Now, it's time to displace, which is the technique used to apply the text layer to the contours and features of our underlying image. This process makes the text conform to the shape and texture of the subject in the photo, creating a more realistic and integrated appearance.
In order to displace non-destructively, the text layer must be turned into a smart object. To do this, click on the three horizontal lines icon in the top right corner of the Layers Panel and select "Convert to Smart Object."

To do this, click the "Filter" menu option, hover over "Distort" from the dropdown menu, and then choose the "Displace" option from the sub-menu.

Depending on the size and resolution of the image you are editing, the horizontal and vertical scales of the displacement may need to be adjusted. For my image, I will be displacing horizontally and vertically by 20 pixels.
Ensure that the "Stretch-to-Fit" and "Repeat Edge Pixels" options are selected and click "Okay." A new tab will open asking you to choose a displacement map; select the "Displacement" .psd file we saved on our desktop earlier.

Now, we need to make a layer mask of the text on the subject layer.
Start by holding the CTRL key and clicking on the text layer, which will make a selection of the text. Then, select the subject layer and click on the layer mask icon in the bottom right corner. This will create a layer mask next to the subject. For now, keep the text layer hidden.

Drag the text group layer to the top of the layers. Then, select the black and white adjustment layer, the subject layer, and the black fill layer and convert them into a single smart object.


Next, make a copy of the text layer by pressing CTRL+J. Drag the copy below the subject layer and make it visible. At this point, the subject layer should be sandwiched between two text layers.

Select the subject Layer and change the Blend Mode to "Linear Burn."

Select the top text layer and make it visible. Change the Opacity to 15% so that some text is also visible in the background. However, this presents a problem as the text layer has now glossed over the entire image, adding a grayness that reduces the shadows and contours.
To fix this, we need to remove the parts of the top text layer that go over the subject’s face.

Start by selecting the subject layer and going to the Channels. To make a selection of the subject, hold down the CTRL key and click the selection of the subject's shape that we saved earlier.
Finally, return to the Layers Panel and ensure the top text layer is active. Then, select the layer mask icon while pressing the Alt key to make an inverted layer mask of the head shape on the text.


Congratulations! Our text-based portrait is now complete!
By combining typography skills, image manipulation, and creative design, you can produce stunning and unique text-based portraits that will capture a viewer's attention and make a striking impression.
Don't be discouraged if your typographic portrait doesn't look perfect the first time! Keep trying and remember that mastering text-based art in Photoshop requires practice and experimentation. Try using different fonts, colors, and layouts to find the perfect combination that matches your artistic vision!

Do you have any questions or comments about How to Create a Typography Portrait in Photoshop? Leave us a comment below - we would love to hear from you! And PLEASE SHARE our tutorial using the social sharing buttons (we really appreciate it!)


Comments