MOTHER'S DAY SALE! UP TO 35% OFF - DISCOUNT APPLIES IN CART.

  • Log in
  • Cart (0)
  • Checkout
Pretty Presets and Pretty Photoshop Actions
  • Lightroom Presets
  • Mobile Presets
  • Photoshop 
    • Photoshop Actions
    • Photoshop Overlays
    • Limited Edition Holiday Collections
  • Learn 
    • Free Lightroom Training
    • Free Photoshop Training
    • Lightroom 101 Workshop
    • Photoshop 101 Workshop
    • Your Pretty Edits
  • Support 
    • About Us
    • Contact Us
    • Order Lookup
    • Lightroom FAQ
    • Photoshop FAQ
  • Install 
    • How to Install Lightroom Presets
    • How to Install Lightroom Brushes
    • How to Install Presets in the Free Lightroom Mobile App
    • How to Sync Lightroom Presets from CC to Mobile
    • How to Install Photoshop Actions
    • How to Install Photoshop Overlays
  • Best Sellers
  • Blog

Use Lightroom Lens Correction (To Enhance Photos in 1 Click!)

By Cat Granger on January 28, 2019 | No Comments

Lightroom Lens Correction

How to Use Lightroom Lens Correction

(To Enhance Photos in 1 Click)

There is one little setting that is so very often overlooked in Lightroom and it's a setting that can make editing quicker and easier.

It is so simple to use, yet has made such a big impact on my final images.  So, what is this magic button that will make everything brighter and corrects lens distortion?

It is the “Enable Profile Corrections” button located in the Lens correction section of the Develop module.

Lightroom & Photoshop Facebook Group

1. Use Lens Correction to Brighten Images

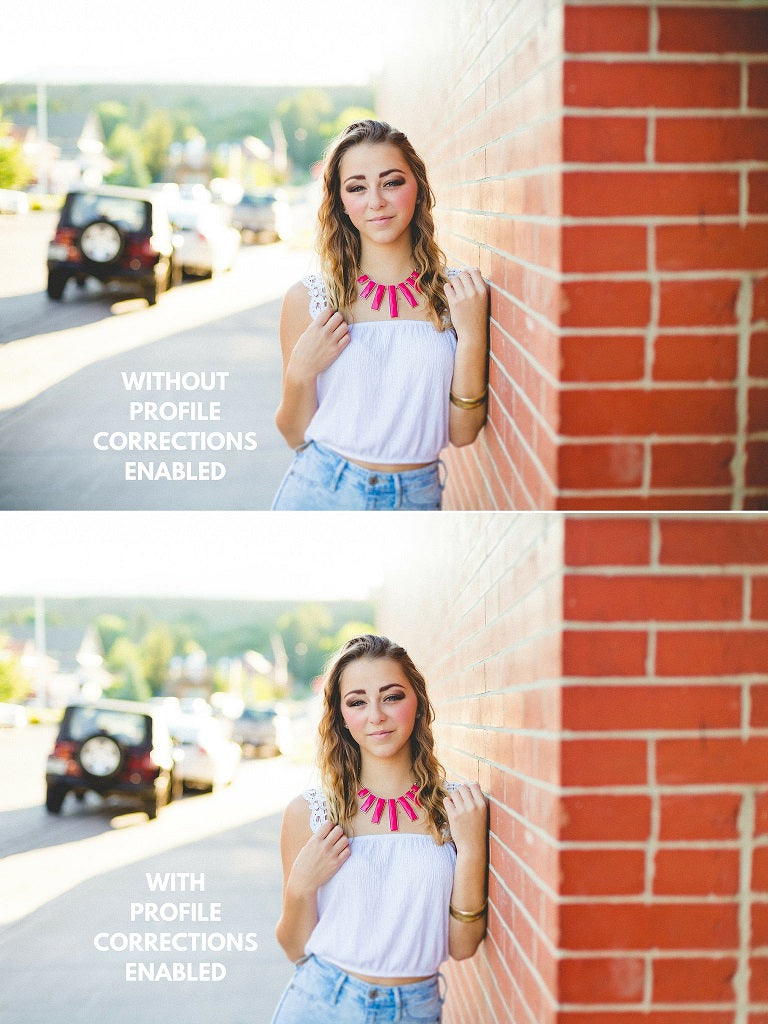
The ONLY difference between the two photos you see below is the enable lens profile corrections button, I promise!  See how much brighter the second image is and how the whites look whiter not gray?

Lightroom Lens Profiles

2. Use Lens Correction to Fix Lens Distortion

Some camera lenses will do weird things to an image.  For example, wide angles can make people or buildings lean towards the center of an image.  Or, it can stretch subjects wider who are on near the edge of the frame.  Some lenses, like my Nikon 60mm f2.8 macro, will put a vignette on the image.

A vignette is an effect that will darken the edges of an image.  Sometimes photographers will add a vignette in post processing for a more dramatic look and to put more focus on the subject, however a lens vignette can be way too overpowering and greatly darken the overall image.

When you enable lens profile corrections, Lightroom will make adjustments and correct for any distortion or vignetting that is created by your particular lens.  Keep in mind, Adobe Lightroom has a profile for most major lenses.  However, not ALL lenses have a profile (one of my older lenses didn't have a profile until just recently).

If you like bright images you may not like the look of a vignette.  Look at the image below and see what happens to the dark corners that were caused by a lens vignette before and after I enable profile corrections.

The difference is small, but using the enable profile corrections button will be extra helpful at keeping the background exactly how you saw it through the camera.

How to Correct Lens Distortion in Lightroom

How to Enable Lens Corrections on an Image

Applying Lens Profile Corrections to your image in Lightroom is easy!

Just navigate to the Develop Module and find the Lens Corrections Panel on the right side.  Check the box "Enable Profile Corrections".  You will see an immediate change in the image and the lens information will appear below the checked box in the panel.

Adobe Lightroom Lens Profiles

How to Apply Lens Profile Corrections on Many Images at Once

If you love the look of your images after applying lens profile correction, you can set it as an import preset, so all of your images will import with the changes already applied to it!

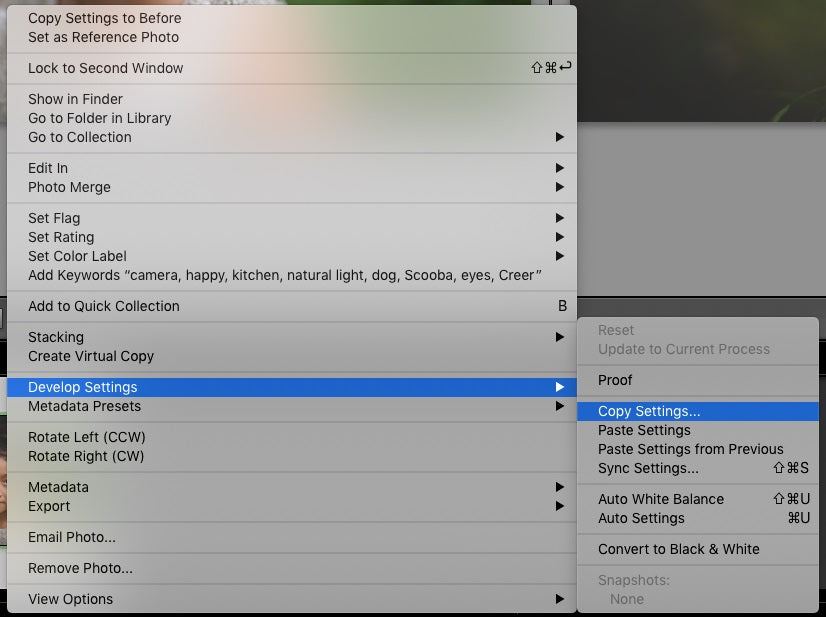
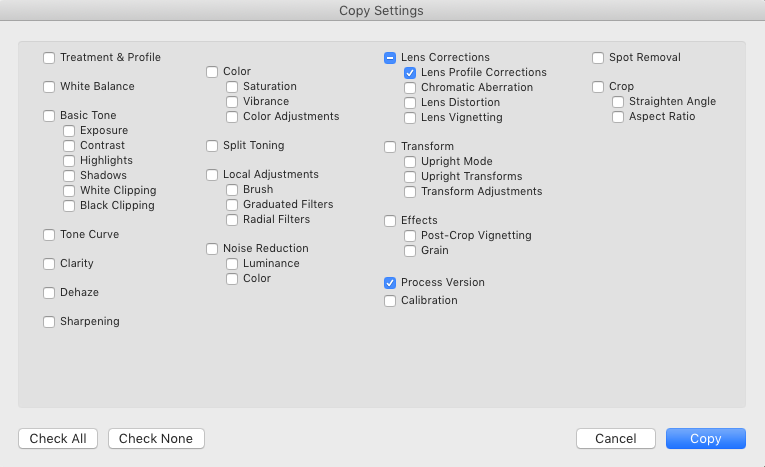
If you don’t want to set up an import preset, you can implement the lens profile correction to multiple images manually, here’s how:

  • Once you have an image with the lens profile correction applied that you are happy with and want to apply it to more, select that image and right click on it (with your mouse).

Lightroom Profile Correction

  • Then select the Develop Settings > Copy Settings as shown below.  Make sure at least the Lens Correction AND the Process version are checked.  (If you click on any other boxes, you will also copy any of the settings you just selected from the current image to all the images you will be selecting).

Lightroom Lens Correction

  • Now that you have selected all of the changes you want to copy, you will need to select all of the pictures you want to apply the changes to.  You can select images by clicking on it.  If you want to select multiple images, highlight the beginning image and then SHIFT+click on the last image you wish to select. 
  • Then, click CTRL+V or with your mouse right click > Develop Settings > Paste Settings.  Lightroom will now copy and apply all of those changes to the images you just selected.
  • Additional Tip: To deselect images, just click on the gray area around any image on the filmstrip.

Do you have any questions or comments about Enabling Profile Corrections on your Images?  Leave us a comment below - we would LOVE to hear from you!  And PLEASE SHARE this post using the social sharing buttons (we really appreciate it)!

Lightroom Presets

Related Articles

Pretty Presets & Actions 2024 Photoshop Scholarship Winner
Pretty Presets & Actions congratulates our 2024 Photoshop Scholarship Winner!  See who won and find out how to apply
Read More
How to Start a Boudoir Photography Business
Ready to start your boudoir photography business?  Learn key tips for building a portfolio, hosting mini sessions, choos
Read More
Beginner's Guide to Boudoir Photography
Are you ready to start your journey into boudoir photography?  This beginner's guide covers everything you need to know
Read More
Pretty Presets for Lightroom author Cat Granger

Cat Granger

I am a wedding and portrait photographer based in Valdosta, Georgia where I live with my sweet husband and our crazy rescue pup. I am a perpetual traveler, champagne-loving red lipstick-wearer who loves to capture true emotion and tell stories through images. Website | Facebook

January 28, 2019

Comments

INFO & SUPPORT
  • Lightroom FAQ
  • Photoshop FAQ
  • Contact Us
  • Order Lookup
  • Log Into Account
Sign up for great freebies and tutorials

Get notified about promotions, giveaways and webinars before they happen!

Join the pretty Community

Come join the #1 Lightroom & Photoshop Facebook Group to help you learn how to edit your photos more confidently today!


  • About Us
  • Testimonials
  • Policies
  • Terms of Service
  • Write for Pretty
  • Lightroom Scholarship
  • Photoshop Scholarship

© 2025 Pretty Presets for Lightroom | support@prettypresets.com (406) 298-3006

  •  
  •  
  •  
One or more of the items in your cart is a recurring or deferred purchase. By continuing, I agree to the cancellation policy and authorize you to charge my payment method at the prices, frequency and dates listed on this page until my order is fulfilled or I cancel, if permitted.