MOTHER'S DAY SALE! UP TO 35% OFF - DISCOUNT APPLIES IN CART.

  • Log in
  • Cart (0)
  • Checkout
Pretty Presets and Pretty Photoshop Actions
  • Lightroom Presets
  • Mobile Presets
  • Photoshop 
    • Photoshop Actions
    • Photoshop Overlays
    • Limited Edition Holiday Collections
  • Learn 
    • Free Lightroom Training
    • Free Photoshop Training
    • Lightroom 101 Workshop
    • Photoshop 101 Workshop
    • Your Pretty Edits
  • Support 
    • About Us
    • Contact Us
    • Order Lookup
    • Lightroom FAQ
    • Photoshop FAQ
  • Install 
    • How to Install Lightroom Presets
    • How to Install Lightroom Brushes
    • How to Install Presets in the Free Lightroom Mobile App
    • How to Sync Lightroom Presets from CC to Mobile
    • How to Install Photoshop Actions
    • How to Install Photoshop Overlays
  • Best Sellers
  • Blog

5 Easy Ways to Add Contrast in Lightroom

By Gayle Vehar on November 21, 2018 | No Comments

Contrast in Lightroom

How to Add Contrast in Lightroom

If you shoot  in "RAW," meaning you use the RAW file format instead of JPEG, then your images probably come out of your camera looking a little "blah."  Raw files are naturally void of contrast, extra color, sharpening, or noise reduction - all things that are added to JPEG files in camera.  So, that means you need to do all those things to your images in post processing.  Today I am going to focus on how to add contrast in Lightroom.

Lightroom & Photoshop Facebook Group

There are 5 ways to add contrast in Lightroom.  The first four options will add contrast globally - meaning to add contrast to the ENTIRE image.  The fifth way to add contrast is done "locally" and will add contrast only to the areas that you specify.

You can use one method, or a combination of two or more methods.  Just be careful not to add too much contrast; it's a fine balance.

1. Contrast Slider:

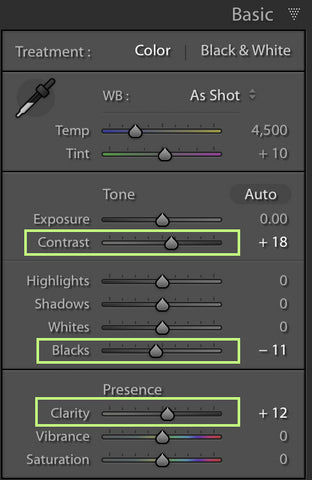
Definitely the most basic and obvious way to adjust your contrast.  Move the Contrast slider in the basic panel to the right until you like what you see.

Contrast Photography

2. Blacks Slider:

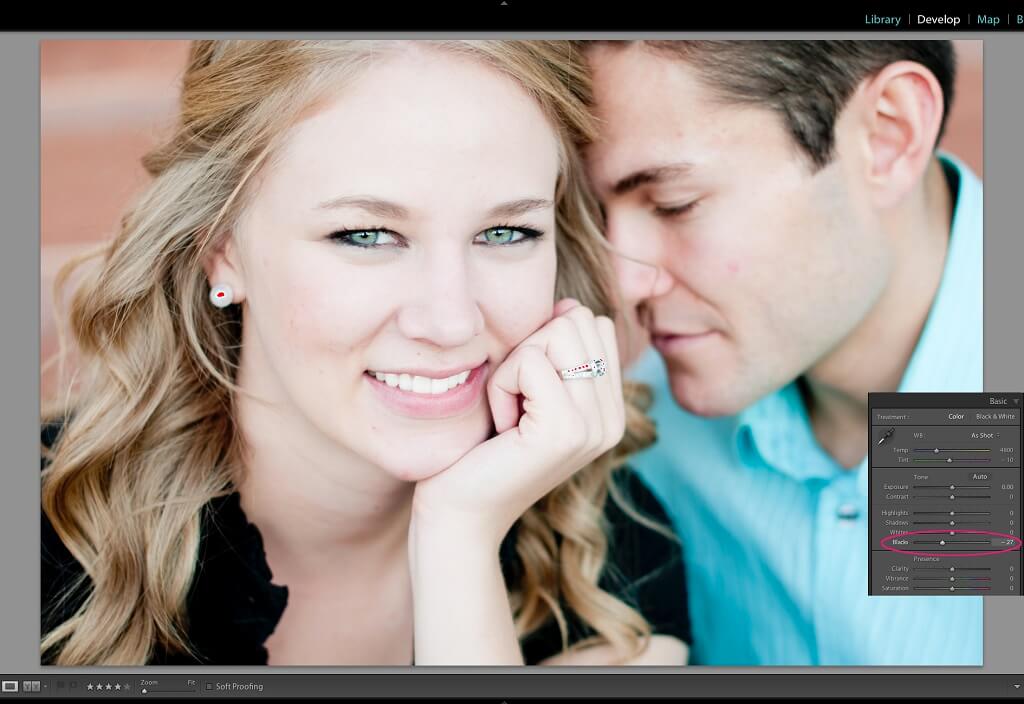
This is the most basic way that I adjust my contrast.  Decreasing my blacks slider to - 20ish is an easy way to add just a bit of contrast to your image.  Some photos require more.  Some need very little at all.  I find that this Lightroom contrast setting works best with photos that are already well exposed.

How to Add Contrast to Photos

3. Clarity Slider:

This slider also adds contrast.  Just move the slider to the right to add a bit of contrast.  I am not a big fan of using this to add contrast, but because it does have this effect, I'm adding it to the list. 

The reason I do not like using the Clarity slider to add contrast is that it is more of an "edge definer".  If you have a subject, like a baby, child, woman, etc. and increase the clarity slider, you will accentuate any edges on their skin, which may not be a good thing.

How to Add Contrast in Lightroom

4. Tone Curve Panel:

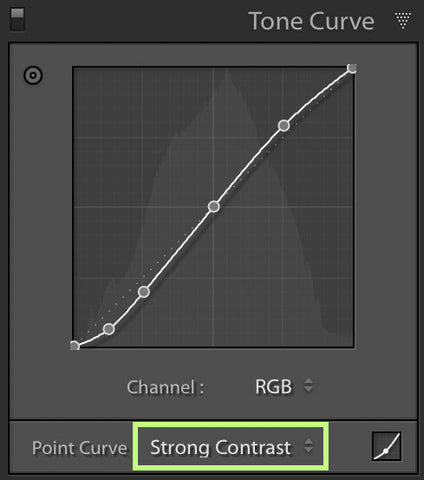
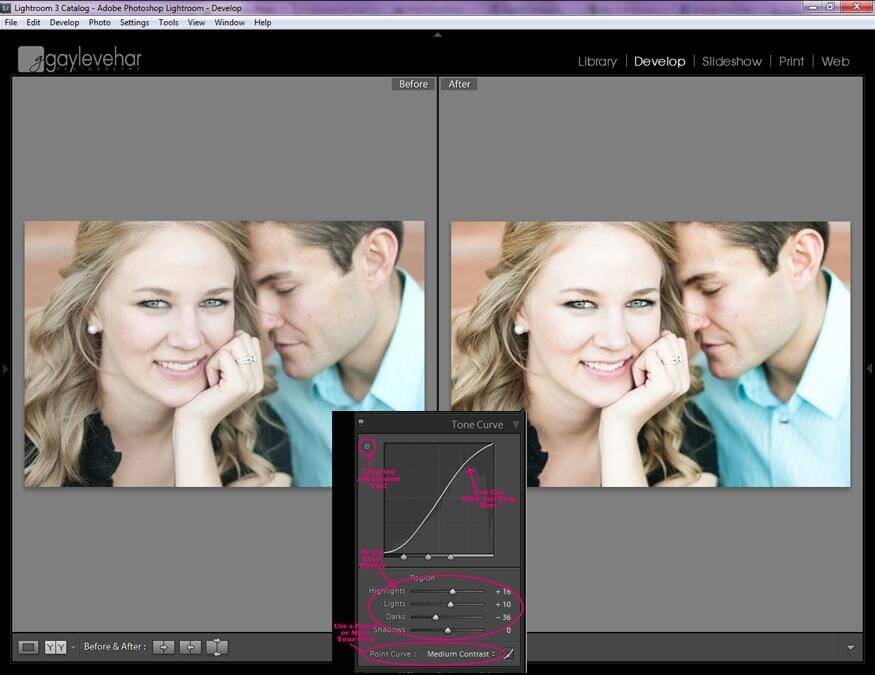
Tone Curves are probably the most powerful way to adjust the contrast.  It is also the best tool to use if you aren't getting the results that you want from the first two options.  To add quick contrast using the Lightroom tone curve panel, choose between 'medium' and 'strong' point curves, or create a curve yourself to add the perfect amount of contrast for your image.

Add contrast in Lightroom using the Tone Curve panel

Another great "visual way" to add contrast is to use the targeted adjustment tool and place it over the areas/tones you want to lighten and click and drag UP.  You can also place the same tool over the areas/tones that you want to darken and click and drag DOWN.

Add Contrast in Lightroom

5. Local Adjustment Brush

The fifth way to add contrast in Lightroom is done "locally" using the Lightroom adjustment brush.  This will apply contrast to only on the areas that you choose.

The brush menu has the same options as the Basic panel does, so simply utilize one or all of the following adjustment brush sliders:

  • Contrast
  • Blacks
  • Clarity (remember this isn't a great way to add contrast)

Add Contrast in Lightroom to Enhance Your Photos

The radial and graduated filters can also be used to add contrast, but I did not include them in my list because those tools are programmed to fade in/out effects, and contrast is not typically something you want to be faded in or out.  With the brush, you can apply it to wherever you choose, at full effect.

Adding Contrast Using Lightroom Presets from Pretty Presets

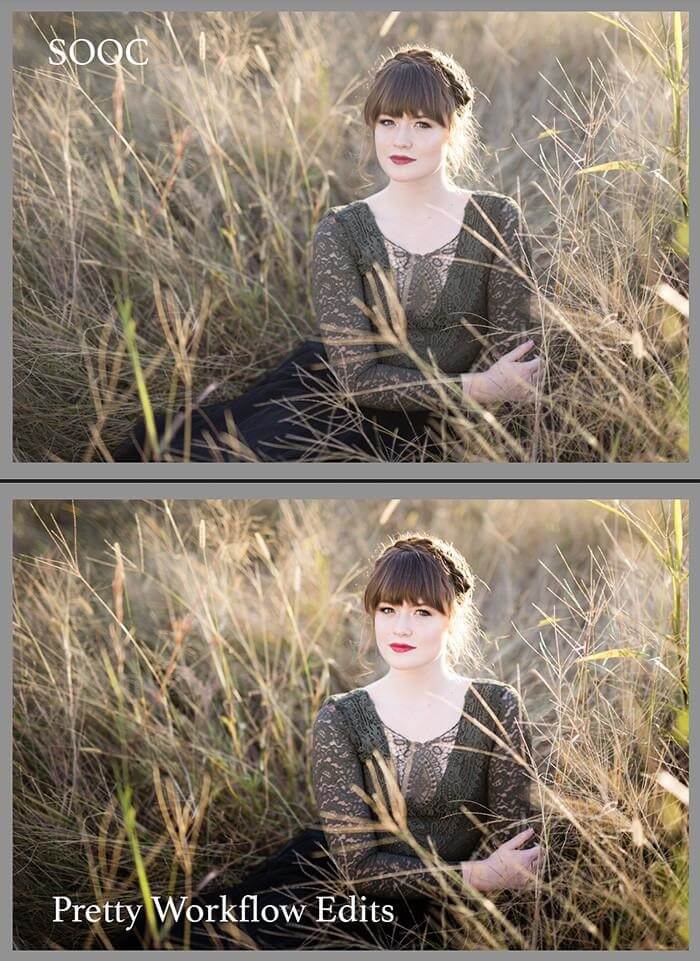
Although adding contrast is fairly fast and easy, Pretty Presets includes options in many collections to help you add beautiful contrast to your image in one click!   This is by far the quickest and easiest way to add contrast!

The Clean Edit Portrait Workflow has several options in the "Base" and "Curve" sections that will add varying degrees of contrast to your image.  In addition, the Toolkit that is included with the Clean Edit Portrait Workflow has even more options for adding Contrast.  This holds true of the Pretty Film Toolkit included with any the Film Preset Collections and Bella Baby Workflow Collection as well. 

Contrast Lightroom Presets

Do you have any questions or comments about How Contrast to your Image in Lightroom?  Leave us a comment below - we would LOVE to hear from you!  And PLEASE SHARE this post using the social sharing buttons (we really appreciate it)!

Lightroom Presets

Related Articles

How to Start a Boudoir Photography Business
Ready to start your boudoir photography business?  Learn key tips for building a portfolio, hosting mini sessions, choos
Read More
Beginner's Guide to Boudoir Photography
Are you ready to start your journey into boudoir photography?  This beginner's guide covers everything you need to know
Read More
Beginner's Guide to Smoke Bomb Photography
Discover the art of smoke bomb photography with our comprehensive guide!  Learn about smoke bomb photoshoots, essential
Read More
Pretty Presets for Lightroom author Gayle Vehar

Gayle Vehar

Lightroom Instructor

Hi!! I am Gayle. I am a wife to my handsome husband and mom to 4 beautiful kids. In my spare time, I am a photographer and blogger at Mom and Camera. I have a passion for sharing my love of photography with others. I teach local photography classes and regularly share photography tips and tricks on my blog. I hang out there a lot—I’d love you to stop by and visit!

November 21, 2018

Comments

INFO & SUPPORT
  • Lightroom FAQ
  • Photoshop FAQ
  • Contact Us
  • Order Lookup
  • Log Into Account
Sign up for great freebies and tutorials

Get notified about promotions, giveaways and webinars before they happen!

Join the pretty Community

Come join the #1 Lightroom & Photoshop Facebook Group to help you learn how to edit your photos more confidently today!


  • About Us
  • Testimonials
  • Policies
  • Terms of Service
  • Write for Pretty
  • Lightroom Scholarship
  • Photoshop Scholarship

© 2025 Pretty Presets for Lightroom | support@prettypresets.com (406) 298-3006

  •  
  •  
  •  
One or more of the items in your cart is a recurring or deferred purchase. By continuing, I agree to the cancellation policy and authorize you to charge my payment method at the prices, frequency and dates listed on this page until my order is fulfilled or I cancel, if permitted.