MOTHER'S DAY SALE! UP TO 35% OFF - DISCOUNT APPLIES IN CART.

  • Log in
  • Cart (0)
  • Checkout
Pretty Presets and Pretty Photoshop Actions
  • Lightroom Presets
  • Mobile Presets
  • Photoshop 
    • Photoshop Actions
    • Photoshop Overlays
    • Limited Edition Holiday Collections
  • Learn 
    • Free Lightroom Training
    • Free Photoshop Training
    • Lightroom 101 Workshop
    • Photoshop 101 Workshop
    • Your Pretty Edits
  • Support 
    • About Us
    • Contact Us
    • Order Lookup
    • Lightroom FAQ
    • Photoshop FAQ
  • Install 
    • How to Install Lightroom Presets
    • How to Install Lightroom Brushes
    • How to Install Presets in the Free Lightroom Mobile App
    • How to Sync Lightroom Presets from CC to Mobile
    • How to Install Photoshop Actions
    • How to Install Photoshop Overlays
  • Best Sellers
  • Blog

Using the Radial Filter in Lightroom

By Gayle Vehar on December 10, 2019 | No Comments

radial filter lightroom

7 Tips for Using the Radial Gradient (Filter) Tool

Most of the edits that you will make in Lightroom's Develop Module in the Basic Panel and other panels will apply adjustments to the full photo.  However, a Radial Gradient gives you the ability to target an adjustment to a specific area!

This is super helpful when editing in Lightroom since there are many times that we need to be able to apply an edit to one specific area and leave the rest alone!

NOTE: In a recent Lightroom update, the Radial Filter was significantly enhanced and is now called the Radial Gradient Tool.  This tool is now found under the Masking icon in the toolbar (on the right side of the Develop Module between the Basic Panel and the Histogram).

Lightroom & Photoshop Facebook Group

1. Why Choose a Radial Gradient

The Lightroom Radial Gradient is a circular adjustment tool that allows you to make adjustments to a part of your image.  Some of these adjustments include exposure, clarity, and saturation using an elliptical mask.  This is the perfect tool for creating a vignette effect on your image or adding light to your subject or a particular area of your photo.

Radial Filter Lightroom Shortcut

2. Where to Find the Radial Gradient Tool

The Radial Gradient Tool is located in the Masking Panel, along with all the other tools that will allow you to adjust a particular area of your image. You can access the Masking Panel inside the Develop Module.  Navigate to Lightroom's toolbar on the right-hand side of the screen just below the Histogram Panel and click on the dotted circle icon on the right-most side of the toolbar.

You can also open the Radial Gradient Tool using the keyboard shortcut "Shift+M."

Where is Radial Filter in Lightroom

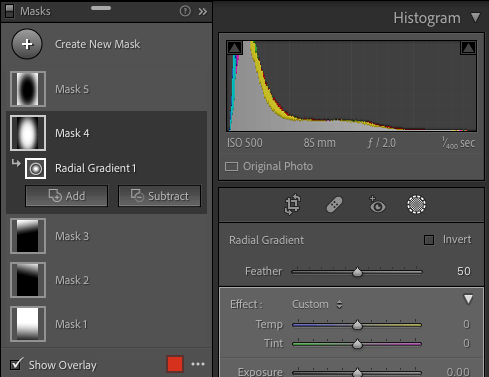
If you already have brushes, gradients, or other masks added to your image, this will open the panel where all your masks are stored.

Lightroom Radial Gradient

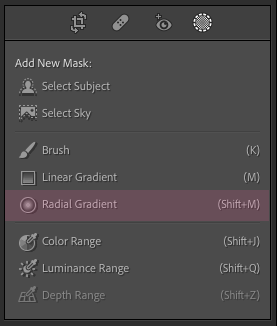
If this is the first masking tool that has been applied to your image, you will see the options listed directly below the toolbar like this:

Inverse Filter Radial Lightroom

3. How to Apply a Radial Gradient

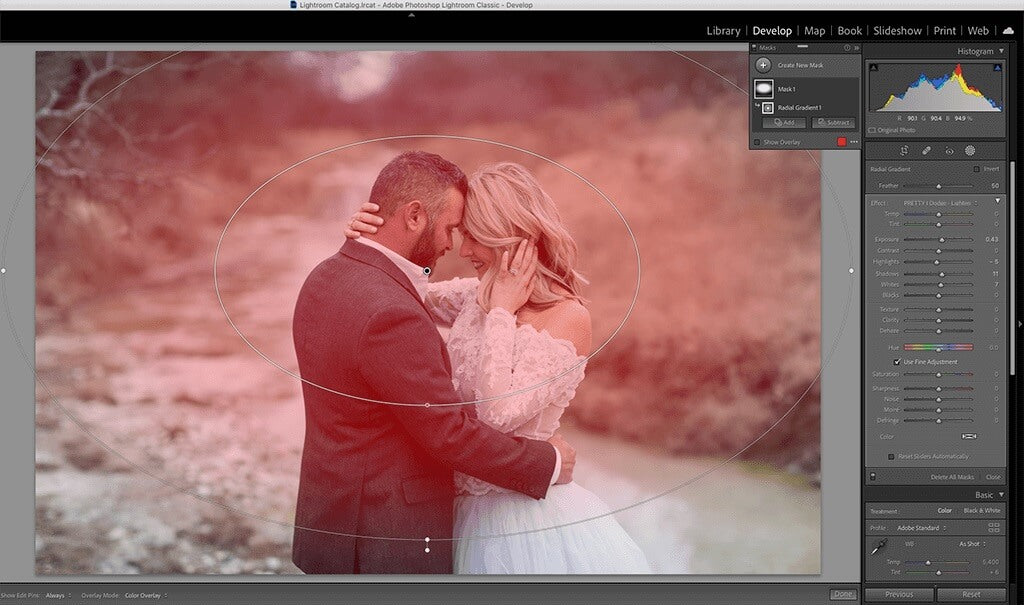
If your image hasn't had any other masks applied, you can apply a radial gradient by clicking on the word "Radial Gradient" and then clicking and dragging a circle shape over a portion of your image. 

Radial Filter Invert

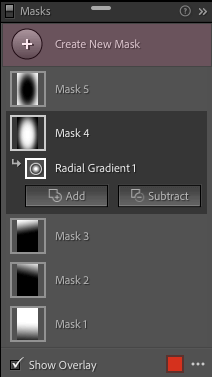
If your image already has other masks applied, click on the "+" next to "Create New Mask."  Some options will open.  Click on Radial Gradient and then click and drag a circle shape over a portion of your image.

Lightroom Radial Filter

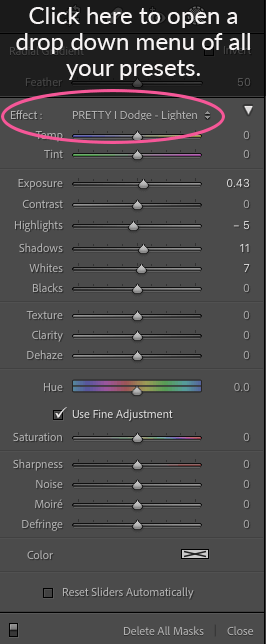
Use the sliders in the mask panel to apply adjustments to the radial gradient you just created.  You can move a single slider or move multiple sliders to combine effects. 

How to Use Radial Filter in Lightroom

4. Access to All Pretty Preset Brush Presets

When using the radial filter, you have access to all the Pretty Preset brushes in your collection.  Any brush presets you have can be applied using any of the mask tools.  This is an excellent feature in Lightroom since it gives you the ultimate flexibility when applying your adjustments.

How to Use Radial Gradient in Lightroom

5. Delete and Move Radial Gradients

You can quickly move or delete Radial Gradients.  Each time you create a mask, a pin will be created.  To delete a pin, make sure the pin is highlighted on your image.  You'll know it is highlighted when a circle with a black dot inside appears.  Then tap the delete key.  EASY!

To move a pin, make sure the pin is highlighted on your image.  Then click and drag the radial gradient where you want it to be.

Radial Gradient Lightroom Mobile

6. Inverting the Mask

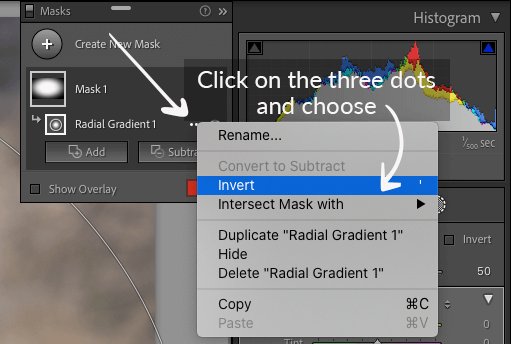
The Radial Gradient tool includes an invert mask option that allows you to decide whether your adjustments are applied outside or inside the circle you create.

By default, the adjustments are applied INSIDE the circle you create.  If you want the adjustments to be applied OUTSIDE the circle, put a check in the Invert Mask checkbox.

To invert a radial gradient, click on the three dots next to the word "Radial Gradient" and choose "Invert" from the open menu options.

How to invert radial filter in Lightroom

7. Adding or Reducing the Effect

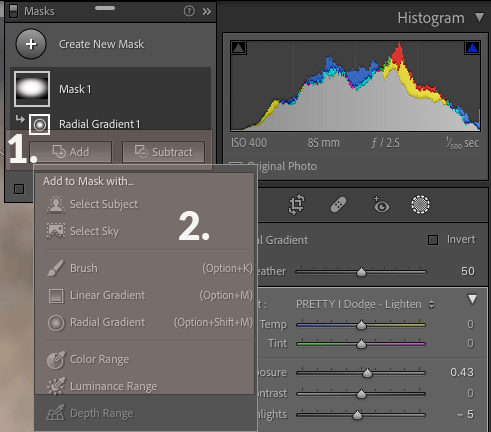
In Lightroom, you have the ability to add or subtract from the Radial Gradient mask you have created.  This will add more of the same effect beyond the constraints of the radial gradient or reduce the effect from areas you choose. 

To do this, make sure you have clicked on the radial gradient you wish to add to or subtract from.  Next, click on the "Add" or "Subtract" button.  Finally, choose how you would like to add or subtract from the mask.  I typically use the "Brush"; however, you can select any of the mask tools to do this.

Radial Filter in Lightroom

I hope this tutorial helps you get the most out of the Radial Gradient Tool in Lightroom!

Do you have any questions or comments about the Lightroom Radial Gradient?  Leave us a comment below - we would LOVE to hear from you!  And PLEASE SHARE this post using the social sharing buttons (we really appreciate it)!

Portrait Lightroom Presets

Related Articles

Social Media for Photographers: Proven Strategies to Attract More Clients
Master social media for photographers and attract more clients.  Discover expert tips on branding, engagement, and conte
Read More
Beginners Guide to Photoshop's Generative Fill Tool
Discover how to use Photoshop's Generative Fill Tool to effortlessly expand and enhance your images.  This step-by-step
Read More
Pretty Presets & Actions 2024 Photoshop Scholarship Winner
Pretty Presets & Actions congratulates our 2024 Photoshop Scholarship Winner!  See who won and find out how to apply
Read More
Pretty Presets for Lightroom author Gayle Vehar

Gayle Vehar

Lightroom Instructor

Hi!! I am Gayle. I am a wife to my handsome husband and mom to 4 beautiful kids. In my spare time, I am a photographer and blogger at Mom and Camera. I have a passion for sharing my love of photography with others. I teach local photography classes and regularly share photography tips and tricks on my blog. I hang out there a lot—I’d love you to stop by and visit!

December 10, 2019

Comments

INFO & SUPPORT
  • Lightroom FAQ
  • Photoshop FAQ
  • Contact Us
  • Order Lookup
  • Log Into Account
Sign up for great freebies and tutorials

Get notified about promotions, giveaways and webinars before they happen!

Join the pretty Community

Come join the #1 Lightroom & Photoshop Facebook Group to help you learn how to edit your photos more confidently today!


  • About Us
  • Testimonials
  • Policies
  • Terms of Service
  • Write for Pretty
  • Lightroom Scholarship
  • Photoshop Scholarship

© 2025 Pretty Presets for Lightroom | support@prettypresets.com (406) 298-3006

  •  
  •  
  •  
One or more of the items in your cart is a recurring or deferred purchase. By continuing, I agree to the cancellation policy and authorize you to charge my payment method at the prices, frequency and dates listed on this page until my order is fulfilled or I cancel, if permitted.