- Lightroom Presets
- Best Sellers
- Mobile Presets
-
Photoshop
-
Learn
-
Support
-
Install
- Blog
By Gayle Vehar on | No Comments

Asking questions is hard enough. But asking questions that you think most everyone else already knows can be even harder. Today, I wanted to answer some of the questions about Lightroom's Brush Tool you may be asking in your head but are too afraid to ask!

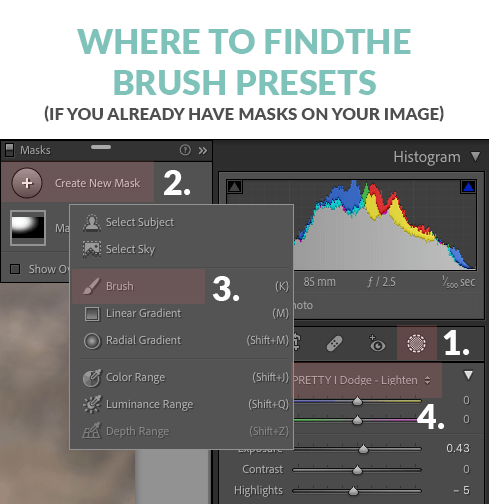
You'll find Lightroom’s Brush Tool located in the Masking Panel which is found on the far-right side of the tool bar. Click the circle with a dotted line around it and then choose "Brush" from the options that open. The brush tool is just one of many ways that you can select specific areas of your image and made adjustments.
Once you choose the Brush Tool, a new box will open with several sliders available for you to use. You make changes to those sliders and brush them on your photo. It really is THAT simple!


Once you have downloaded and installed the Brush Presets you have purchased you will find them over on the right-side panel in Lightroom. First, click on the brush tool. Then click on the words or double-arrow next to the word Effect. A menu will open and you can choose the Brush Preset that you’d like to use.


Almost always when someone thinks that their brushes have stopped working, they really haven’t. They have just accidentally moved some sliders that make you THINK they have stopped working.
At the bottom of the brush panel are two sliders called “Flow” and “Density”. Setting either of these sliders to anything less than 100% will adjust the strength of the brush or limit how much of the brush can actually be brushed on your photo. If you find that your brushes aren’t working any longer, check those two settings and set them back to 100%. I bet they will be magically fixed.

Seeing where you have brushed is as simple as checking the “Show Selected Mask Overlay” box just below your image. You won’t see this option unless you have the Brush Tool selected.
Once you select that box selected, and one of your brush pins selected, you will see a red haze over the areas where you have brushed.
There are a few ways that you can tone down a brush. If you have already brushed it on, then the easiest way is to adjust the sliders in the brush panel to the amount you think looks best.
If you haven’t already brushed on the effect, then the best way to add an effect lightly is to decrease the flow a bit and then brush over the area more times to increase the effect. Think of flow like a spray paint can. The first time you spray over an area with a spray paint nozzle only pressed halfway, the surface won’t likely be completely covered. You would spray over the area a times to cover it completely. In the same way, each time you brush over an area of your photo you are increasing the amount of the effect being applied to that area.

You have two options. You can press ctrl/cmd + z and undo everything you have brushed on and start completely over. If you have brushed a large area, that means a lot more work for you.
The easier option would be to select the erase tool and brush over any areas you hit that you didn’t want to. When using the erase tool, it is nice to have the “Show Selected Mask Overlay” box checked so that you can see the areas you need to erase.


Hi!! I am Gayle. I am a wife to my handsome husband and mom to 4 beautiful kids. In my spare time, I am a photographer and blogger at Mom and Camera. I have a passion for sharing my love of photography with others. I teach local photography classes and regularly share photography tips and tricks on my blog. I hang out there a lot—I’d love you to stop by and visit!

Comments