See our BEST SELLING Pretty Presets here!

  • Log in
  • Cart (0)
  • Checkout
Pretty Presets and Pretty Photoshop Actions
  • Lightroom Presets
  • Mobile Presets
  • Lightroom Brushes
  • Photoshop 
    • Photoshop Actions
    • Photoshop Overlays
    • Limited Edition Holiday Collections
  • Learn 
    • Free Lightroom Training
    • Free Photoshop Training
    • Lightroom 101 Workshop
    • Photoshop 101 Workshop
  • Support 
    • About Us
    • Contact Us
    • Order Lookup
    • Lightroom FAQ
    • Photoshop FAQ
  • Install 
    • How to Install Lightroom Presets
    • How to Install Lightroom Brushes
    • How to Install Presets in the Free Lightroom Mobile App
    • How to Sync Lightroom Presets from CC to Mobile
    • How to Install Photoshop Actions
    • How to Install Photoshop Overlays
  • Blog
Home   /   Lightroom Tutorials   /   Adjusting the Matte and Haze Effect of a Pretty Preset

Adjusting the Matte and Haze Effect of a Pretty Preset

By Gayle Vehar on May 11, 2016 | No Comments

Adjusting the Matte and Haze Effect of Pretty Preset in Lightroom

One of the questions we get asked a lot is about how to reduce the matte or haze effect of a preset. Some of the presets in our collections add a slight matte or haze effect to your image and it is easy to adjust if you know how.

You can adjust the these effects using the tone curve!  Watch this video to learn how to adjust this effect or follow the steps below the video!

Using the Tone Curve

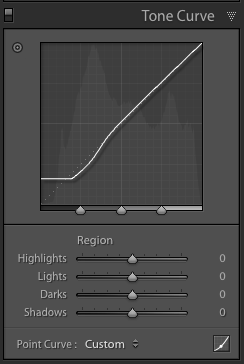
Both these effects are created using the Tone Curve Panel. The Tone Curve Panel is located just below the Basic Panel. 

The Tone Curve Panel gives you the option for two different views.  The view you are likely seeing is this one.

Adjusting the Matte and Haze Effect of Pretty Preset in Lightroom

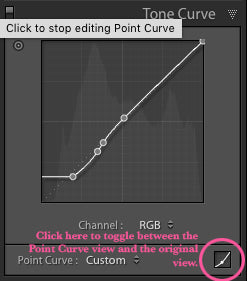
The view that we want to be seeing will have points on the curve.  To get to that view, you click on the little box with a curve from the top-right corner to the bottom corner.  If you want to come back to this original view, just click the same box again.  The Tone Curve view that you want to see for this tutorial is shown below.

Adjusting the Matte and Haze Effect of Pretty Preset in Lightroom

Adjusting the Haze Effect

The haze in a preset generally happens when the left-side of the solid line of the curve is above the dotted line.  To reduce the haze effect, you need to click on one of the dots on the left-side of the curve and pull it closer to the dotted line. 

Adjusting the Matte and Haze Effect of Pretty Preset in Lightroom

Adjusting the Matte Effect

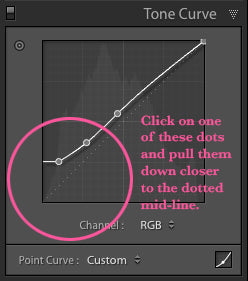
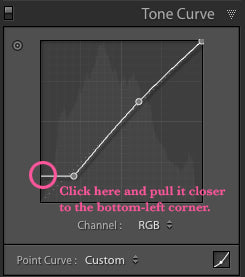
The matte effect in a preset also can be adjusted in the tone curve.  The matte effect happens because the left-side of the solid line of the curve ends before the bottom left corner of the curve.

You can adjust it by clicking where the curve ends and pulling the end closer to the bottom-left corner.  Pulling it somewhere between the bottom corner and the first square usually works the best.  The closer it is to the corner the less matte effect there will be.

Adjusting the Matte and Haze Effect of Pretty Preset in Lightroom

Hopefully this helps you adjust any matte or hazy effects in your presets to be exactly how you like them!  Comment here if you have any more questions about making these adjustments in the Tone Curve.

Related Articles

Do's and Don'ts of End of Life Photography
Discover essential do's and don'ts for end-of-life photography. Learn how to capture meaningful moments with sensitivity
Read More
4 Essential Tips For Sharper Photos
Are you photos not as sharp as you would like them to be?  Learn how to achieve sharper photos with these 4 expert tips!
Read More
Focus Stacking (Step by Step Guide for Beginners)
Unlock the Power of Focus Stacking!  In this step-by-step guide, I'll show you how to use focus stacking to capture ever
Read More
Pretty Presets for Lightroom author Gayle Vehar

Gayle Vehar

Lightroom Instructor

Hi!! I am Gayle. I am a wife to my handsome husband and mom to 4 beautiful kids. In my spare time, I am a photographer and blogger at Mom and Camera. I have a passion for sharing my love of photography with others. I teach local photography classes and regularly share photography tips and tricks on my blog. I hang out there a lot—I’d love you to stop by and visit!

May 11, 2016

Comments

INFO & SUPPORT
  • Lightroom FAQ
  • Photoshop FAQ
  • Contact Us
  • Order Lookup
Sign up for great freebies and tutorials

Get notified about promotions, giveaways and webinars before they happen!

Join the pretty Community

Come join the #1 Lightroom & Photoshop Facebook Group to help you learn how to edit your photos more confidently today!


  • About Us
  • Testimonials
  • Policies
  • Terms of Service
  • Write for Pretty
  • Lightroom Scholarship
  • Photoshop Scholarship

© 2023 Pretty Presets for Lightroom.