MOTHER'S DAY SALE! UP TO 35% OFF - DISCOUNT APPLIES IN CART.

  • Log in
  • Cart (0)
  • Checkout
Pretty Presets and Pretty Photoshop Actions
  • Lightroom Presets
  • Mobile Presets
  • Photoshop 
    • Photoshop Actions
    • Photoshop Overlays
    • Limited Edition Holiday Collections
  • Learn 
    • Free Lightroom Training
    • Free Photoshop Training
    • Lightroom 101 Workshop
    • Photoshop 101 Workshop
    • Your Pretty Edits
  • Support 
    • About Us
    • Contact Us
    • Order Lookup
    • Lightroom FAQ
    • Photoshop FAQ
  • Install 
    • How to Install Lightroom Presets
    • How to Install Lightroom Brushes
    • How to Install Presets in the Free Lightroom Mobile App
    • How to Sync Lightroom Presets from CC to Mobile
    • How to Install Photoshop Actions
    • How to Install Photoshop Overlays
  • Best Sellers
  • Blog

How to Use the Lens Blur Filter in Photoshop

By Anna Gay on April 27, 2018 | No Comments

How to Blur Background in Photoshop

How to Use the Lens Blur Filter in Photoshop to Create Shallow Depth of Field

Are you looking to achieve that creamy, background blur and shallow depth of field in your image that you were not quite able to achieve in camera?  It is definitely possible to do this in Photoshop and I am going to show you how.

Adding blur to your image during post-processing can create the illusion of a shallower depth of field than what occurred in camera.  As with any photography technique, this effect can be used subtly or dramatically, depending on your style.

There are several different blur filters in Photoshop, and in this tutorial we will be looking at the Lens Blur Filter.

Lightroom and Photoshop Facebook Group

Step 1. Selecting the Area to Blur

For this type of selection work, I prefer to use the Magnetic Lasso Tool in order to create a selection with irregular edges.  We do not want the line between the blurred and sharp portions of the image to be extremely obvious, so avoiding harsh lines is key:

Lens Blur Photoshop Tutorial Image

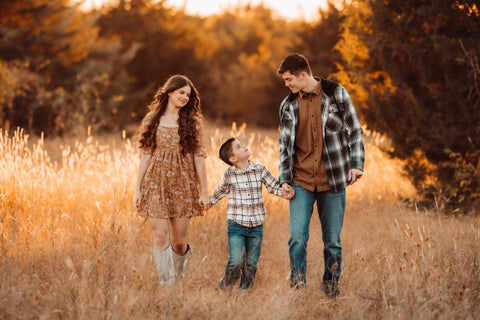
In this image, there is already a fairly shallow depth of field, so I can easily see where I want to enhance the blur.

For now, I am using the Magnetic Lasso and selecting only the sharpest portions of my image - so, I am selecting my subject and her immediate surroundings, and everything that is in sharp focus, mainly in the middle of the image:

Photoshop Blur Background

In order to keep my line between blur and sharp as minimal as possible, I am going to feather the edges of my selection by right clicking, and then selecting Feather>100 pixels:

Perspective Blur Photoshop

Next, I want to select the inverse of my current selection: right click>Select Inverse:

Photoshop Focus Blur

Step 2. Adding the Lens Blur

Before adding the blur, make sure you have duplicated your Background layer.

Then, select Filter>Blur>Lens Blur in your top tool bar.  The Lens Blur dialogue will appear:

How to Blur in Photoshop

Play around with different values of blur to see how the sliders affect the image.  Below are the settings that I have used for this image.  As you can see, the blur is very intense, but I will show you how to tone it down in the following steps:

How to Blur Background in Photoshop

Next, add a Layer Mask to the Background Copy layer:

Blurring Background in Photoshop

By using a Layer Mask and selecting a soft, black brush, I can now erase portions of blur in my image.  For example, around my subject's head:

Image Showing Lens Blur Photoshop

You may also find it helpful to use varying opacities on your brush when blending in the blurred portions of your image.  Starting with a low opacity and building up the brush strokes will help you achieve a more blended line between blurred and sharp:

Lens Blur Photoshop

Photoshop Lens Blur Before and After Image

Here is the before (top) and after (bottom) of the effect we just created:

Photoshop Lens Blur Before and After Image

For a similar effect, you can also use the Faux Tilt Shift action that's included in the Pretty Photoshop Actions PURE Color Worfkflow Portrait Action Collection.  This action is so easy to use, I highly recommend it!

Do you have any questions or comments about Blurring a Background in Photoshop Using Photoshop's Lens Blur?  Leave us a comment below - We would LOVE to hear from you!  And PLEASE SHARE this post using the social sharing buttons (we really appreciate it)!

Portrait Photoshop Actions

Related Articles

Streamline Your Photography Business: Top Tips & Tricks
Discover efficient strategies for booking, shooting, and editing photos. Learn how to save time, boost profits, and focu
Read More
How to Restart Your Photography Business: 10 Proven Steps for a Successful Relaunch
Discover how to restart photography business with these 10 expert tips.  From refining your niche to boosting your brand
Read More
How to Price Your Photography For Profit
Unlock profitable Photography Pricing strategies!  Discover how to cover costs, value your craft, and grow your business
Read More
Pretty Presets for Lightroom author Anna Gay

Anna Gay

Portrait Photographer

Anna Gay is a portrait photographer based in Athens, GA and the author of the dPS ebook The Art of Self-Portraiture. She also designs actions and textures for Photoshop. When she is not shooting or writing, she enjoys spending time with her husband, and their two cats, Elphie and Fat Cat.

April 27, 2018

Comments

INFO & SUPPORT
  • Lightroom FAQ
  • Photoshop FAQ
  • Contact Us
  • Order Lookup
  • Log Into Account
Sign up for great freebies and tutorials

Get notified about promotions, giveaways and webinars before they happen!

Join the pretty Community

Come join the #1 Lightroom & Photoshop Facebook Group to help you learn how to edit your photos more confidently today!


  • About Us
  • Testimonials
  • Policies
  • Terms of Service
  • Write for Pretty
  • Lightroom Scholarship
  • Photoshop Scholarship

© 2025 Pretty Presets for Lightroom | support@prettypresets.com (406) 298-3006

  •  
  •  
  •  
One or more of the items in your cart is a recurring or deferred purchase. By continuing, I agree to the cancellation policy and authorize you to charge my payment method at the prices, frequency and dates listed on this page until my order is fulfilled or I cancel, if permitted.