- Lightroom Presets
- Mobile Presets
-
Photoshop
-
Learn
-
Support
-
Install
- Best Sellers
- Blog

Adobe recently announced a new OPACITY SLIDER that users have been requesting for AT LEAST a decade. But if you didn't look closely, you may have missed this subtle but powerful tool that may revolutionize how you edit and use Lightroom Presets!!
For many years, Lightroom users have wanted the ability to REDUCE THE EFFECT OF A PRESET after it is applied in much the same way that you can lower the opacity of a layer in Photoshop.
It seemed like a simple ask, but for whatever reason, this feature was never added...until this year!
Third parties, like "The Fader from Capture Monkey," attempted to add this feature, but it was an extra step to install and make available in Lightroom, and many users never made an effort to add it.
Fast-forward to 2022, and an opacity feature called the "Amount Slider" that allows you to reduce or increase the effect of a preset by simply moving a slider left or right is NOW AVAILABLE IN ALL VERSIONS OF LIGHTROOM!

A preset can look drastically different with the opacity/amount slider set to varying amounts. For example, in the image below, you can see the fan favorite Reverie preset from the Dark and Moody Millennium Collection with the slider set to 100 and the slider set to 50.
Notice how the greens are less intense, and the shadows and contrast are decreased with the opacity/amount slider set to 50.


On the left side of the Develop Module, just below the Navigator Panel, you will find a new panel with a slider inside. It will appear greyed out by default and only comes to life when you apply a preset to your image.
Once you apply a Lightroom preset to your photo, the opacity/amount slider will become active. By default, the slider will be set to 100. This means that 100% of the preset's effect is being applied to your image.

The Opacity Slider is also available in the cloud version of Lightroom, although it is located in a completely different place.
From the Edit Panel, click the Presets button in the top left. A new panel will open. Slide over to the "Yours" section to find the Pretty Presets you have installed.
Once you open a folder and click a preset, an opacity/amount slider will appear directly below the preset name. Simply move the slider to the preferred amount to customize the edit.

The opacity/amount slider is also found in the Lightroom Mobile app. To access this feature, start by selecting an image to edit. With the photo open, choose the Presets icon at the bottom of the screen (hint: it looks like two overlapping circles). Next, navigate to the preset that you want to use on your image and click to apply it.
Once the preset is applied to your image, a slider icon will appear on the image thumbnail next to the preset name. Tap on the thumbnail again, and the opacity/amount slider will appear, allowing you to adjust the intensity of the preset applied to your image.

The preset opacity/amount slider isn't just available in Lightroom. It's also available in Adobe Camera Raw (ACR)—Photoshop's raw processor! Any preset you have installed in Lightroom, and that has been converted to XMP will appear in ACR.
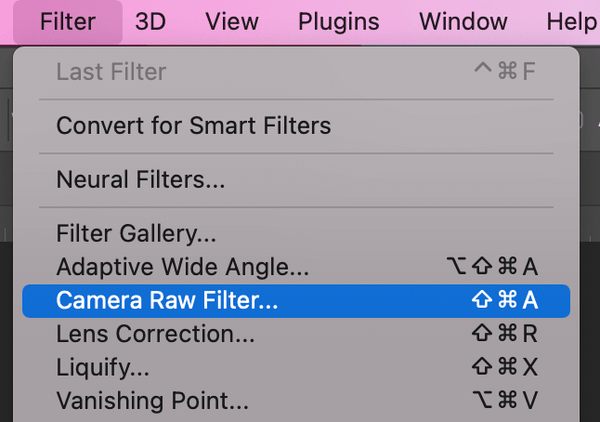
To open a photo in ACR, simply open the photo in Photoshop and then go to Filter>Camera Raw Filter.
Once your photo is open in ACR, click on the preset icon found on the right side of the screen. A list of your presets will open. Click on one of your presets to apply it. Once a preset has been applied, a new slider will become active at the top of the Presets panel. By default, the slider will be set to 100, meaning the preset will be at 100% initially.

Because this is a brand new feature, sometimes glitches can occur. One of the issues you may run into is your opacity/amount slider is greyed out. This can happen when the presets you are applying are incompatible with the new update.
If this happens to you, you can make some simple changes in Lightroom to ensure your presets are compatible.
To do this, you will need to locate a raw or jpeg image that has NO EDITS applied. Alternatively, you can reset all the edits on a raw or jpeg image.
Next, you will need to apply a preset "that needs to be updated" to your image. Once the preset is applied, right-click on the image and choose "Update with Current Settings" from the options that appear.

A new menu will open, asking you which settings to update. Once you are done with your selections, click the update button.
As a general rule for presets from Pretty Presets, you can uncheck Exposure and White Balance as well as Lens Corrections, Transform, Spot Removal, and Crop.

Now that your preset has been updated, the next time that you apply it to an image, the opacity/amount slider will be available for you to use.
The opacity/amount slider is an amazing new feature that Lightroom users have anticipated for a long time! And, as a fantastic bonus, it has been added to ALL versions of Lightroom—including Adobe Camera Raw. How fantastic is that?
For more information on Lightroom's new Opacity/Amount Slider, check out this post: How to Adjust Masks in Lightroom Using the Amount Slider.
Do you have any questions or comments about How to Change the Opacity of a Lightroom Preset? Leave us a comment below - we would LOVE to hear from you! And PLEASE SHARE our tutorial using the social sharing buttons (we really appreciate it!)


Comments