- Lightroom Presets
- Mobile Presets
-
Photoshop
-
Learn
-
Support
-
Install
- Best Sellers
- Blog

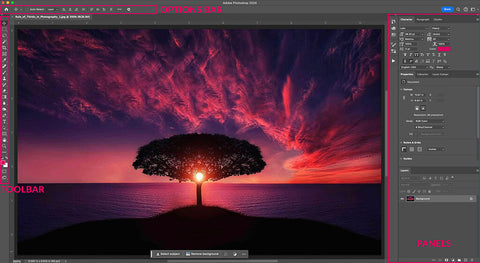
Has your beautiful photo been marred by a noticeable blemish on your subject's skin or some other imperfection?
Don’t worry! In this tutorial, I will show you how to remove these blemishes and fix your photos in Photoshop quickly and easily!
You may think ONLY portrait photographers need to learn how to fix blemishes in post-production. And while it's true the most common type of blemish is facial acne, often occurring in portrait photos, you can also find blemishes in ALL TYPES of photography, like unwanted litter in a street photo or brown spotted fruit in a still life photo. These can all be considered blemishes that need fixing. Even dust on a camera sensor can result in a blemish (regardless of the subject).
As a photographer, you are sure to encounter different types of blemishes regularly. Therefore learning how to remove them will be a VALUABLE SKILL. Thankfully, Photoshop is aware of this and provides three different healing tools to help get rid of blemishes quickly and easily.

The 3 Photoshop Tools I will cover in this guide (step-by-step) are the Spot Healing Brush, the Healing Brush, and the Healing Patch.
Let's start with the most popular and easiest to use blemish removal tool - the Spot Healing Brush!
As I mentioned above, the Spot Healing Brush is the easiest tool to use for removing acne and other blemishes. Simply set the size and hardness of the brush and click on top of the blemish. Photoshop’s A.I. magic will gather information from the surrounding areas of the image and blend it with the existing pixels to heal the blemish. Here are the steps in more detail:

Creating a new blank layer will allow you to work non-destructively. In other words, you won’t be changing anything in your original image. If anything goes wrong, you can just delete it. Also, if you toggle the layer visibility on and off, you will be able to see the before and after.
To add a new layer, you can click on the New Layer icon at the bottom of the Layers panel. Otherwise, go to the menu Layers>New Layer. You can also rename your new layer to keep your work organized if you wish

Find the Spot Healing Brush icon on your toolbar (highlighted below) and click on it. If you can’t see it, find any of the healing tools (it may be the Healing Patch or the Healing Brush) - then click and hold to reveal the other choices where the Spot Healing Brush Tool should be.

Since you’re working on an empty layer, you will have to enable the ‘Sample All Layers’ option on the top bar so that the tool will grab information from the background layer.

On the left side of the toolbar, you can choose the size and hardness of your brush. I recommend using a very soft brush, so set the hardness to zero (or a low value). As for the size, make sure it's big enough to cover the blemish.

Finally, just hover your spot removal brush directly over the blemish and click to see the magic happen. Voila - blemish removed!

Removing blemishes using the Spot Healing Brush Tool works most of the time. However, try the next tool if your results aren’t satisfactory (maybe the colors aren’t blending well, or the healing is too noticeable).
Photoshop's Healing Brush Tool works similarly to the Spot Healing Brush but gives you MORE CONTROL.
With this tool, you can tell Photoshop precisely WHERE to sample the information it needs, to blend with the existing pixels, and heal the blemish.
The Healing Brush is quite useful when the information around the blemish is very different, either in tone or texture. It’s also helpful when there are borders or other objects around the blemish that could "contaminate" the sample.

As with any advanced tool, when you move away from auto mode (in this case, the Spot Healing Brush), you also need more skills to use it. Specifically, if you don’t sample from the right place, your healing work will be noticeable and look sloppy.
Let's take a closer look at the Healing Brush Tool:
As I mentioned previously, it’s better to work on a separate layer to protect your original image. So go ahead and add a new blank layer using the icon on the Layers panel or go to the menu Layers>New Layer.

Go to the toolbar and find the Healing Brush Tool. Once again, keep in mind that it may be hidden under another healing tool. If this is the case, just click and hold until the menu pops up - then choose the Healing Brush icon (highlighted below).

On the top bar, you will find an option called "Sample." When you open its drop-down menu, you will see three additional choices - "Current Layer," "Current & Below," and "All Layers." You will want to choose Current & Below or All Layers, depending on what you need.

On the top left of the toolbar, you can choose the size and hardness of the Healing Brush. Once again, I generally prefer a soft brush (low hardness percentage) as it will blend better with the surrounding area, making the heal less perceptible.

To determine the sample area, hold down the Alt key (for PC users) or the Option key (for Mac) and then click on your desired source point. Then, place the healing brush on top of your blemish and click again to heal it.

If the blemish is too big or you need to heal a larger area, try using the Healing Patch tool. This tool doesn't limit you to the shape of the brush. You can use it with any shape since it works with a selection.
Let's take a closer look at the Healing Patch Tool:

Unlike the other healing tools, the Healing Patch tool won’t work on an empty layer. So, to protect the original image, it’s better to duplicate the background layer.
To do this, just click on the background layer in the Layers Panel and drag it to the New Layer icon at the bottom or use the keyboard shortcut CMD/CTRL+J. You can also right-click on the background layer and choose Duplicate Layer from the pop-up menu.

On the toolbar, find the Healing Patch Tool and click on it. Once again, if it’s not visible, it will be hidden behind the healing tool that was previously active. Just click and hold to open the menu and click on the Healing Patch Tool icon (highlighted below).

To make a selection of the area, click and drag the cursor around the blemish that you want to heal.
To apply the Healing Patch, click on the selected area and drag it to a BLEMISH-FREE location where you want Photoshop to gather the information it needs to heal. This tool also has a live preview (by default), so whenever you are happy with the results and the blemish is accurately covered, just let go of the mouse to apply the heal.

Every image and every blemish represents a different challenge which is why Photoshop offers multiple options to remove blemishes (each one with its pros and cons).
Over time, you will learn which tool works best on different types of images and blemishes. You can also use a combination of healing tools (I find this often gives the most professional and precise result).
Remember, the best way to learn is through practical use. So get your camera out, take some photos that need blemish removal, and practice using these three different Photoshop tools to see how they behave on your own images.
Do you have any questions or comments about How to Remove Blemishes in Photoshop? Leave us a comment below - we would LOVE to hear from you! And PLEASE SHARE this post using the social sharing buttons (we really appreciate it)!


Comments