MOTHER'S DAY SALE! UP TO 35% OFF - DISCOUNT APPLIES IN CART.

  • Log in
  • Cart (0)
  • Checkout
Pretty Presets and Pretty Photoshop Actions
  • Lightroom Presets
  • Mobile Presets
  • Photoshop 
    • Photoshop Actions
    • Photoshop Overlays
    • Limited Edition Holiday Collections
  • Learn 
    • Free Lightroom Training
    • Free Photoshop Training
    • Lightroom 101 Workshop
    • Photoshop 101 Workshop
    • Your Pretty Edits
  • Support 
    • About Us
    • Contact Us
    • Order Lookup
    • Lightroom FAQ
    • Photoshop FAQ
  • Install 
    • How to Install Lightroom Presets
    • How to Install Lightroom Brushes
    • How to Install Presets in the Free Lightroom Mobile App
    • How to Sync Lightroom Presets from CC to Mobile
    • How to Install Photoshop Actions
    • How to Install Photoshop Overlays
  • Best Sellers
  • Blog

How to Export Photos from Lightroom Mobile (In 3 Quick Steps)

By Gayle Vehar on June 02, 2022 | No Comments

How to export from Lightroom Mobile

How to Export Photos from Lightroom Mobile

Lightroom Mobile has become a VERY popular and powerful tool for editing and sharing photos.  I find myself using it more and more.  While it has some similarities to other versions of Lightroom, there are also some significant differences.

How to export and share photos is one of those significant differences. 

And since we have already covered how to export photos from Lightroom Classic, in this tutorial, we wanted to share the steps to export from Lightroom Mobile.

Exporting from Lightroom Mobile can be done quickly and easily following these three simple steps:

Lightroom & Photoshop Facebook Group

Step 1: Tap the "Share To" Icon

To export from Lightroom Mobile, you first need to select the image you want to export.  Once you have made your selection, tap the "Share To" icon at the top of the editing screen.

How to Save in Lightroom Mobile

Step 2: Choose Export Location

When you tap the "Share To" button, a menu will open that includes options to choose where and how to save your image.  "Export to Camera Roll" and "Export to Files" are the fastest ways to export your photo.

    • The "Export to Camera Roll" option will save the image file directly to your mobile device's camera roll.  The photo will now show up along with the rest of the images on your mobile device.
    • The "Export to Files" option allows you to choose a file location on your device, including cloud storage apps like Dropbox, iCloud, and Google Drive.  Saving to the cloud is my favorite option because it allows me to share and make the image available to my other computers and mobile devices.

Once you have chosen the appropriate option, tap it to begin exporting.

Export from Lightroom Mobile

Step 3: Locate Your Image

The last step is simply to navigate to the location where you saved your image to ensure that everything went well with the export, and from there, you can share it on Instagram, Facebook, or wherever you wish.

Customizing Export Settings

There may be times when you want to customize your export settings in Lightroom Mobile.  This is absolutely possible!  

Here are the steps to customize your export, including which settings are best for print and sharing on the web:

Step 1: Tap the "Share To" Icon

This step is exactly the same as above.  To access the "Share To" icon, select the image you'd like to save or export.  Then tap the "Share To" icon located at the top of the image.

How to Save in Lightroom Mobile

Step 2: Choose a Location & Open Custom Settings

Once you press the "Share To" icon, the same options will open as they did previously.  This time, before you choose your export location, tap on the settings icons to the right of the export location name (icons highlighted below).

Lightroom Mobile Export Settings

Step 3. Choose Custom Export Settings

Tapping the settings icon will open an Export Settings Dialog Box, which will allow you to customize the file type, dimensions, and image quality of the image you are exporting.

How to Export Photos from Lightroom Mobile

Custom Setting #1: File Type

The first setting you can customize is File Type.  The file types you can choose are JPG, TIF, and DNG.  JPG is the most versatile file type and most often selected.

How to Export Photos from Lightroom to iPhone

Custom Setting #2: Dimensions

The next export setting you can customize is Dimensions.  The options include Largest Available Dimensions, Small (2048 px), and Custom.

    • "Largest Available Dimensions" will export the file in its original size.  However, if the image was originally a RAW file, the file size will be compressed when you export it as a JPG.  So if you choose this option, don't be surprised if the file size is less than it was initially.
    • "Small (2048 px)" will export the image with the longest side at 2048 pixels.  This option is a good choice if you plan to share this image anywhere on the web.
    • "Custom" allows you to choose the EXACT dimensions you'd like on export.  This is the option to use if you want an image smaller than 2048 pixels OR if you need something larger than 2048 pixels but less than the "Largest Available Dimensions."

Lightroom Mobile Custom Aspect Ratio

Custom Setting #3: Image Quality

The third setting you can customize is Image Quality.  You can select any amount between 10% and 100% (in 10% increments). 

The higher the percentage, the better the image quality will be.  I didn't notice much difference in image quality between 80% and 100%, so I recommend choosing within that range for the best image quality. 

If you don't want a high-quality image, feel free to choose a lower setting.

How to Change Resolution in Lightroom Mobile

Custom Setting #4: Watermark

In the Export Settings Dialog Box, you can also toggle the option to apply a watermark.  When this watermark option is toggled to the "on" position, a box will appear and allow you to customize your watermark.  Use the options to either add a graphic watermark or text watermark.

Lightroom Mobile Export

Step 4: Choose "More Options" Settings

Now, let's look at the "More Options" section of the Export Settings Dialog Box.  Click on "More Options" just below the "Include Watermark" option to open an additional dialog box.   

How to Transfer Photos from Lightroom to iPhone

More Options Setting #1: Include Metadata

The first selections available are the "Include Metadata" options.  Metadata refers to all the information related to your image, including details on the camera used to take the photo, the settings used, and where and when the photo was taken. 

It's generally a good idea to include most of this info in your metadata as it can help you or the software organize your photos.  On the other hand, you may NOT want to include location information when sharing photos online, including on social media.

How to Save Edits in Lightroom Mobile

More Options Setting #2: File Naming

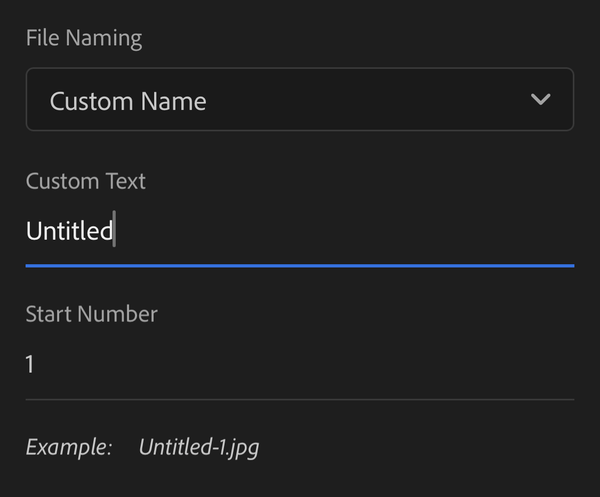
The next options available are related to "File Naming."  The choices are Original, Custom Name, and Date Filename.

    • "Original" leaves the filename as-is.  By default, this will probably be something like IMG_2134.jpg.  For most snapshots, I leave it as is.  However, if I am working on photos for a specific project or images for clients, I often prefer to use a "Custom Name."
    • "Custom Name" gives you the ability to set a custom word or phrase for the filename.  This could look something like "Smith-1.jpg."
    • The last option is "Date Filename," which simply adds a date in front of the filename.

    Exporting Photos from Lightroom Mobile

    Lightroom Mobile Export Settings for Facebook

    More Options Setting #3: Output Sharpening

    The next set of options lets you choose the amount of "Output Sharpening" done on export.  The choices available include None, Screen, Matte Paper, and Glossy Paper.

      • I generally leave this Output Sharpening option set to "None" and use the settings in Lightroom mobile for sharpening, if needed.
      • The "Screen" option will help your image appear sharper when viewed on screens.
      • The "Matte Paper" option will apply specific sharpening for photos printed on matte paper.
      • The "Glossy Paper" option will apply specific sharpening for photos printed on glossy paper.

    If you aren't sure which option to choose, keep it set at "None."

    Print from Lightroom Mobile

    More Options Setting #4: Color Space

    The last option to adjust here is "Color Space."  The available settings include sRGB, Adobe RGB, Display P3, and ProPhoto RGB.  These options will determine how the image colors are displayed on various devices.

    If you have images that will be printed or shared on the web, it is essential to leave this set to sRGB since this is the most universal setting.

      Lightroom Mobile Export Photos

      Step 5: Export Image with Custom Settings

      Once you have FINISHED choosing your custom settings, it's time to export your image.

      First, you will need to return to the Export Settings screen by tapping the back arrow in the upper-left corner of the "More Options" screen.

      How to Get Pictures from Lightroom to iPhone

      Once you are back to the Export Settings screen, tap the checkmark icon on the upper-right side of the screen to begin the export process using all the custom settings you just chose.

      When the export is complete, head to the location where you sent your photo to ensure that everything went well with the export.

      Export photos in Lightroom mobile

      Exporting Multiple Photos in Lightroom Mobile

      One of Lightroom Mobile's little-known features is the ability to export multiple photos at once.

      To do this, open an album of images on the Library screen.  From there, click and press down on one of the images you wish to export.  The image will be outlined in blue, and there will be a checkmark in the lower-right corner.  Once an image is selected in this way, you can tap on additional photos to select them for a multiple photo export.

      Lightroom Mobile Multi Photo Export

      How to Export from Lightroom Mobile

      Next, tap on the "Share To" icon at the bottom of the screen, which will open the same "Share To" options that we covered above. 

      As before, you can choose "Export to Camera Roll" or "Export to Files,"  and you can also tap on the setting icons next to either of those options to customize your multi-photo export.

      How to export multiple photos from Lightroom Mobile

      From here, the exporting process is the same as outlined above. 

      Tip: When exporting many files for a client, I find it best to choose "Export to Files" and select my favorite cloud storage.  This prevents my mobile device's storage space from getting bogged down with many client photos.

      Best Lightroom Mobile Export Settings for Web

      The BEST export settings to use in Lightroom Mobile for web use or sharing on social media are:

        • File Type: JPG
        • Dimension: choose "Custom" and then enter the best long-side dimensions for your platform (i.e. 2048 for Facebook, 1350 for vertical photos on Instagram, 1080 for horizontal images on Facebook, etc.)
        • Image Quality: between 80%-100%
        • Include Watermark: turn this setting on and customize how you like.  We recommend a watermark to prevent your image from being reproduced or stolen, but it isn't required.
        • Include Metadata: make sure Location Info is turned off.
        • Output Sharpening: change this to Screen
        • Color Space: sRGB

      Lightroom Mobile Export Settings for Facebook

      Best Lightroom Mobile Export Settings for Print

      The BEST export settings to use in Lightroom Mobile for print are:

        • File Type: JPG
        • Dimension: Largest Available Dimensions
        • Image Quality: between 80%-100%
        • Include Watermark: make sure this is turned to the OFF position
        • Include Metadata: turn all on, if desired
        • File Naming: choose Custom Name and add a descriptive name
        • Output Sharpening: leave this set at none
        • Color Space: sRGB

      Lightroom Mobile Export Settings for Print

      Conclusion

      Lightroom Mobile is a powerful tool that allows you to EDIT ON THE GO.  Exporting and sharing your photos directly from Lightroom Mobile makes it even more helpful for all your mobile editing needs!

      How do you use Lightroom Mobile?  Leave us a comment below - we would LOVE to hear how you use Lightroom mobile in your workflow!  And PLEASE SHARE this post using the social sharing buttons (we really appreciate it)!

      Lightroom Mobile Preset Collections

      Related Articles

      How to Start a Boudoir Photography Business
      How to Start a Boudoir Photography Business
      Ready to start your boudoir photography business?  Learn key tips for building a portfolio, hosting mini sessions, choos
      Read More
      Beginner's Guide to Boudoir Photography
      Beginner's Guide to Boudoir Photography
      Are you ready to start your journey into boudoir photography?  This beginner's guide covers everything you need to know
      Read More
      Beginner's Guide to Smoke Bomb Photography
      Beginner's Guide to Smoke Bomb Photography
      Discover the art of smoke bomb photography with our comprehensive guide!  Learn about smoke bomb photoshoots, essential
      Read More
      Pretty Presets for Lightroom author Gayle Vehar

      Gayle Vehar

      Lightroom Instructor

      Hi!! I am Gayle. I am a wife to my handsome husband and mom to 4 beautiful kids. In my spare time, I am a photographer and blogger at Mom and Camera. I have a passion for sharing my love of photography with others. I teach local photography classes and regularly share photography tips and tricks on my blog. I hang out there a lot—I’d love you to stop by and visit!

      June 02, 2022

      Comments

      INFO & SUPPORT
      • Lightroom FAQ
      • Photoshop FAQ
      • Contact Us
      • Order Lookup
      • Log Into Account
      Sign up for great freebies and tutorials

      Get notified about promotions, giveaways and webinars before they happen!

      Join the pretty Community

      Come join the #1 Lightroom & Photoshop Facebook Group to help you learn how to edit your photos more confidently today!


      • About Us
      • Testimonials
      • Policies
      • Terms of Service
      • Write for Pretty
      • Lightroom Scholarship
      • Photoshop Scholarship

      © 2025 Pretty Presets for Lightroom | support@prettypresets.com (406) 298-3006

      •  
      •  
      •  
      One or more of the items in your cart is a recurring or deferred purchase. By continuing, I agree to the cancellation policy and authorize you to charge my payment method at the prices, frequency and dates listed on this page until my order is fulfilled or I cancel, if permitted.