MOTHER'S DAY SALE! UP TO 35% OFF - DISCOUNT APPLIES IN CART.

  • Log in
  • Cart (0)
  • Checkout
Pretty Presets and Pretty Photoshop Actions
  • Lightroom Presets
  • Mobile Presets
  • Photoshop 
    • Photoshop Actions
    • Photoshop Overlays
    • Limited Edition Holiday Collections
  • Learn 
    • Free Lightroom Training
    • Free Photoshop Training
    • Lightroom 101 Workshop
    • Photoshop 101 Workshop
    • Your Pretty Edits
  • Support 
    • About Us
    • Contact Us
    • Order Lookup
    • Lightroom FAQ
    • Photoshop FAQ
  • Install 
    • How to Install Lightroom Presets
    • How to Install Lightroom Brushes
    • How to Install Presets in the Free Lightroom Mobile App
    • How to Sync Lightroom Presets from CC to Mobile
    • How to Install Photoshop Actions
    • How to Install Photoshop Overlays
  • Best Sellers
  • Blog

How to Edit Sunrise & Sunset Photos in Lightroom

By Lucy Song on April 21, 2022 | No Comments

How to Edit Sunrise & Sunset Photos in Lightroom

How to Edit Sunrise & Sunset Photos in Lightroom

The natural beauty of a sunrise and sunset is quite challenging to capture in photos due to the contrasting exposures between a bright sky and a darker foreground that occurs during those times.

That is why raw, unedited versions of a sunrise or sunset often seem flat, lifeless, and underwhelming compared to what you see with the naked eye.

One solution to bring life back to the image is to manually combine two exposures of the same composition, one exposure with the sky appropriately lit and a separate exposure for the foreground.

However, there is a much simpler method (as long as the photo is not irreparably under or over-exposed) -- USING LIGHTROOM'S DEVELOP MODULE!

Lightroom & Photoshop Facebook Group

In this tutorial, I am excited to share four simple steps in Lightroom that will effectively bring your sunrise/sunset photo to life.  First, I will focus on global adjustments to the entire image, and then I will fine-tune the more minor details.

In general, for nature and landscape photography, it is IMPORTANT to preserve the natural essence of each scene.  If you over-edit, it can often result in a hyperreal composition.  Better results can usually be achieved by gently accentuating each photo’s unique characteristics, so the audience can more accurately visualize themselves experiencing the captured moment.

Remember, photo editing is a highly customizable process based on your own preferences, so this tutorial should serve as a launchpad for your creativity!

Step 1: Make Global Adjustments: Tone, Presence, and Sharpening

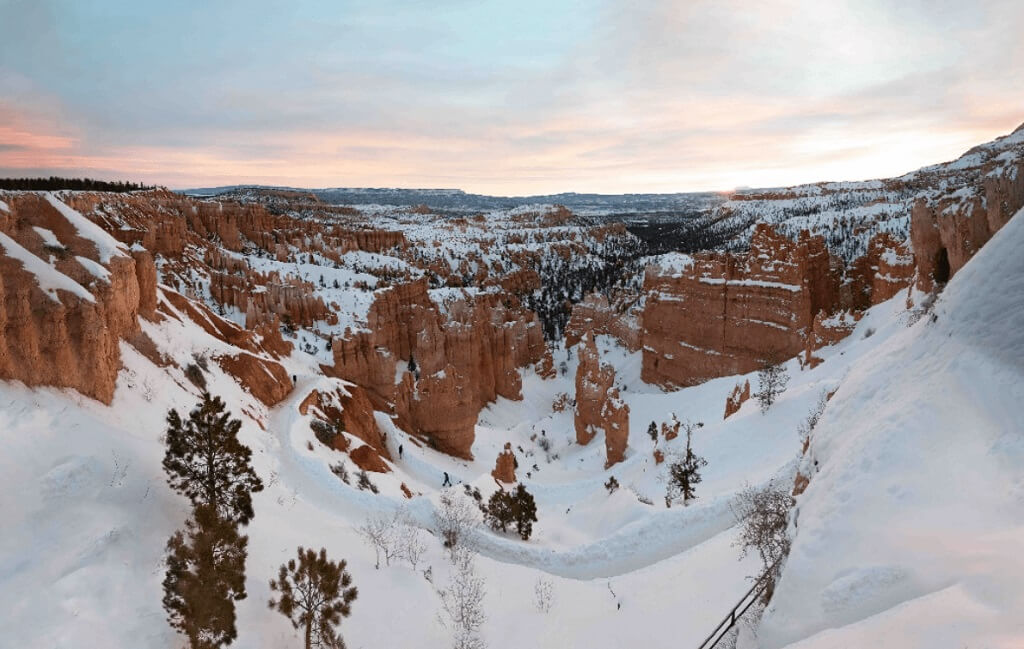
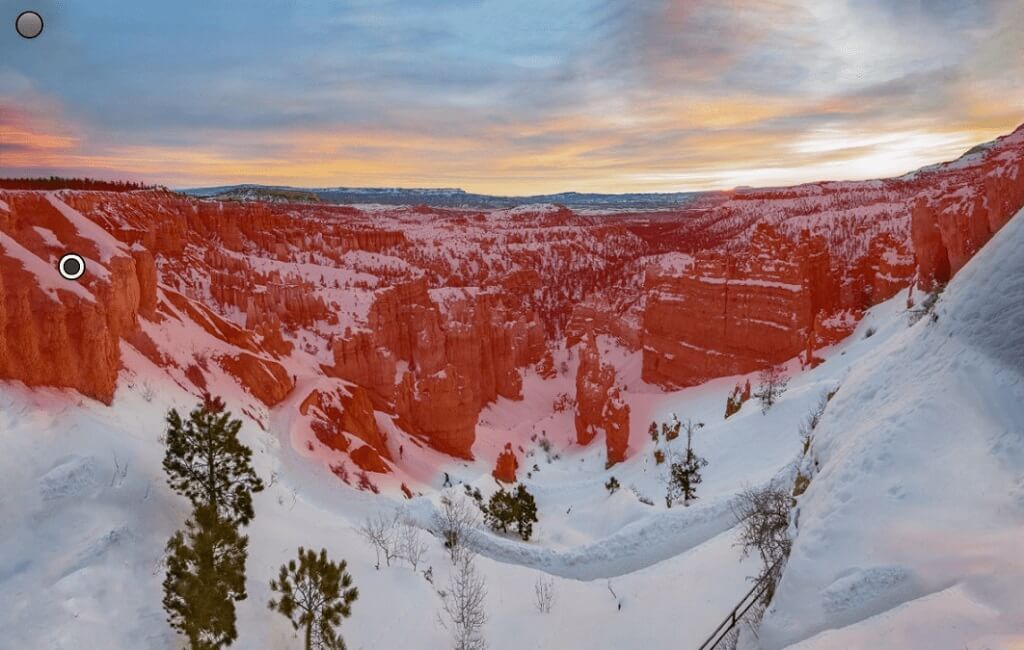
Let’s start with this unedited photo of Bryce Canyon at sunrise (note these same techniques can be used for editing an image taken at sunset):

How to Edit Sunrise Photos in Lightroom

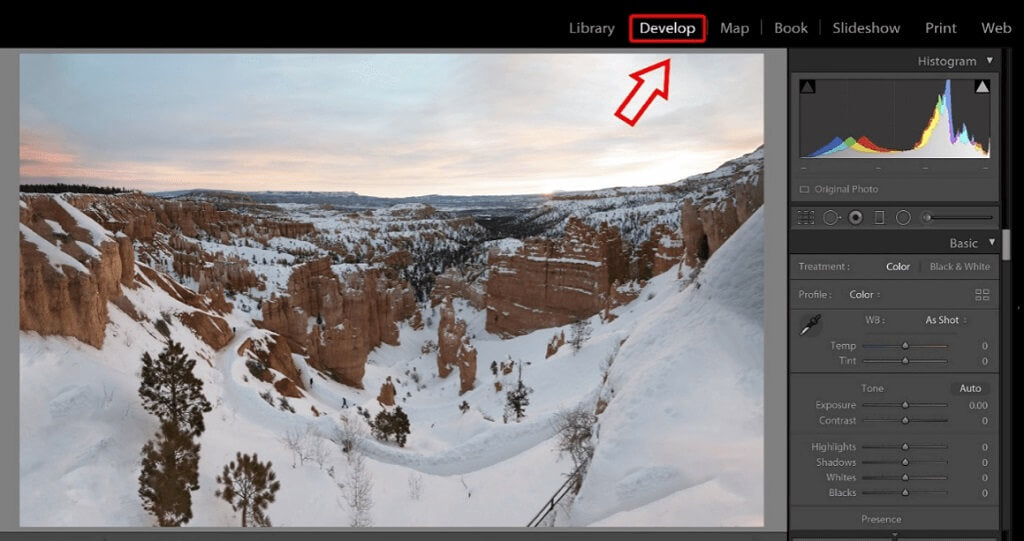
Go ahead and access Lightroom’s Develop Module.

How to Edit Sunset Photos in Lightroom

  • I set Highlights to -100.  This may seem excessive, but it significantly lowers the brightness of the sky and the snow in the bottom third of the photo while leaving the rest of the areas alone.  This will also redirect the focus back to where the sky and rock formations are.
  • I adjust the Shadows (+32) and Blacks (+60) settings to brighten up the lower two-thirds of the image.
  • Increase Clarity (+20) and Sharpening (10) (under the “Details” tab) to enhance the overall sharpness of the landscape and the definition of the rocks to look more 3D.
  • I find that Dehaze often brings out the color of a scene (when used in moderation).  It does exactly what it sounds like; if your photo has a slight overcast or fog - whether in terms of composition (e.g. boat in a misty lake) or photo quality - Dehaze can help decrease its intensity to bring out certain subjects in the photo.  This is especially helpful for sunrise/sunset photos since the main focus is on the colors of the sky. Beware of increasing it too much; it can make the colors look artificial.
  • The rocks still look dull and dusty, so I will increase Vibrance and Saturation to introduce a flush of color.
  • I leave Temp and Tint alone because my image already exhibits a warm-red tone to match the color of the natural sunlight during sunrise.

Edit Sunset Lightroom

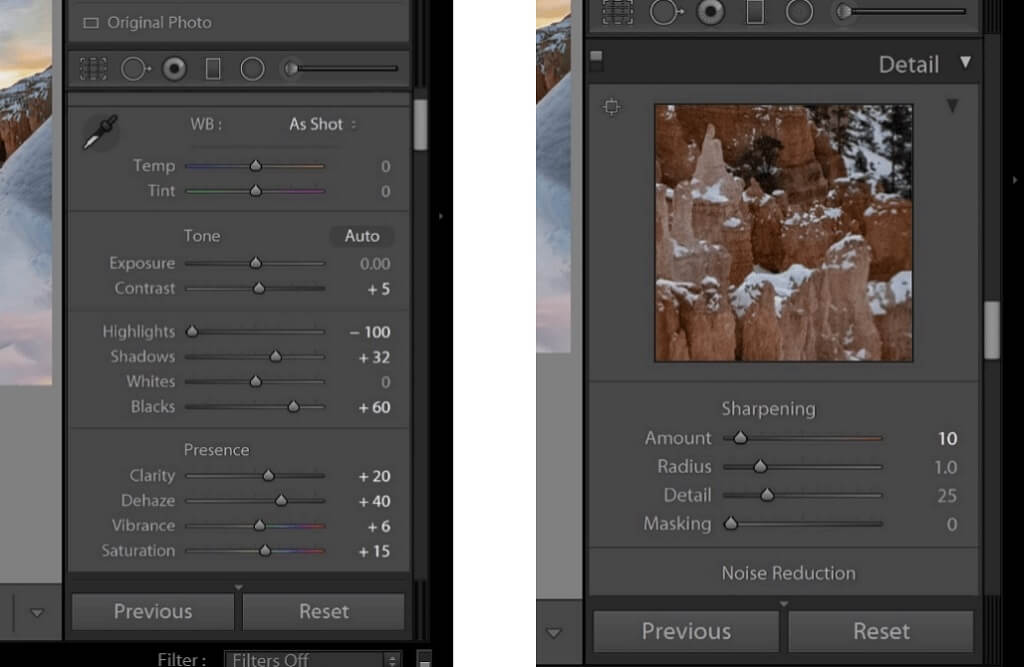
With just these few adjustments, the image is already looking so much more colorful and dynamic!

How to Edit Sunset Photos in Lightroom Mobile

However, since the sky and foreground are of different exposures, we now need to split them off and edit them separately.

Step 2: Make Background Adjustments (Sky)

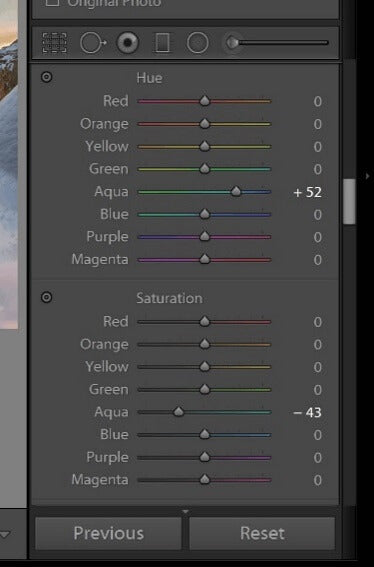
As a result of the edits in Step 1, the blue in the sky now looks too artificial for my preference.  I want to lighten it to a softer, more natural blue by changing Hue to +52 and Aqua to -43.

Note that I did not adjust the other colors:

Edit Sunrise Lightroom

Close up of the sky before and after my color adjustments:

How to Edit Sunset Portraits in Lightroom

To make the clouds pop out even more against the sky, I use the Adjustment Brush/Mask to select, slightly darken and define the area with increased Dehaze settings.

Sunset Lightroom

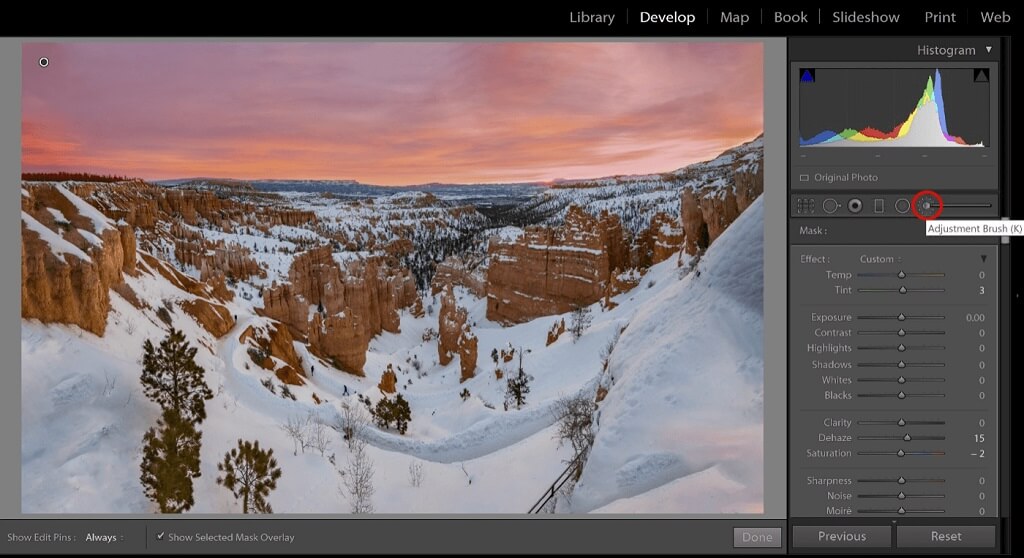
I also modify Tint and Saturation to balance the color intensity resulting from an increase in the Dehaze setting.  A good rule of thumb is to readjust saturation, vibrance, and coloring each time after using Dehaze.

Make sure to turn on Show Selected Mask Overlay at the bottom of the screen to see which areas are being masked.  The Erase function is helpful for times I accidentally “overpaint.”  It will erase masked areas, such as (for demonstration purposes only) the pale blue spot in the top left.

Sunrise Lightroom

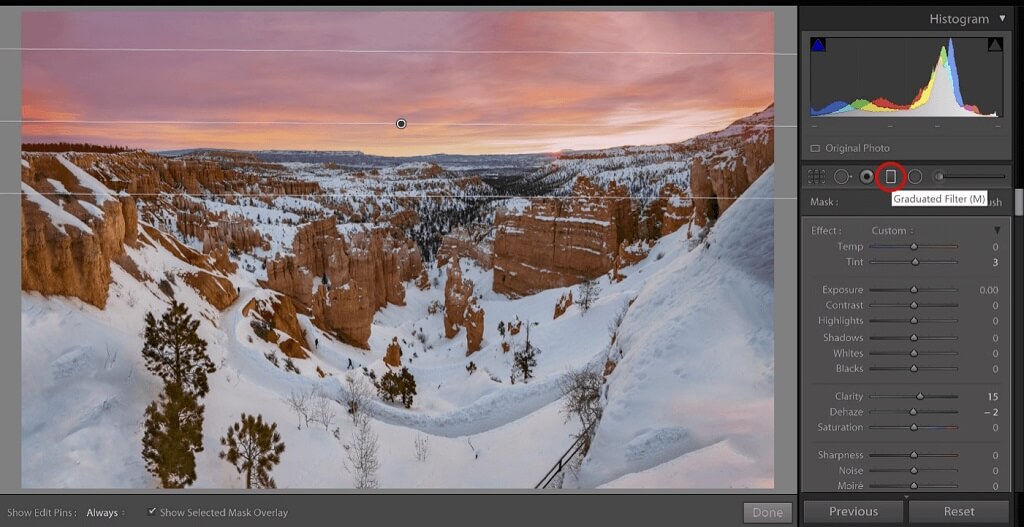
Alternatively, you may also use a gradient mask or Graduated Filter:

However, I find that the brush mask gives me more control and flexibility over which areas I want to edit.  With the gradient mask, part of the mountains to the top right is covered and becomes darkened with the new settings.

How to Make Sunset Photos Look Better

One of the things I really enjoy about Lightroom is that it is a powerful tool that allows users to create similar effects using different methods.

Here are the results after this step:

How to Make Sunrise Photos Look Better

Step 3: Make Foreground Adjustments

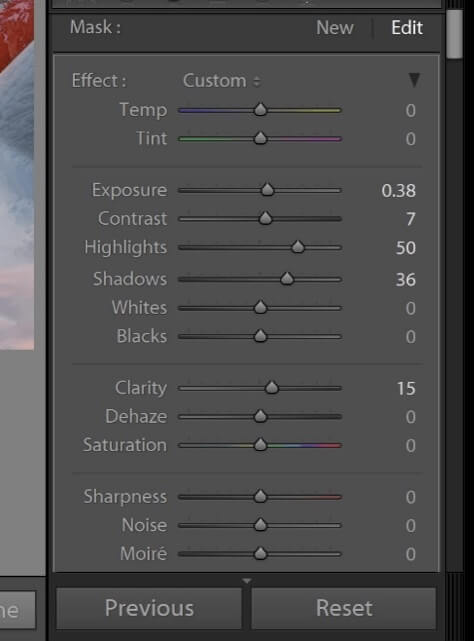
The rock columns still look dim in contrast to the sky, so I will now use the Adjustment Brush/Mask to select JUST THE MIDDLE AREA.

Editing Sunrise Photos in Lightroom Mobile

Accordingly, I adjust the Exposure, Contrast, Highlights, Shadows, and Clarity to illuminate this area.

How to Add a Sunset to a Photo

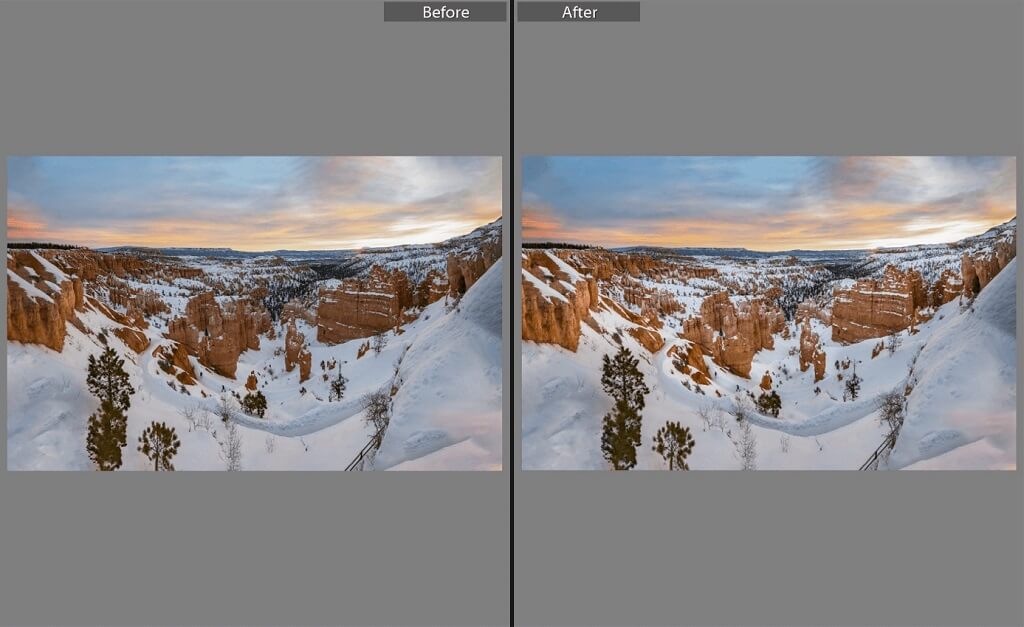
Here are the results after this step!  As you can see, the lighting now evenly guides our attention to BOTH the sky in the background and rock columns in the foreground.

Lightroom Sunset Presets

Step 4: Crop the Image

Cropping is critical in framing the scene because it redirects our focus.  It is an excellent opportunity to leave out ANY UNNECESSARY AND DISTRACTING COMPONENTS, such as the handlebars at the bottom right.

For more information on cropping, here's a quick tutorial on How to Crop in Lightroom.

Since I removed a section from the bottom of the photo, I also cropped a bit from the top to maintain the rule of thirds.

Editing Sunrise Photo in Lightroom

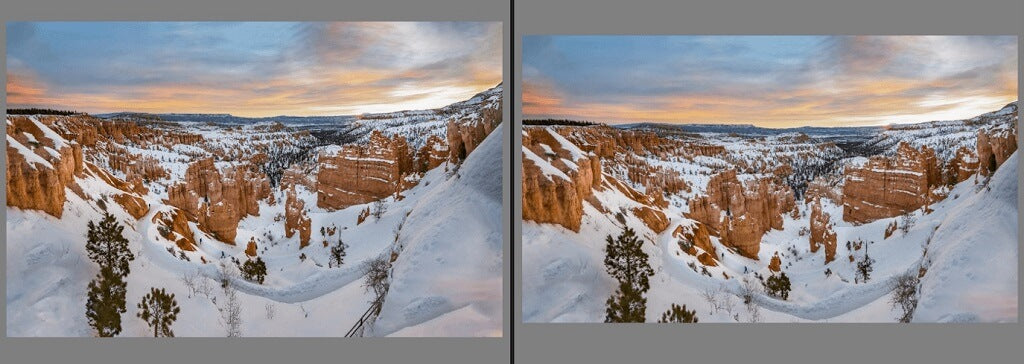
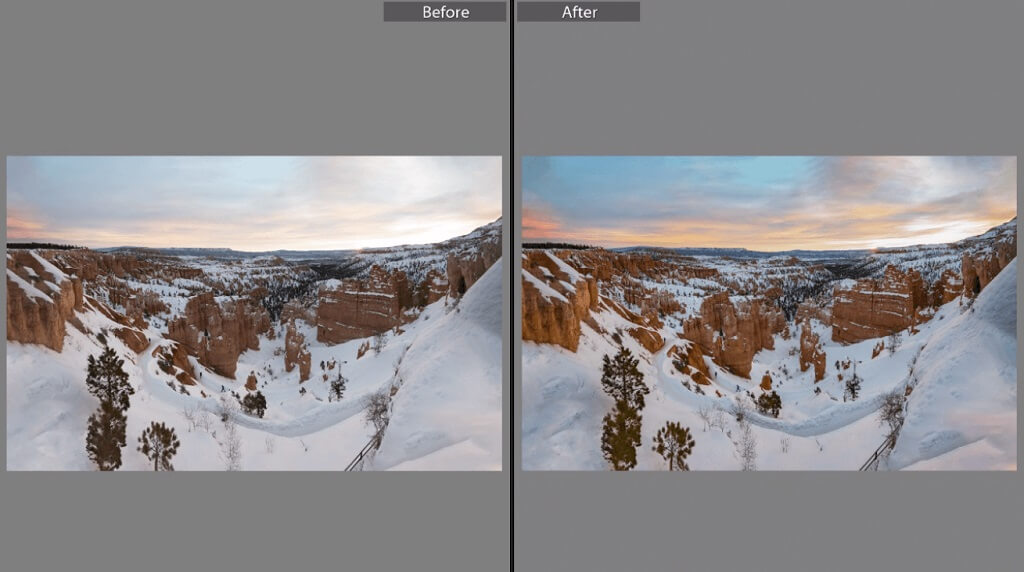
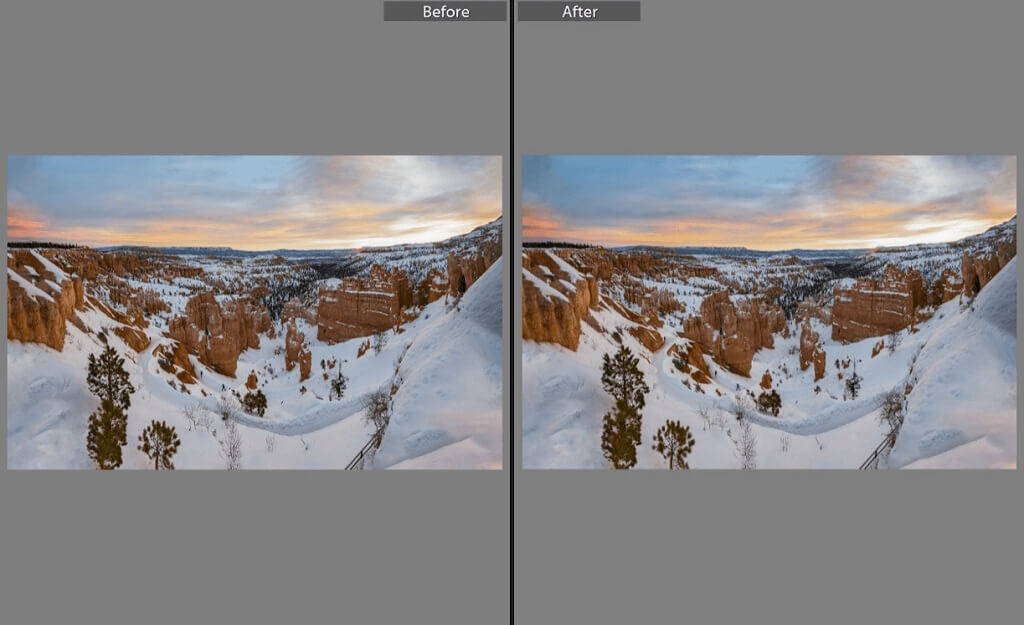
Here is the final result (Before and After):

Before

How to Edit Sunrise Photos

After

How to Edit Sunset Photos

Just like that, we’ve breathed new life into this sunrise photo!

Remember that the steps described in this tutorial, such as individually manipulating the foreground and background exposure, are not limited to nature and landscape photography; they can also be used on any photo with multiple distinct and contrasting exposures, such as backlit images.

I hope this tutorial has inspired you in your next Lightroom editing adventure!

Do you have any questions or comments about How to Edit Sunrise & Sunset Photos in Lightroom?  Just leave us a comment below - we would LOVE to hear from you! And PLEASE SHARE this post using the social sharing buttons (we really appreciate it)!

Painted Sky Overlays

Related Articles

Beginners Guide to Photoshop's Generative Fill Tool
Discover how to use Photoshop's Generative Fill Tool to effortlessly expand and enhance your images.  This step-by-step
Read More
Pretty Presets & Actions 2024 Photoshop Scholarship Winner
Pretty Presets & Actions congratulates our 2024 Photoshop Scholarship Winner!  See who won and find out how to apply
Read More
How to Start a Boudoir Photography Business
Ready to start your boudoir photography business?  Learn key tips for building a portfolio, hosting mini sessions, choos
Read More
Pretty Presets for Lightroom author Lucy Song

Lucy Song

Lucy Song is a sophomore at Arizona State University's Barrett Honors College studying computer science and the 2020 winner of the Pretty Presets Lightroom Scholarship.  In her free time, she loves to venture outdoors on photography-hiking trips in search of beautiful landscapes and starry skies to capture.

April 21, 2022

Comments

INFO & SUPPORT
  • Lightroom FAQ
  • Photoshop FAQ
  • Contact Us
  • Order Lookup
  • Log Into Account
Sign up for great freebies and tutorials

Get notified about promotions, giveaways and webinars before they happen!

Join the pretty Community

Come join the #1 Lightroom & Photoshop Facebook Group to help you learn how to edit your photos more confidently today!


  • About Us
  • Testimonials
  • Policies
  • Terms of Service
  • Write for Pretty
  • Lightroom Scholarship
  • Photoshop Scholarship

© 2025 Pretty Presets for Lightroom | support@prettypresets.com (406) 298-3006

  •  
  •  
  •  
One or more of the items in your cart is a recurring or deferred purchase. By continuing, I agree to the cancellation policy and authorize you to charge my payment method at the prices, frequency and dates listed on this page until my order is fulfilled or I cancel, if permitted.