MOTHER'S DAY SALE! UP TO 35% OFF - DISCOUNT APPLIES IN CART.

  • Log in
  • Cart (0)
  • Checkout
Pretty Presets and Pretty Photoshop Actions
  • Lightroom Presets
  • Mobile Presets
  • Photoshop 
    • Photoshop Actions
    • Photoshop Overlays
    • Limited Edition Holiday Collections
  • Learn 
    • Free Lightroom Training
    • Free Photoshop Training
    • Lightroom 101 Workshop
    • Photoshop 101 Workshop
    • Your Pretty Edits
  • Support 
    • About Us
    • Contact Us
    • Order Lookup
    • Lightroom FAQ
    • Photoshop FAQ
  • Install 
    • How to Install Lightroom Presets
    • How to Install Lightroom Brushes
    • How to Install Presets in the Free Lightroom Mobile App
    • How to Sync Lightroom Presets from CC to Mobile
    • How to Install Photoshop Actions
    • How to Install Photoshop Overlays
  • Best Sellers
  • Blog

Tips for Editing RAW Images in Lightroom

By Anna Gay on April 17, 2014 | No Comments

Tips for Editing Raw Image Files

Editing RAW Images in Lightroom

If you are new to shooting RAW files, one of the first things you will notice is that, when you import your RAW files from your camera into Lightroom, after the image preview has been on the screen for a second, it will suddenly change, and look different from what you originally saw in your camera’s preview.

Without getting into too much technical jargon, the reason this happens is that a RAW file is not really a file that you can import and view AS IT IS – think of it as sort of an abstract idea, not something tangible.

The software on your computer, and in your camera, reads the information from the RAW file, and then converts it to a viewable image that is somewhat close to the preview that you saw on your camera.  Sometimes the conversion will look almost identical to the preview on your camera, but other times, it will be different.

At this point, your goal will be to make a few minor adjustments to your RAW file in order to restore it to what you saw in your preview. 

While there is no set-in-stone method for editing RAW files, here are a few common settings that you will almost always need to adjust in Lightroom upon importing your RAW files:

  • White Balance
  • Exposure/Contrast
  • Highlights
  • Clarity
  • Vibrance

Let me walk you through a quick edit on a RAW image just so you can get a feel for what is happening to the image, and how to adjust the above settings.

Import the image you would like to edit. In the camera preview, this particular image looked fine, but after importing the RAW file into Lightroom, it is a bit flat in contrast, underexposed, and the white balance is just a tad too warm. Easy fix! Seriously, this can be done in about one minute:

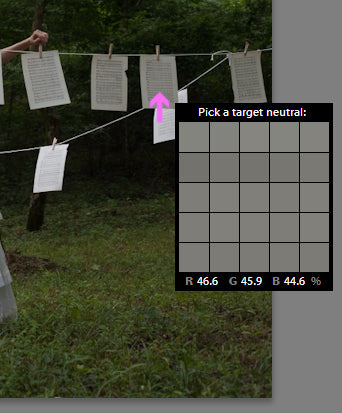
First, select the Dropper tool:

Look for the most neutral area in your image, preferably shades of gray. The idea here is to get the RGB values to match up as closely as possible. Once you have found the most neutral area in your image, left-click once, and this will adjust the overall white balance of your image:

Next, let’s look at adjusting the values of the settings I mentioned above. I moved all the highlighted sliders to the right, but not too much. Sometimes, you’ll find that a little bit of adjusting goes a long way, so just experiment with the sliders until you are happy with the result.  

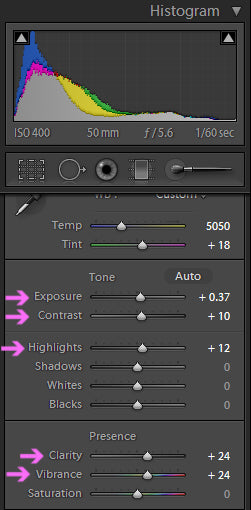
My only word of caution, though, is to not overdo the Clarity adjustment. When you import your RAW file, you may feel like a lot of the Clarity is lost, and the image is not sharp enough. Just be careful not to over-sharpen your image, especially if you are printing. While an over-sharpened image may look fine on your screen, once it is printed, it will appear grainy, noisy, and unnatural. 

Below is a Before/After of the image right after it was imported into Lightroom, versus how it looks after making a few quick adjustments:

From here, you can do several things. You can call your image finished and move on to your next image, or you can begin to make more adjustments to your image, such as adding presets. 

When you are finished editing, you can export and save your image. Lightroom will give you different options on what type of file you would like to export your image as. If you are going to continue to edit your image later, or if you intend to make prints, you may want to export your RAW file as either a DNG or a TIFF, as these file types will retain more information in the file, and not compress the file as much as a JPEG will. If you are simply exporting to share your image online, a JPEG will do just fine.   

Related Articles

Beginner's Guide to Boudoir Photography
Are you ready to start your journey into boudoir photography?  This beginner's guide covers everything you need to know
Read More
Beginner's Guide to Smoke Bomb Photography
Discover the art of smoke bomb photography with our comprehensive guide!  Learn about smoke bomb photoshoots, essential
Read More
Introduction to the Photoshop Workspace (+ Simple Workflow to Get You Started)
Discover how to navigate and customize the Photoshop workspace with ease.  Learn essential tips and workflows to enhance
Read More
Pretty Presets for Lightroom author Anna Gay

Anna Gay

Portrait Photographer

Anna Gay is a portrait photographer based in Athens, GA and the author of the dPS ebook The Art of Self-Portraiture. She also designs actions and textures for Photoshop. When she is not shooting or writing, she enjoys spending time with her husband, and their two cats, Elphie and Fat Cat.

April 17, 2014

Comments

INFO & SUPPORT
  • Lightroom FAQ
  • Photoshop FAQ
  • Contact Us
  • Order Lookup
  • Log Into Account
Sign up for great freebies and tutorials

Get notified about promotions, giveaways and webinars before they happen!

Join the pretty Community

Come join the #1 Lightroom & Photoshop Facebook Group to help you learn how to edit your photos more confidently today!


  • About Us
  • Testimonials
  • Policies
  • Terms of Service
  • Write for Pretty
  • Lightroom Scholarship
  • Photoshop Scholarship

© 2025 Pretty Presets for Lightroom | support@prettypresets.com (406) 298-3006

  •  
  •  
  •  
One or more of the items in your cart is a recurring or deferred purchase. By continuing, I agree to the cancellation policy and authorize you to charge my payment method at the prices, frequency and dates listed on this page until my order is fulfilled or I cancel, if permitted.