>> SAVE UP TO 20% OFF IN CART <<

  • Log in
  • Cart (0)
  • Checkout
Pretty Presets and Pretty Photoshop Actions
  • Lightroom Presets
  • Mobile Presets
  • Photoshop 
    • Photoshop Actions
    • Photoshop Overlays
    • Limited Edition Holiday Collections
  • Learn 
    • Free Lightroom Training
    • Free Photoshop Training
    • Lightroom 101 Workshop
    • Photoshop 101 Workshop
    • Your Pretty Edits
  • Support 
    • About Us
    • Contact Us
    • Order Lookup
    • Lightroom FAQ
    • Photoshop FAQ
  • Install 
    • How to Install Lightroom Presets
    • How to Install Lightroom Brushes
    • How to Install Presets in the Free Lightroom Mobile App
    • How to Sync Lightroom Presets from CC to Mobile
    • How to Install Photoshop Actions
    • How to Install Photoshop Overlays
  • Best Sellers
  • Blog

How to Take Photos in Harsh Sunlight

By Anna Gay on March 06, 2019 | No Comments

How to Take Photos in Harsh Light

4 Tips for Taking Photos in Harsh Light

While many of us love shooting in the soft light of late afternoon (and early morning!) we may sometimes find ourselves having to shoot in harsh sunlight conditions.  If you find yourself in a situation with less than "ideal" light, here are 4 tips to help you make the best of it:

1. Find Open Shade

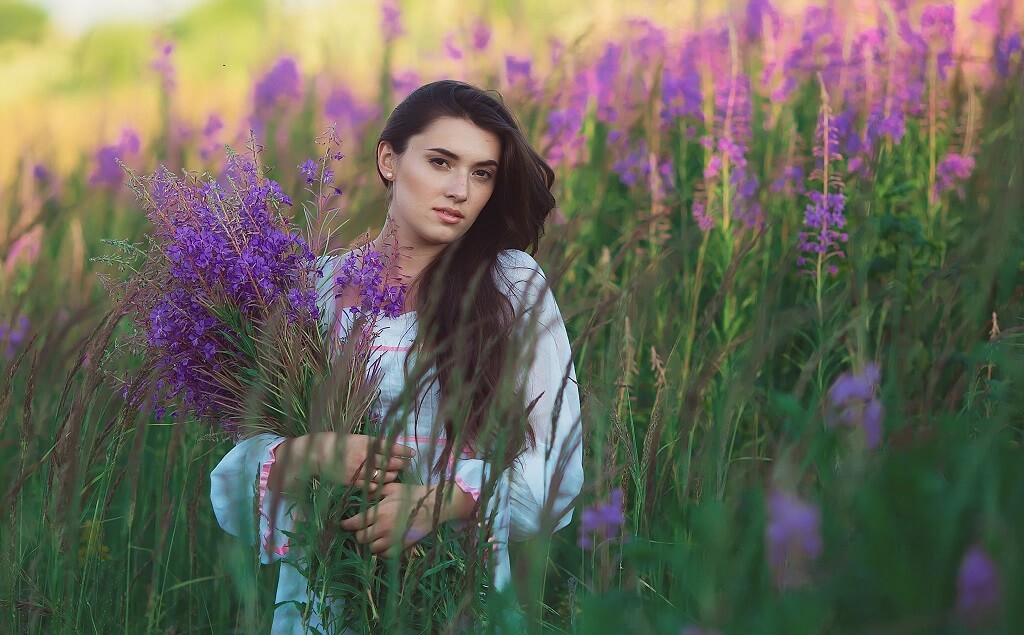
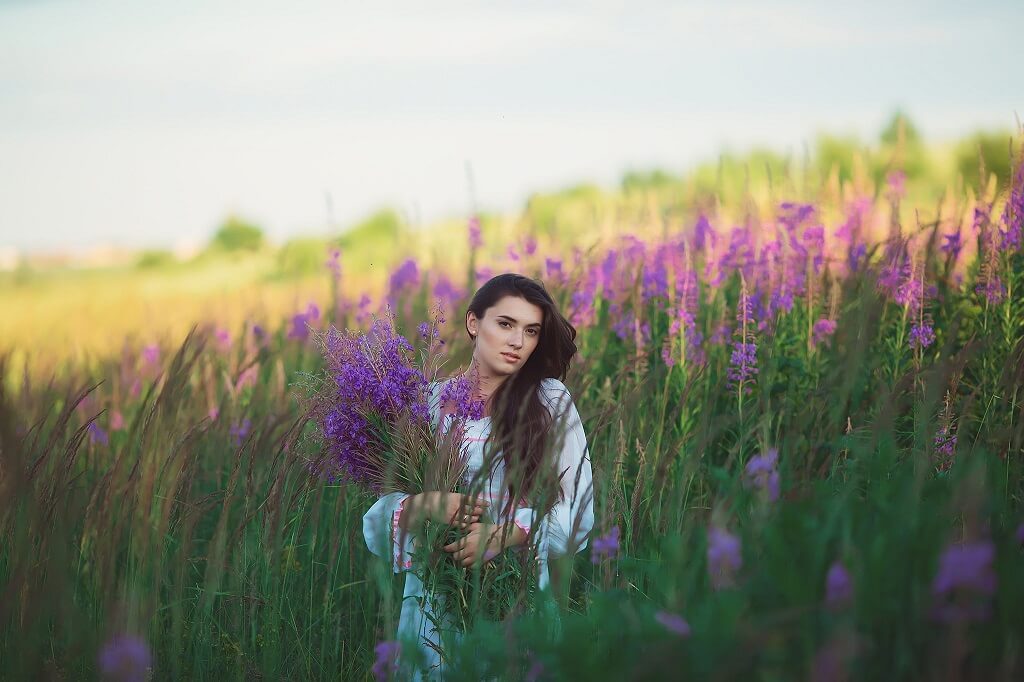
If possible, find a spot that is shaded.  As you can see in the example below, there was a lot of intensely bright sunlight in the background of this image.  But, I had my subject move forward, into the shade of the tree line, and it made all the difference.  The shade provides more even lighting on my subject and reduces any squinting because of the bright sun.

Cropped Image:

Sunlight Pictures

Pull Back Image:

Shooting in Harsh Light

2. Consider Your Background

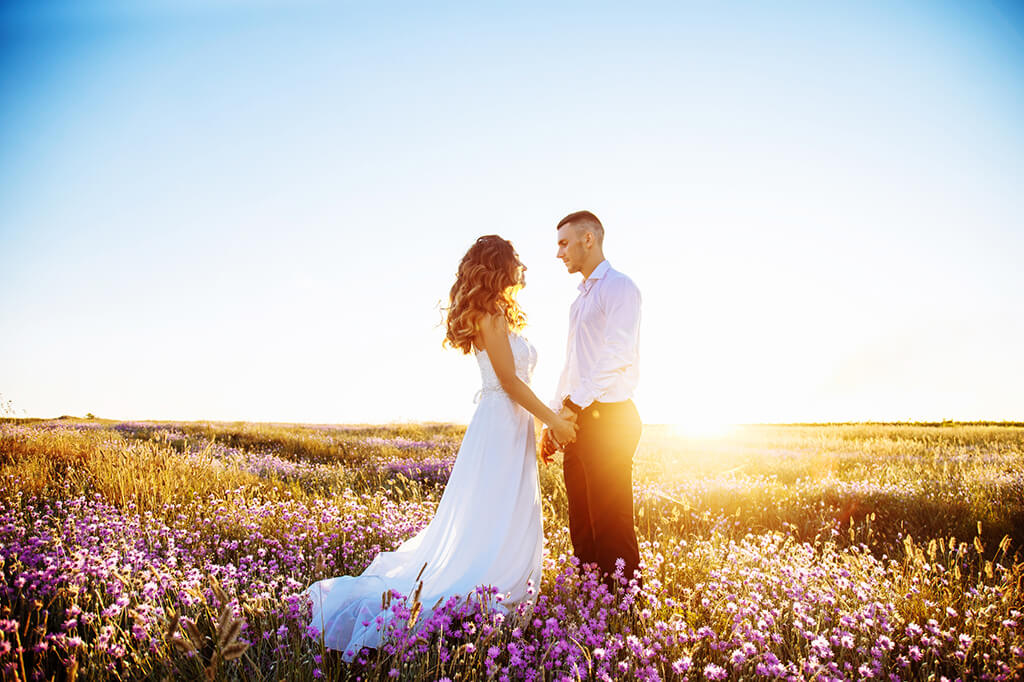
If you simply cannot locate any open shade, try finding a way to pose your subject so that the background is lit in the same way as the subject.  For example, make sure that the sunlight in the background of your image is not completely overpowering the foreground and your subject.

In this photo, there is no open shade to be found!  However, the light is not distracting, in fact, it's working quite well, because the entire scene is lit exactly the same throughout the image.  You can do this best when the subject and background are lit slightly from the side and not directly overhead.

Harsh Light Photography

3. Warm Up the Image in Post Processing

All too often, shooting in harsh light can result in washed-out skin tones and surroundings.  Generally, when your image is lit with bright sun, the camera will compensate by choosing a cooler white balance. 

Adding some warmth in post-processing can help relieve some of those washed-out tones, but keep in mind that a little goes a long way, so start off small and work your way up - you don't want your images to get too warm!

Harsh Light

4. Convert Your Image to Black & White

High noon and harsh sunlight can lend themselves to fantastic lighting for black and white photos.  The bright light creates great contrast, and converting to black and white can help minimize the appearance of dappled light, especially if you are shooting near trees.

How to Photograph in the Sun

These are just a few of the ways in which you can make the most of shooting in harsh light!

Do you have any questions or comments about Shooting in Harsh Sunlight?  Leave us a comment below - we would LOVE to hear from you!  And PLEASE SHARE our tutorial using the social sharing buttons (we really appreciate it)!

Lightroom Presets

Related Articles

How to Restart Your Photography Business: 10 Proven Steps for a Successful Relaunch
Discover how to restart photography business with these 10 expert tips.  From refining your niche to boosting your brand
Read More
How to Price Your Photography For Profit
Unlock profitable Photography Pricing strategies!  Discover how to cover costs, value your craft, and grow your business
Read More
Social Media for Photographers: Proven Strategies to Attract More Clients
Master social media for photographers and attract more clients.  Discover expert tips on branding, engagement, and conte
Read More
Pretty Presets for Lightroom author Anna Gay

Anna Gay

Portrait Photographer

Anna Gay is a portrait photographer based in Athens, GA and the author of the dPS ebook The Art of Self-Portraiture. She also designs actions and textures for Photoshop. When she is not shooting or writing, she enjoys spending time with her husband, and their two cats, Elphie and Fat Cat.

March 06, 2019

Comments

INFO & SUPPORT
  • Lightroom FAQ
  • Photoshop FAQ
  • Contact Us
  • Order Lookup
  • Log Into Account
Sign up for great freebies and tutorials

Get notified about promotions, giveaways and webinars before they happen!

Join the pretty Community

Come join the #1 Lightroom & Photoshop Facebook Group to help you learn how to edit your photos more confidently today!


  • About Us
  • Testimonials
  • Policies
  • Terms of Service
  • Write for Pretty
  • Lightroom Scholarship
  • Photoshop Scholarship

© 2025 Pretty Presets for Lightroom | support@prettypresets.com (406) 298-3006

  •  
  •  
  •  
One or more of the items in your cart is a recurring or deferred purchase. By continuing, I agree to the cancellation policy and authorize you to charge my payment method at the prices, frequency and dates listed on this page until my order is fulfilled or I cancel, if permitted.