MOTHER'S DAY SALE! UP TO 35% OFF - DISCOUNT APPLIES IN CART.

  • Log in
  • Cart (0)
  • Checkout
Pretty Presets and Pretty Photoshop Actions
  • Lightroom Presets
  • Mobile Presets
  • Photoshop 
    • Photoshop Actions
    • Photoshop Overlays
    • Limited Edition Holiday Collections
  • Learn 
    • Free Lightroom Training
    • Free Photoshop Training
    • Lightroom 101 Workshop
    • Photoshop 101 Workshop
    • Your Pretty Edits
  • Support 
    • About Us
    • Contact Us
    • Order Lookup
    • Lightroom FAQ
    • Photoshop FAQ
  • Install 
    • How to Install Lightroom Presets
    • How to Install Lightroom Brushes
    • How to Install Presets in the Free Lightroom Mobile App
    • How to Sync Lightroom Presets from CC to Mobile
    • How to Install Photoshop Actions
    • How to Install Photoshop Overlays
  • Best Sellers
  • Blog

Editing With Photoshop's Lens Flare Filters

By Anna Gay on May 21, 2015 | No Comments

How to Use Photoshop's Lens Flare Filters

Photoshop's Lens Flare filter is a wonderful way to add hazy light to your images, and also a great way to brighten an underexposed image. In this tutorial, I will show you a couple of tricks to get the most out of the Lens Flare filters.

First, duplicate your background. 

With your duplicated layer selected, add your lens flare by selecting Filter>Render>Lens Flare:

How to Use Photoshop's Lens Flare Filters

Photoshop has four lens flare filters. I tend to use the 35mm and 100mm prime almost exclusively because I feel as though they are the closest to mimicking an actual lens flare that would occur if you were shooting into the sun. I have selected the 35mm prime for this example, with the Brightness at 195%. This value will vary from image to image, so be sure to experiment. I am starting off with a very bright flare to figure out the placement, but I am going to reduce the effect in my next steps. You can move the flare by clicking on it in the preview box:

How to Use Photoshop's Lens Flare Filters

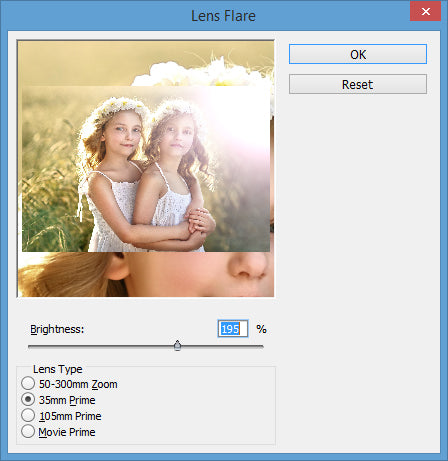
IMPORTANT NOTE: to get the most natural looking lens flares, always place your filter in the spot where the natural light is coming into the original image

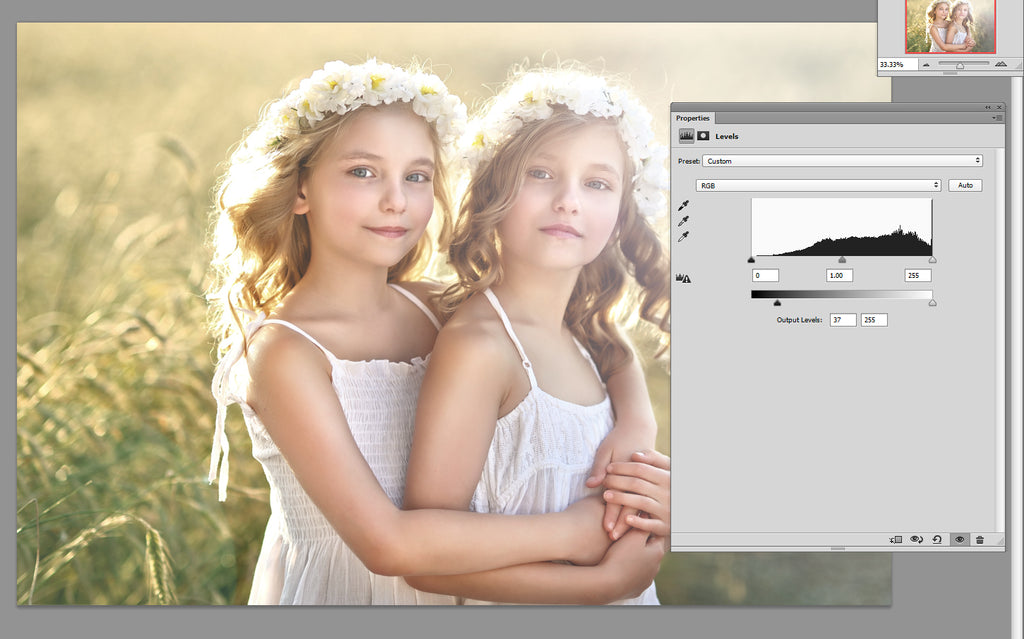
I have reduced the opacity of my Background copy to 61%, which softens the effect to make it appear more natural:

How to Use Photoshop's Lens Flare Filters

Making a quick levels adjustment will add even more haze to the image to blend the lens flare more seamlessly. Here, I created a new Levels Layer, and moved the left Output Levels slider (the arrow in the blacks) towards the right/whites - this creates a hazy effect in your image. 

How to Use Photoshop's Lens Flare Filters

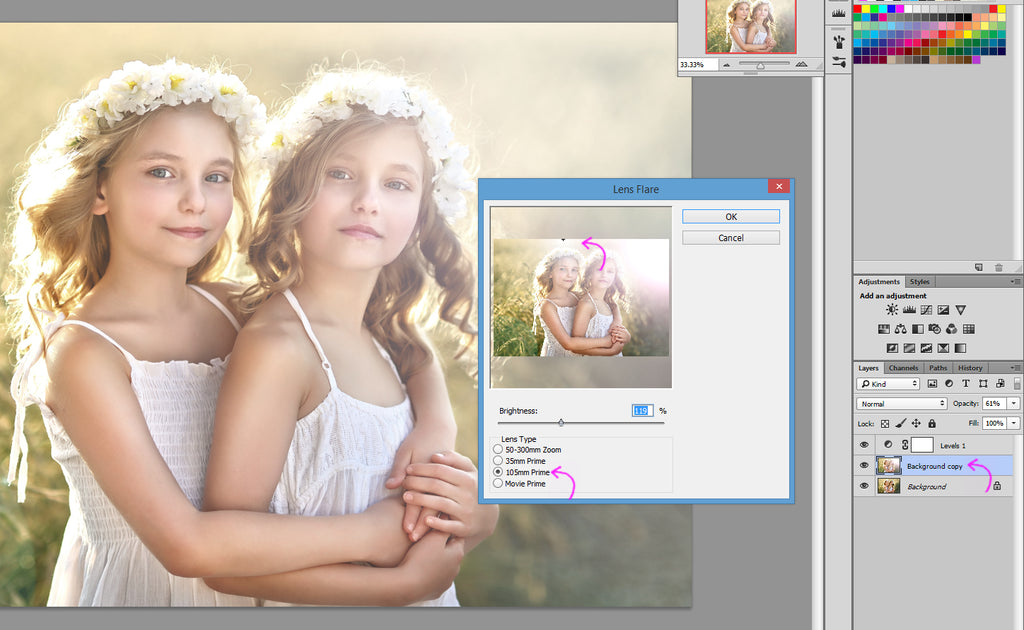
Now, I am going to go back and click on my Background copy in my Layers panel because I would like to add one more lens flare. If you find that your flare is too heavy on one side of your image, you can go back and add more flares in order to balance out the light. In this case, I am adding a new flare to the top/center of my frame.

Also, you will see that I am using the 105mm prime. The 105mm has a slightly cooler tone to it than the 35mm, so by layering the 105mm on top, I am preventing my lens flares from becoming too warm right out of the gate. This is something that can easily be corrected if you do accidentally make your flares to warm or cool, but I generally like to tackle color correction at the source rather than creating extra steps for myself:

How to Use Photoshop's Lens Flare Filters

Finally, I am going to make a slight curves adjustment to reduce the overall exposure and contrast of the image. Sometimes, you may find that the Lens Flare filters will overexpose your image too drastically, so a Curves bump will help bring things back to a nice range of tonality.

As you experiment with lens flares, you will definitely find that these filters work better on some images than on others. Here are a few examples where lens flares work really well:

  • backlit images
  • images with windows visible 
  • images where the window is just barely out of the frame and the subject is lit by the window
  • outdoor images with even light light (morning and evening light work really well with the hazy quality of the lens flare filters) 

If you enjoyed this tutorial, we have lots of other great Photoshop tutorials just for you!

And be sure to check out all of Pretty Actions professional Photoshop Actions and Overlay Collections!

Related Articles

Beginner's Guide to Boudoir Photography
Are you ready to start your journey into boudoir photography?  This beginner's guide covers everything you need to know
Read More
Beginner's Guide to Smoke Bomb Photography
Discover the art of smoke bomb photography with our comprehensive guide!  Learn about smoke bomb photoshoots, essential
Read More
Introduction to the Photoshop Workspace (+ Simple Workflow to Get You Started)
Discover how to navigate and customize the Photoshop workspace with ease.  Learn essential tips and workflows to enhance
Read More
Pretty Presets for Lightroom author Anna Gay

Anna Gay

Portrait Photographer

Anna Gay is a portrait photographer based in Athens, GA and the author of the dPS ebook The Art of Self-Portraiture. She also designs actions and textures for Photoshop. When she is not shooting or writing, she enjoys spending time with her husband, and their two cats, Elphie and Fat Cat.

May 21, 2015

Comments

INFO & SUPPORT
  • Lightroom FAQ
  • Photoshop FAQ
  • Contact Us
  • Order Lookup
  • Log Into Account
Sign up for great freebies and tutorials

Get notified about promotions, giveaways and webinars before they happen!

Join the pretty Community

Come join the #1 Lightroom & Photoshop Facebook Group to help you learn how to edit your photos more confidently today!


  • About Us
  • Testimonials
  • Policies
  • Terms of Service
  • Write for Pretty
  • Lightroom Scholarship
  • Photoshop Scholarship

© 2025 Pretty Presets for Lightroom | support@prettypresets.com (406) 298-3006

  •  
  •  
  •  
One or more of the items in your cart is a recurring or deferred purchase. By continuing, I agree to the cancellation policy and authorize you to charge my payment method at the prices, frequency and dates listed on this page until my order is fulfilled or I cancel, if permitted.